Wednesday, December 31, 2008

Tang Yuan

Tang yuan, or sweet glutinous rice balls, are traditionally eaten during the winter solstice. It's a little late for that, but they're so easy and fun to make and perfect all winter long as a warm, sweet ending to a Chinese meal. Plus, they're so cute to photograph! It's like edible Hello Kitty!

Tang yuan

Tang Yuan (or sweet glutinous rice balls)
makes a lot

1 16 oz. bag glutinous rice flour (the green bag with the 3 elephants on it)
1 cup warm water, divided
red food coloring
sugar

In a medium mixing bowl, add 1/2 cup of water to the rice flour and mix well. Continue adding more water until the dough is the consistency of Play-Doh. It should feel slightly wet and cooling to the touch, but neither runny nor crumbly.

Set aside 1/3 of the dough and cover so it doesn't dry out. With the other 2/3 of dough, take a handful at a time and roll into a long snake, covering the remaining dough. Pinch off centimeter long pieces and place on a plate, being careful not to let them touch each other. Roll each piece with both hands into a ball and set back on the plate. You can roll 2 or 3 at a time this way. Continue until all the white dough is used up.

Add 4 drops of red food coloring to the remaining 1/3 dough. Knead until the color is homogeneous. Roll, pinch, and shape into balls as above.

If you are not going to cook them right away, cover the plates with plastic wrap and set in the freezer until the balls are hardened. Then you can transfer them to freezer bags. If they are stuck to the plate, heat the bottom of the plate over low heat until they can be removed easily but make sure they don't get warm enough to melt.

To cook, boil water in a medium pot. Start boiling another pot or tea kettle of water. Add the rice balls to the first pot and cook until they have been floating for a minute or two. Transfer with a slotted spoon to serving bowls. Add the boiling water from the second pot or tea kettle and add sugar to taste.
Alternatively, add to hua sen tang (sweet peanut soup). I'd tell you how to make that except my mom hasn't taught me yet, and it involves a pressure cooker, which I don't have. So you'll just have to settle for a picture of it. =)

Hua sen tang yuan

You can also try filling the balls with sweet sesame paste, red bean paste, or peanut butter. And for extra bonus points, you could fill it with lotus paste, roll it in sesame seeds, and deep fry them to make those awesome sesame balls you can get at Cantonese dim sum.

Happy new year, everyone!

Monday, December 29, 2008

Hot Pot

Hot pot set up

One of the few holiday traditions my family has is to do huo guo, or hot pot, when my brother and I are home. It's very similar to the Japanese shabu shabu, but I think the biggest difference is in the dipping sauce.

I've noticed that most Taiwanese people use a lot more sa cha, or Chinese barbecue sauce, and also add a raw egg to thicken the sauce up even more. Now sa cha is this intensely flavorful sauce that tastes different from anything else I've ever tasted. And apparently, it usually contains brill fish and fermented shrimp paste, which is why there is a vegetarian version of it. If you've never tried this sauce before, the old adage, "a little goes a long way" definitely applies. But for those of us that are addicted to it for hot pot, you can almost never get enough. Every time I go out for shabu shabu now I have to ask for a small bowl of sa cha because they never give you more than like a tablespoon to start off with.

Now let's talk about the raw egg. My family splits the egg so that the egg yolk goes in your bowl to be mixed into the dipping sauce and the egg white goes in the boiling water to be cooked. I didn't realize this was unusual until I started hosting hot pot parties and everyone else either used the whole raw egg in their dipping sauce or didn't use it at all. For those who are concerned about salmonella and stuff, you can always add enough of the boiling water to your bowl to temper the sauce so that the heat kills off all the bad germs, but I prefer to keep the sauce as undiluted as possible. I figure I've lived a year in Taiwan eating street food and survived so I should be able to handle a raw egg every once in a while.

Lastly, I add soy sauce to the dipping sauce in about a 1:1 ratio with the sa cha. You can also add chopped raw garlic, chopped scallions, chopped ginger, hot sauce, heck, someone I know even puts peanut butter in there. Speaking of weird hot pot combinations, I once had a Coca-cola hot pot in Taiwan where Coke was used instead of broth and the dipping sauce kind of resembled a ranch dressing but thinner. It was weird, but surprisingly yummy.

Fish balls, shrimp balls, and crab balls
Pork and beef

Fish cakes, fish balls, and crab balls

As for what to put in the hot pot, these are my personal favorites: napa cabbage, Shanghai bok choi, taro, firm tofu, tofu puffs, fried gluten, sliced pork, fish balls, shrimp balls, fish cakes, enoki mushrooms, and bean thread vermicelli. You can also use any type of sliced meat, fish, shrimp, shellfish, veggies, noodles...anything! Even though I usually don't like pork, it's my favorite meat to use in hot pot because it's so fatty that it remains tender after boiling. Chicken usually gets too tough and dry and a poorer cut of beef will also be too tough and dry but a better cut of beef would be wasted by boiling. If you can't find any sliced meat (I find this at Asian grocery stores) you can always slice it yourself. I find that it's a lot easier to get a very thin slice with a partially frozen block of meat. And if you have the time and are so inclined, you can roll up each individual slice so that when you dump it into the hot pot you don't get a huge wad of meat stuck together. Plus, it looks pretty. =)

I have an electric hot pot with interchangeable plates so that I can use it to grill as well. You can also use an electric hot plate or a portable gas burner with your own pot. Basically you want to be able to have a boiling pot of broth in the middle of a table so that people can sit around and grab what they want to eat out of the hot pot. A fondue pot most likely wouldn't work because it wouldn't be able to keep a pot of broth boiling.

Since I my pot has a non-stick coating, I only use allow plastic utensils (ladles, slotted spoons, etc.) to be used in it, but traditionally everyone gets their own little metal net to use. Sometimes people use two bowls, one larger one to put the cooked food in and a smaller one to use for the dipping sauce. Me, I hate washing dishes, so I just put the cooked food in my bowl with the dipping sauce.

Having hosted hot pot so many times, I've developed my own set of rules to increase efficiency and decrease chances of foodborne illnesses.
  • Right before guests arrive, start the chicken broth boiling in the hot pot. Add the white parts of the vegetables and taro to the broth to pre-cook since they will take a little longer to cook through. You can also add the tofu, tofu puffs, fish balls, and fish cakes since these are not as time sensitive.
  • Have a pot or kettle of boiling water ready to add to the hot pot as the level of the liquid decreases in the pot.
  • I like to use a shot glass, sake cup, or a Chinese soup spoon to hold individual raw eggs as part of each person's place setting.
  • If you are adding raw eggs or egg whites to the hot pot, make sure the water is boiling before you do so. This is something my mom told me to do, and I think it's because this way it will cook faster and not spread out too much before it gets to cook. I'm always searching around for my cooked egg enough as it is.
  • Before adding any raw meat or seafood, make sure everyone has had a chance to grab enough food. This is because you don't want to be getting any food from the hot pot until the meat is cooked through and any bacteria or other fun stuff is all killed off. Wait until the water is boiling again before removing any further food to eat. This does create natural pauses during the process, but it should only take a few minutes for the water to re-boil again. You definitely don't want to let the meat or shrimp to overcook so make sure it gets removed from the hot pot once it is done. Sometimes I have a larger bowl handy to dump cooked but unclaimed food in so that nothing gets overcooked. Also, I usually use a chopstick that's different from the ones set out to eat with to use for the raw meat.
  • Don't add the bean thread vermicelli or any other noodles until the really end because the noodles will soak up the liquid in the pot. My favorite part of hot pot is drinking the delicious broth left in the pot at the very end. So many yummy ingredients have been cooked in it that it turns into this really fragrant and savory soup full of umami flavoring.
My favorite ingredient to add to my hot pot is my mom's pork and fish meatballs. She taught me how to make these a couple of years ago, and I try to make a batch at the start of every hot pot season not only because they are so good themselves, but also because the water used to cook them is a really good starter broth for hot pot too. Recently, I called my mom to ask her for the recipe again and it turns out she tweaked it this year to include celery and carrots.

Ingredients for meat balls

My Mom's Hot Pot Meatballs

makes about 24 meatballs

1 lb ground pork
1 lb fish paste, thawed (sometimes called fish meat emulsion, sold in 16 oz. plastic tubs and usually found near the fish balls in an Asian grocery store)
1 large carrot or 2 small carrots, peeled and shredded (optional)
3 celery stalks, deveined and finely chopped (optional)
1 tablespoon sugar
1 egg
2 tablespoons fried shallots (also found in Asian grocery stores)
2 tablespoons corn starch
1 tablespoon sesame oil
Pepper to taste (my mom uses black, I prefer white)

Mix all the ingredients together. You can taste test the mixture before cooking by microwaving a small teaspoons worth in the microwave for 15-20 seconds. Adjust seasonings as needed.

Drop rounded tablespoons of the mixture into boiling water. Alternatively, you can roll the meatballs with your hands before dropping into the water. Stop adding meatballs to the boiling water once you can cover the bottom with a single layer. The meatballs will be done a minute or two after they start floating. Remove with slotted spoon and set aside. Repeat until all meatballs have been cooked.

Reserve the broth as a soup base (delicious with sliced daikon and bean thread vermicelli) or as a starter broth for hot pot.

Hot pot meat balls
The celery and carrots are optional but add some nice color and texture to the meatballs.

Wednesday, December 24, 2008

Peppermint Ice Cream with Peppermint Candy and Dark Chocolate Flecks

I've never had the chance to go to a Jeni's Ice Cream which is based in Columbus, OH (what is it with awesome ice cream parlors in Ohio; Graeter's is from Ohio too!), but I've read about how she doesn't make her ice cream with eggs and instead uses cream cheese, cornstarch, and corn syrup in her recipes. And even though I know people rave about Jeni's, I just can't get over putting corn starch and corn syrup in an ice cream. I actually can't stand it when I can taste either in my foods; corn starch is usually used to thicken a sauce (Eugene used it on the latest episode of Top Chef and got dinged for it) and corn syrup is a cheaper alternative to sugar and used in American-made Coke (Coke from Mexico uses pure sugar and is soooo much better) and Snapple (which is why I abhor Snapple and love Nantucket Nectar, which uses pure cane sugar).

But then I saw this recipe on The Kitchn and just had to try it. My favorite mint chocolate chip ice cream is made by Breyer's, and I just love the pureness of the mint ice cream (no green food coloring!) and the use of semi-sweet chocolate in it. I was hoping for something similar with this recipe, and it pretty much came through for me. I couldn't taste the cream cheese, corn starch, or corn syrup, and best of all, this is another "makes a little more than one quart" recipe which means there will be some left in the ice cream machine to eat after you make it. =)

Peppermint ice cream with dark chocolate flecks

Peppermint Ice Cream with Dark Chocolate Flecks (adapted from here)
makes a little more than one quart

3 tablespoons cream cheese, softened
1 tablespoon plus 1 teaspoon corn starch
3 1/2 cups half and half
2/3 cup sugar
1 1/2 tablespoons corn syrup
1/8 teaspoon salt
1 teaspoon peppermint extract
1/4 cup crushed peppermint candy (use a Ziploc bag and a hammer or mallet)
3 oz. chopped dark chocolate

In the bottom of a medium bowl, beat the cream cheese until soft and loose and set aside.

In a small bowl, whisk together the cornstarch and 2 tablespoons of the half and half, making sure the cornstarch is dissolved. Pour the rest of the half and half into a large pot and whisk in the sugar and corn syrup. Bring to a boil over medium-high heat, and then simmer, stirring frequently, for 4 minutes.

Remove from heat and whisk in the cornstarch mixture. Return the pot to medium-high heat, bring back to a boil, and cook for 1 more minute, stirring or whisking constantly, until the mixture is slightly thickened.

Pour the milk mixture into the bowl with the cream cheese and whisk until the cream cheese is combined. Add the salt and peppermint extract. Set the bowl into a larger bowl filled with snow or an ice bath and cool, stirring every few minutes, until the liquid is at least down to room temperature. Transfer the inner bowl to the refrigerator and allow to chill thoroughly.

Freeze in an ice cream maker, adding the peppermint candy and chocolate at the very end. Transfer the ice cream to a container and freeze for several hours until firm.

Peppermint ice cream with dark chocolate flecks

So in my first attempt to make this, I over-churned the ice cream to the point where it was melting in the machine. Since I have one of those ice cream makers that uses a frozen canister, there was no way to save it immediately. The best I could do was re-freeze the canister overnight and try again the next day. I'm not sure if the reason I over-churned is because either the canister wasn't frozen solid (maybe the freezer door had been left slightly ajar?) or if I was expecting it to start looking like the thick frozen custards I was more used to and it just never did and started going downhill instead. So to be on the safe side, I froze the ice cream base overnight as well and then put it in the fridge the next morning to thaw so that it would start off very cold. I had a small hope that I wouldn't need to re-churn the ice cream after freezing the almost liquid base overnight, but that hope was dashed when I checked it in the morning and it was obviously quite quiescently frozen. =( About 10 hours after I put it in the fridge to thaw, I tried re-churning it, and it actually came out okay. Still a bit too many ice crystals for my liking, but definitely better than a solid block of ice. =) I think I shall have to try some more of Jeni's ice cream and frozen yogurt recipes. Or maybe I can adapt one to make a ispahan flavored ice cream!

Monday, December 22, 2008

Curry Turnovers(?)

Rows and rows of homemade beef curry pies

Okay, so I have no idea what to call these things. Even in Chinese I've heard them called both jia li jiao and ga li jiao. I asked my mom if one was Mandarin and the other Taiwanese or Cantonese, but even she admits she doesn't know. My guess is that the former is Taiwanese Mandarin and the latter possibly Beijing Mandarin or Cantonese. Anyone know? Anyways, whatever these things are, they're delicious. The first time I ever had them my mom made the pastry from scratch, and it was this incredibly complicated process of making two types of dough and then combining them so that you got this extremely flaky crust, kind of like this. But then one day I was flipping through some old copies of Better Homes and Gardens and noticed that there was this reader submitted recipe for something very similar that just used refrigerated pie crust, and I was sold. They also used mashed potatoes instead of pieces of cooked potato, but I decided to use mashed potato flakes instead to make it even simpler.

The most impressive part of these turnovers is the crimped crust, which of course, my mom taught me how to do. Here's a quick video to show you how to do it:


Curry Turnovers (or whatever they're called)
makes about 56

2 packages of refrigerated pie crusts (4 pie crusts total)
1 tablespoons vegetable oil
1 cup chopped onions
4 tablespoons curry powder
1 lb. ground beef, 80% lean is good (you don't want to get too lean)
4 tablespoons soy sauce
1 cup instant mashed potato flakes
1 egg yolk, beaten

Pre-heat the oven to 450° F.

Thaw and unwrap the pie crusts. Unfold and use a cup or cookie cutter to cut out 3" circles. Re-roll the excess pie crust and cut more. You should be able to get around 56 circles.

Cutting circles out of the pie crust

Saute the onions and 1 tablespoon curry powder in the oil until the onions are sweating. Add the ground beef and continue cooking until beef is brown. Add soy sauce and more curry powder to taste.

Add 1/4 cup potato flakes to bind the mixture. Continue adding flakes until all the liquid is soaked up and the mixture is no longer crumbly.

Place a little less than 1 tablespoon of filling in the middle of each pie crust circle. Fold in half and pinch the edges to seal.

Filled curry turnovers

Place the turnovers on a cookie sheet and brush the top of each with the beaten egg yolk.

Bake at 450° F for 9 to 15 minutes or until golden brown.

Curry turnovers

The reason for the color difference in the turnovers above is that I used two different brands of pie crust dough: Pillsbury and Shaws. Believe it or not, the darker turnovers were made using the Pillsbury brand. I'm not sure if there is a difference in the thickness of the doughs or more likely the ingredients in the dough, but the Pillsbury brand was a lot easier to shape. Taste-wise, I think I like the Pillsbury ones better, too; it's just too bad they don't look as nice as the Shaws' ones. Oh yeah, and personally, I think these taste better once they've cooled down and aren't piping hot anymore. =)

Thursday, December 18, 2008

Macarons: A Lesson in Humility

A few months ago Ellen was telling me about her obsession with macarons and how she was going to try to make them. I wasn't that familiar with these confections although I had seen plenty of beautiful pictures of them on other food blogs. Turns out that 1) they are another species entirely from the coconut macaroons (two o's) that I'm used to, and 2) supposed to be incredibly difficult to make. Naturally, that meant I was going to try at some point.

So first of all, macarons are made with almond flour, sugar, and egg whites, whipped to a meringue. They are then sandwiched with the an appropriate filling (ganache, buttercream, jam, curd, etc.) and the resulting sandwich is also (confusingly) called a macaron. An unique feature of the macaron cookie is called the "feet"--the uneven, ruffled skirt around the edge. Amazingly enough, you want feet on your macarons. The hard part about making a macaron mostly involves the meringue and folding in the tant-pour-tant (the one-to-one mixture of almond flour and sugar). One fold too many or too little will result in cracked and/or hollow cookies and no feet.

Another difficult part about making macarons is amassing the ingredients and tools needed to make them. Egg whites aren't hard to come by, but one tip that has been circulating around is that they should be "aged" at room temperature at least overnight and up to 72 hours. Sure it sounds disgusting, but any germs and bacteria that might grow would be killed in the oven and the aged egg whites hold a meringue that much better because more water has evaporated, leaving more of the structural proteins. Next, almond flour. If you can't find any you can always make it yourself with almonds and a food processor (although I'm not sure how you would get almond flour vs. almond butter) but luckily enough, Harvest carries almond meal in their bulk bins. Unfortunately, the almonds aren't skinned beforehand, so there's flecks of almond skin in the meal, but what can you do? (Actually, now that I think about it, maybe I can sieve the meal beforehand to try to get rid of the skin....) Anyways, you'll want to use the food processor to grind the meal even finer. One great tip I read is to use the food processor to mix the almond flour and powdered sugar so that you don't have to individually sift the two (which is great because I don't have a sifter, although I guess a sieve would work).

To make the macarons you need a mixer (a stand mixer is ideal but I'm too cheap so I just used a hand mixer), pastry bag (again, too cheap to buy so I just filled a large Ziploc bag and cut a hole in the corner), high quality baking sheets (I used my Pampered Chef stoneware cookie sheet), parchment paper, Silpat, or non-stick aluminum foil (I used parchment paper), a food processor (thanks, Carsten!), a candy thermometer, and ideally, a food scale.

Folding the meringue
You can tell it's an Italian meringue because it is so glossy.

There are two ways of making meringue for the macarons, the French way or the Italian way. The Italian way is a little more difficult and involves streaming boiling sugar syrup into the egg whites are they are being whipped but results in almost foolproof macarons as the Italian meringue is much more stable than French meringue. So I chose to try the Italian method. Since I didn't have a food scale (yes, I am cheap!) I used Lesley's recipe here which is "translated" from Tartelette's and decided to try my hand at making a hazelnut macaron with Nutella filling.

Nutella cream macarons
Yes, you can see the specks of almond skin, but look, you can see feet as well!

Hazelnut Macarons (based on Lesley's recipe)
Ingredients:
1/2 cup aged egg whites (comes out to about 4 egg whites)
3 T sugar
1 1/4 cups powdered sugar
1 cup almond meal
2 tsp. hazelnut extract

For syrup:
3/4 cups sugar
1/4 cups water

Begin by placing the water and sugar for the syrup in a small saucepan and bring to a boil. Once the sugar syrup registers 170° F on a candy thermometer, start whipping two of your egg whites. When the egg whites have started to froth, slowly add the 3 T sugar.

When the sugar syrup gets to 230° F on a candy thermometer, add it in driblets to your egg whites (which should hold soft peaks at this point).

Whip the mixture for 10 - 15 minutes, until cool.

Mix the remaining egg whites with the almond meal and powdered sugar in a food processor. Fold this mixture and the hazelnut extract into the meringue mixture.

Fill a pastry bag with a 1/4 inch tip (or a large Ziploc bag with a corner snipped off) with your mixture. Pipe 1" circles on cookie sheets lined with parchment paper, non-stick aluminum foild, or Silpat.

Bake at 320° F for 12 - 15 minutes. After they are done baking, allow them to cool and carefully transfer them to an airtight container. Macarons can be stored in the fridge or freezer.

I made the filling used in the picture above with this recipe, but in the end, I decided I liked just plain Nutella as a filling. I forgot to mention that I had never actually had a macaron before, so I was quite surprised at how sweet it was with my first bite. But after a while I knew what to expect, and it might have helped that I was eating them chilled from the freezer (the colder something is, the less sweet it will taste; one reason why there is so much sugar in an ice cream recipe).

So ta-da! I made my first batch and didn't have too many issues: my macarons had feet, weren't hollow, and didn't have any cracks. The hardest part was actually piping the cookies as I had never piped anything before in my life, and I wasn't exactly using the best tool. The macaron batter is actually quite drippy so you really have to be careful if you aren't using a pastry tip. I would definitely recommend having your parchment paper already cut and spread out so that you can pipe all the macarons at one time. One site I read recommending drawing 1" circles onto the paper beforehand so you know when to stop piping and also where to place them. Another tip that I read on many, many sites is to let the macarons sit for an hour before putting them in the oven so that the top can dry out. I didn't really adhere to this with my first batch as I figured that by the time I had piped the last macaron, the first one would have already had a chance to sit a bit.

Piped macarons
Piped orange macarons (although not very orange in color)

So now that I had one good batch under my belt, I figured it was time to try a different flavor, and I settled on orange macarons with clementine curd using the recipe here. I added orange extract to the macaron batter and used food coloring to try to get them orange. I'm not used to using food coloring, and even though I read that baked macarons come out much lighter than the batter, I was just too scared to get much color into the cookies. And this time I decided to let them sit after being piped. Well I think that was a mistake. Of the four trays I made, only the first one came out without cracks, and I'm pretty sure that was because that one didn't sit as long as the others. Even so, the macarons from the first tray were almost all hollow. =( I was able to salvage a few to take pictures of, but the rest I'm just eating individually and dipping into the curd like chips and dip. I also need to find a filling that's not as runny. As you can see in the picture below, the curd is starting to drip out the sides and one of the principles of macaron making is that the filling should never go past the circumference of the cookie.

Orange macarons with clementine curd

Now I understand the angst of making macarons; even the "almost fool-proof" recipes can go horribly wrong. But I'm not entirely defeated; I think I'll try to make more macarons in the next few days. I even have the egg whites sitting out already. It's really too bad Highrock is a nut-free church or else I'd bring some for people to try. Anyone have any ideas for other flavor combinations? I might try a peppermint macaron and chocolate ganache combo or maybe a coconut macaron with orange marshmallow creme filling....


P.S. I tried the peppermint macarons with peppermint chocolate ganache!

Peppermint macarons with peppermint chocolate ganache

Monday, December 15, 2008

Pork and Cabbage Dumplings

Shui jiao

Another favorite thing my mom makes are her dumplings. She also taught me how to wrap them, and I've definitely become something of a dumpling wrapping nazi when I'm at dumpling making parties. I really, really don't like the dumplings without pleats, the ones that just lay there on its side looking so pitiful. Not only do they just not look like real dumplings, they can't sit upright so they take up more space both on the tray and in the frying pan. This is a problem because a) you don't want the fresh dumplings to touch one another or else they will stick together, and b) you want the dumplings to be able to stand upright on the frying pan so that you can fry the bottom and steam the rest (I'll tell you how below).

And while I'm on the topic of personal preferences, I like my dumplings thin-skinned. Not really sure why, other than it's a texture preference. I also do not like the ones with Chinese chives--the flavor is way too strong! I find that pork and cabbage are the perfect fillers because they are innocuous enough to deliver the flavors of the seasonings used. Another weird quirk of mine: I don't like black pepper. But to compensate I use white pepper which is a little less piquant.

A couple of tips for making dumplings:
  • If you don't have a food processor (I didn't have one for years until Carsten gave me his, thanks Carsten!) you can use a blender for the cabbage and scallions, but you'll need to add water so that the cabbage and stuff can move around. Just make sure you squeeze out the water thoroughly afterwards. I haven't tried using a blender to mince ginger, but I have a feeling it wouldn't work properly. Fortunately, there is much less ginger than cabbage to mince, and there's always the chef's knife and a cutting board.
  • To taste test the filling, just microwave a teaspoon or so for about 20 seconds. Yes, this is a tip from my mom. Isn't she the smartest?
  • You want the filling to be moist, but not swimming in liquid because the excess liquid will often seep out of the wrapped dumplings and cause them to stick to each other. If you see a lot of excess liquid in your filling, transfer it into a sieve placed over a bowl (but not touching the bottom of the bowl). The liquid will seep out on its own, and you'll be back in business. Another way my mom combats this issue is to add bean thread vermicelli so that it soaks up some of the liquid. It also adds a wonderful dimension to the texture of the filling.
  • One of the hardest parts of folding a dumpling properly is getting the skin pliant enough. If you have really fresh dumpling skins, this won't be an issue as they'll be elastic enough for you to stretch and fold to your heart's content. If they've been in the fridge or freezer for a while, one way to get the edges softer is to wet them with warm water before you add the filling so they have some time to soften.
  • To keep the freshly-wrapped dumplings from sticking to each other, place a few tablespoons of flour on the tray you'll be using to set the dumplings on after you wrap them. Dip each dumpling in the flour so that the bottom won't stick to the tray. Make sure that when you set them down they don't touch each other. When the tray is filled with fresh dumplings and if you are planning on freezing the dumplings, place the tray in the freezer for about 15 minutes or until they are starting to feel a little stiff. Then pop them in a freezer bag or Tupperware and put back in the freezer.
  • Here is a quick video (thanks Annie for her videography skills) for how to wrap the dumplings. I'm especially proud of the serendipitous Taiwan-shaped imprint I leave in the flour after dipping my dumpling. You can also check out step-by-step photos for how to wrap starting here.

My Mom's Pork and Cabbage Dumplings

makes about 124 dumplings

2.5 lbs. ground pork
1 medium head of napa cabbage, roughly chopped
4 scallions, roughly chopped
1 tablespoon ginger, peeled and roughly sliced
2 bundles of bean thread vermicelli (dong fen)
3/4 cup soy sauce
6 tablespoons sesame oil
2 teaspoons white pepper
3 tablespoons sugar
124 round dumpling wrappers (2 packs)
flour

1) Soak the bean thread vermicelli in a bowl filled with hot water for 15 minutes.

2) While the vermicelli is soaking, use a food processor to mince the cabbage, scallions, and ginger. Transfer to a large mixing bowl by handfuls, squeezing out the extra water.

3) Squeeze out the excess water in the vermicelli and use the food processor to chop into about 1/2" pieces. Add to the mixing bowl.

4) Add the ground pork, soy sauce, sesame oil, white pepper, and sugar to the bowl and mix well. Taste test the filling by microwaving about a teaspoon of the mixture for about 20 seconds and tasting the result. Add more soy sauce, sesame oil, pepper, or sugar as necessary.

5) Prepare plates or trays with flour for dipping and have a small bowl of warm water ready. Hold the wrapper in one hand and use the other to dip a finger in the water and wet the edges of the wrapper. Put a spoonful of the filling in the middle of the wrapper and fold in half. Seal center portion of the joined edges. Make two pleats on both the left and right side of the dumpling. Make sure that the whole thing is totally sealed and then dip the bottom in the flour and place on the tray. Repeat 123 times.

6) Once a tray is filled, if you are planning on freezing the dumplings, place it in your freezer and work on the next tray. By the time the second tray is ready, the dumplings on the first tray should be solid enough to place in a freezer bag. I usually add another tablespoon of flour to the bag just to make sure that nothing sticks together.

Cooking shui jiao

7) To boil the dumplings (i.e. to make shui jiao): bring a pot of water to boiling. Drop the frozen or fresh dumplings in and stir occasionally to make sure they don't stick to one another. After a few minutes, they will start to float, and they are ready once the skin is swollen (a few minutes after they start to float).

8) To pan-fry the dumplings (i.e. to make guo tie): heat a frying pan on high and add oil once it is hot. Once the oil is hot (I sprinkle a few drops of water onto the pan and wait for them to sizzle and evaporate), add the dumplings one at a time so that they are sitting upright. Once the bottoms are browned, add about a 1/2 cup of water (for 8 dumplings, my usual serving size). If you like your guo tie extra crispy, add 1 T of flour or cornstarch to the water and mix to get rid of the lumps before you add it to the pan. Be very careful as the steam coming off the pan may burn you. Cover and let cook for a few minutes until the water is almost all gone. Remove the lid and let the rest of the water cook off.

9) Serve with a dipping sauce. Straight soy sauce works, but if you have the time, add some vinegar, sesame oil, and sugar.

Making guo tie (pot stickers)

Wednesday, December 10, 2008

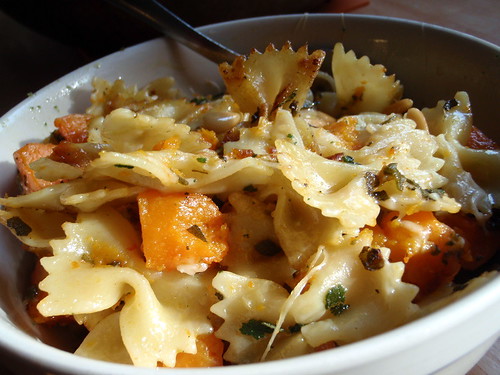
Pan-Fried Pasta with Butternut Squash, Fried Sage, and Pine Nuts

One of my favorite cooking sites is The Kitchn because not only are they generally socially conscious (advocating fresh, in-season, locally grown products, farmer's markets, CSAs, etc.) but because they also update several times a day so almost every time I check back, they have something new to read. I often find the inspiration to try a new dish there, and so far this one has been my favorite. I brought it to small group once, and someone who didn't think she liked squash said that she loved the dish. I gave them the recipe, and I know it's been made multiple times since.

It's a little too late to find butternut squash at the farmer's market now, but I know they're still being sold in the supermarkets. If you really want to save time (although probably not money), you can buy the squash all peeled and cut up already. But if you want to peel and cut it up yourself, this is what I usually do:
  1. Cut off the top (so that you have an edge to start peeling from) and bottom (so that you have a level surface to stand the squash upright).
  2. Use a vegetable peeler (I use a Palm Peeler which was given to me by jalzee--one of the most useful gifts ever!) and peel the skin from top to bottom, going around the whole squash. You may find that you will need to do several layers before you get past the pale skin and to the brighter colored and softer flesh. Alternatively, you can just peel using a knife, but I find using a peeler is safer and less wasteful.
  3. Cut the squash in half horizontally (along the equator), then cut each half in half vertically. Scoop out the seeds and icky stuff from the cavity of the bottom part.
  4. Slice the squash into 1" wide sticks and then turn the stick 90 degrees and cut into 1" chunks.
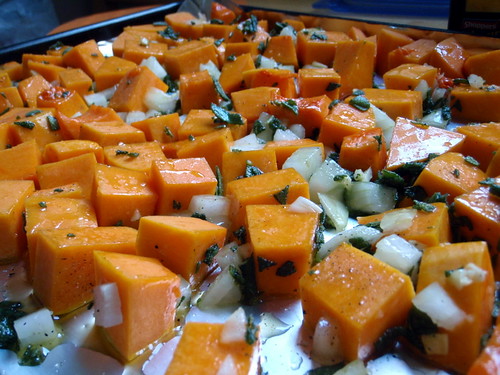
Squash, Onions, Garlic, Sage, and Olive Oil

Pan-Fried Pasta with Butternut Squash, Fried Sage, and Pine Nuts (adapted from The Kitchn)
Makes 4-6 servings
 
1 medium butternut squash, peeled and cut into 1" pieces
1 small sweet onion, peeled and diced
3 cloves garlic, minced
Olive oil
Salt and pepper
1/2 cup fresh sage leaves
1 pound farfalle pasta
3/4 cup pine nuts
4 ounces high quality Parmesan, shredded or shaved (I actually like less)

Heat the oven to 375°.

Mince about half of the fresh sage leaves and toss with the butternut squash, onion, garlic, a drizzle of olive oil, salt and pepper. Spread the squash mixture in a thin layer on a large baking sheet and roast for about 40 minutes or until the squash is soft.

In the meantime, heat up a large, high-sided, un-oiled sauté pan until hot and toss in the nuts. Try to spread them out in a single layer and stir every 30 seconds or so until browned and you can smell the nutty aroma. These burn rather quickly so make sure you are paying attention! When toasted, set aside.

Heat salted pasta water to boiling and cook the farfalle until al dente. Drain and set aside.

As the squash finishes roasting, heat about two tablespoons of olive oil in the sauté pan. The oil is ready when it pops and sputters. (Don't let it start smoking.) Drop in the rest of the sage leaves and fry for about a minute, or until they begin to just shrivel up. Remove with a slotted spoon (leaving the sage-seasoned olive oil in the pan) and salt lightly. Crush with the back of a spoon.

Add half the pasta to the pan, along with half the roasted squash mixture. Crumble in half the sage. Cook, stirring frequently, for five minutes or until the pasta is heated through and getting crispy on some of the edges. Add the pine nuts and cook for another minute. Stir in half the cheese, salt to taste, and serve.

Repeat the last step with the rest of the ingredients. It's very important that you not crowd the pan too much - you want the pasta to really pan-fry, not just steam up.

Pan-Fried Pasta with Butternut Squash, Fried Sage, and Pine Nuts

Monday, December 8, 2008

Beef Noodle (Soup) and Lu Dan

My mom is the best cook I know, and I'm not just saying that because she's my mom. Not only doe she make some awesomely impressive dishes for potlucks and the like, she also makes awesome everyday dishes just for us, and the best thing is, she's self-taught. One of the dishes that my brother and I always demand she makes when we're home is niu rou mian, or Taiwanese beef noodle soup. Actually, the translation is a little misleading because it's not exactly niu rou tang mian (tang means soup in Mandarin). The dish my mom makes doesn't have a whole lot of soup (although you could just add beef broth if you wanted, I suppose), it's more like a healthy amount of sauce.

One change I made to her recipe is that I used chuck beef instead of beef shank because I'm not a big fan of all the jing, which is the chewy gross stuff that is probably tendons and junk that other people seem to really like. So yeah, if you like that junk, use beef shank, which comes out much more tender, or maybe that's just because my mom made it.

Niu Ro Mien

My Mom's Taiwanese Beef Noodle (Soup)

makes 6 servings

2 scallions, chopped
4 garlic cloves, chopped
1 teaspoon ginger, minced
1 star anise
2 tablespoons vegetable oil
1 1/2 lbs. chuck beef (or beef shank) cut into 3/4" pieces
1/2 cup rice wine
1/2 cups soy sauce
1 1/4 cup water
3 tablespoons rock sugar or brown sugar
1 tomato, skinned and roughly chopped (optional)
1 lb. angel hair pasta
1 small head napa cabbage, washed and cut into 3" pieces

In large saucepan, saute the first four ingredients the oil for 2 minutes. Add the beef and cook until just browned.

Add the wine, soy sauce, water, and sugar, and tomato (if using) and heat to boiling. Reduce to a simmer and cook with the lid on for 1-2 hours (1 hour is enough for chuck beef, may need 2 hours for beef shank).

Fifteen minutes before beef is done, boil water in a large pot. Add pasta and cook while stirring occasionally for 3 minutes. Add napa cabbage and cook for 2 more minutes. Drain off most of the water.

Divide the noodles and cabbage among 6 large bowls, adding a little of the excess hot water. Add the beef on top and ladle in some of the sauce (making sure to remove the star anise).

Another Taiwanese food I really like is lu dan, or soy sauce braised eggs. In Taiwan, these are so common you can get them at the ubiquitous 7-Elevens, but it's darn near impossible to find them here unless you make them yourself. Since I had a large amount of soy sauce mixture left from making the beef noodles, I decided to make some. (Note: these are different form cha dan, or tea eggs, in that 1) there is tea in the braising sauce for tea eggs, and 2) the egg shells are not completely removed for making tea eggs.)

Lu Dan

Soy Sauce Braised Eggs

1) Add eggs to a pot of cold water. Bring the water to a boil and reduce to a simmer. Cook for 12-15 minutes. Transfer eggs to a bowl full of cold water to cool.

2) Once eggs are not hot to the touch, peel them.

3) Heat the soy sauce mixture leftover from beef to boiling. Reduce to a simmer and add the peeled eggs. If the level of the liquid does not cover the eggs, make sure to rotate the eggs throughout the braising process. Braise for 30 minutes.

That's it! You can probably braise the eggs in a straight mixture of soy sauce, water, and sugar (i.e. without braising beef or some other kind of meat in the liquids first), but for some reason, I've only had them cooked in a mixture that had first been used to cook something else. Hmmm, maybe it's because it's a Taiwanese thing, and we're kinda cheap and efficient like that. =P

Wednesday, December 3, 2008

Salted Butter Caramel Ice Cream

I don't remember when I first stumbled upon this recipe, but I do know that I've been wanting to make it ever since I first heard of it. I guess it was the whole making caramel thing that scared me off--one second too long on the stove and you end up with burnt sugar (although the burnt caramel ice cream flavor from Toscanini's is actually one of my favorites). But after I ran out of my last pint of Haagen-Dazs Sticky Toffee Pudding ice cream, I needed something equally as decadent so I decided to finally try to make this, and I am so glad I did!

Let not the caramel making process scare you off, although I would shy away from it if you only have an electric stove as you really need to be able to control the heat. Just make sure you pay attention with your eyes and your nose. As soon as you start to smell something like burnt sugar, take it off the heat. As I read somewhere else, it is better to err on the side of burnt than to have only slightly browned sugar.

I didn't have any fleur de sel so I just used kosher salt, but whatever you do, do not use regular table salt; you need something refined and flaky here. I also didn't have any salted butter so I just used unsalted and added a pinch more salt, even though I still can't taste the salt in the finished product, so perhaps next time I will add a little extra. (Yes, it may sound gross, but I'm the girl that adds a sprinkle of sea salt to my chocolate ice cream; it's so good, you must try it!) The most drastic substitution I had to make was half and half for the heavy cream, but I think the ice cream turned out just fine and in fact maybe hardens a little more because of the greater water to fat ratio. This is a good thing because the large amount of sugar in the recipe keeps the texture very creamy and not as hard as I usually like my ice cream.

Salted Butter Caramel Ice Cream

Salted Butter Caramel Ice Cream (based on David Lebovitz's recipe)
Makes one generous quart*

For the caramel praline (mix-in):

½ cup (100 gr) sugar
¾ teaspoon kosher or sea salt, such as fleur de sel

For the ice cream custard:

2 cups (500 ml) whole milk, divided
1½ cups (300 gr) sugar
4 tablespoons (60 gr) butter
scant ½ teaspoon sea salt
1 cups (250 ml) heavy cream (or half and half)
5 large egg yolks
¾ teaspoon vanilla extract

1. To make the caramel praline, spread the ½ cup (100 gr) of sugar in an even layer in a medium-sized, unlined heavy duty saucepan. Line a baking sheet with a silicone baking mat or brush it sparingly with unflavored oil.

2. Heat the sugar over moderate heat until the edges begin to melt. Use a heatproof utensil to gently stir the liquefied sugar from the bottom and edges towards the center, stirring, until all the sugar is dissolved. (Or most of it—there may be some lumps, which will melt later.)
Continue to cook, stirring infrequently, until the caramel starts smoking and begins to smell like it's just about to burn. It won't take long.

3. Without hesitation, sprinkle in the ¾ teaspoon salt without stirring (don't even pause to scratch your nose), then pour the caramel onto the prepared baking sheet and lift up the baking sheet immediately, tilting and swirling it almost vertically to encourage the caramel to form as thin a layer as possible. Set aside to harden and cool.

4. To make the ice cream, make an ice bath by filling a large bowl about a third full with ice cubes and adding a cup or so of water so they're floating. Nest a smaller metal bowl (at least 2 quarts/liters) over the ice, pour 1 cup (250 ml) of the milk into the inner bowl, and rest a mesh strainer on top of it.

5. Spread 1½ cups (300 gr) sugar in the saucepan in an even layer. Cook over moderate heat, until caramelized, using the same method described in Step #2.

6. Once caramelized, remove from heat and stir in the butter and salt, until butter is melted, then gradually whisk in the cream, stirring as you go. This is one of the most dramatic reactions in the kitchen so please be careful and go slowly!

The caramel may harden and seize, but return it to the heat and continue to stir over low heat until any hard caramel is melted. Stir in 1 cup (250 ml) of the milk.

7. Whisk the yolks in a small bowl and gradually pour some of the warm caramel mixture over the yolks, stirring constantly. Scrape the warmed yolks back into the saucepan and cook the custard using a heatproof utensil, stirring constantly (scraping the bottom as you stir) until the mixture thickens. If using an instant-read thermometer, it should read 160-170 F (71-77 C).

8. Pour the custard through the strainer into the milk set over the ice bath, add the vanilla, then stir frequently until the mixture is cooled down. Refrigerate at least 8 hours or until thoroughly chilled.

9. Freeze the mixture in your ice cream maker according to the manufacturer's instructions.

10. While the ice cream is churning, crumble the hardened caramel praline into very little bits, about the size of very large confetti (about ½-inch, or 1 cm).

11. Once your caramel ice cream is churned, quickly stir in the crushed caramel, then chill in the freezer until firm.

Note: As the ice cream sits, the little bits of caramel may liquefy and get runny and gooey, which is what they're intended to do. One day after I had made the ice cream, the caramel was still quite hard, but I'm hoping that will change as it continues to sit, although I'm not sure how long it will last!

*One of hardest parts of making ice cream is the patience factor. Not only do you have to wait for the mixture to chill in the fridge before you start churning (can take up to 8 hours!) but you have to wait again after you churn it for it to harden up. However, I've found that after transferring the just-churned ice cream to a container to freeze, the leftover ice cream stuck to the sides of the ice cream maker cannister is already hard enough to eat! This recipe is perfect because after filling up a quart-sized container there is enough left in the cannister for a full serving of the yummiest ice cream you may ever make. Thanks so much for the recipe, David!