Showing posts with label almond. Show all posts
Tuesday, February 24, 2015
Hugo & Victor's Pink Grapefruit Tart
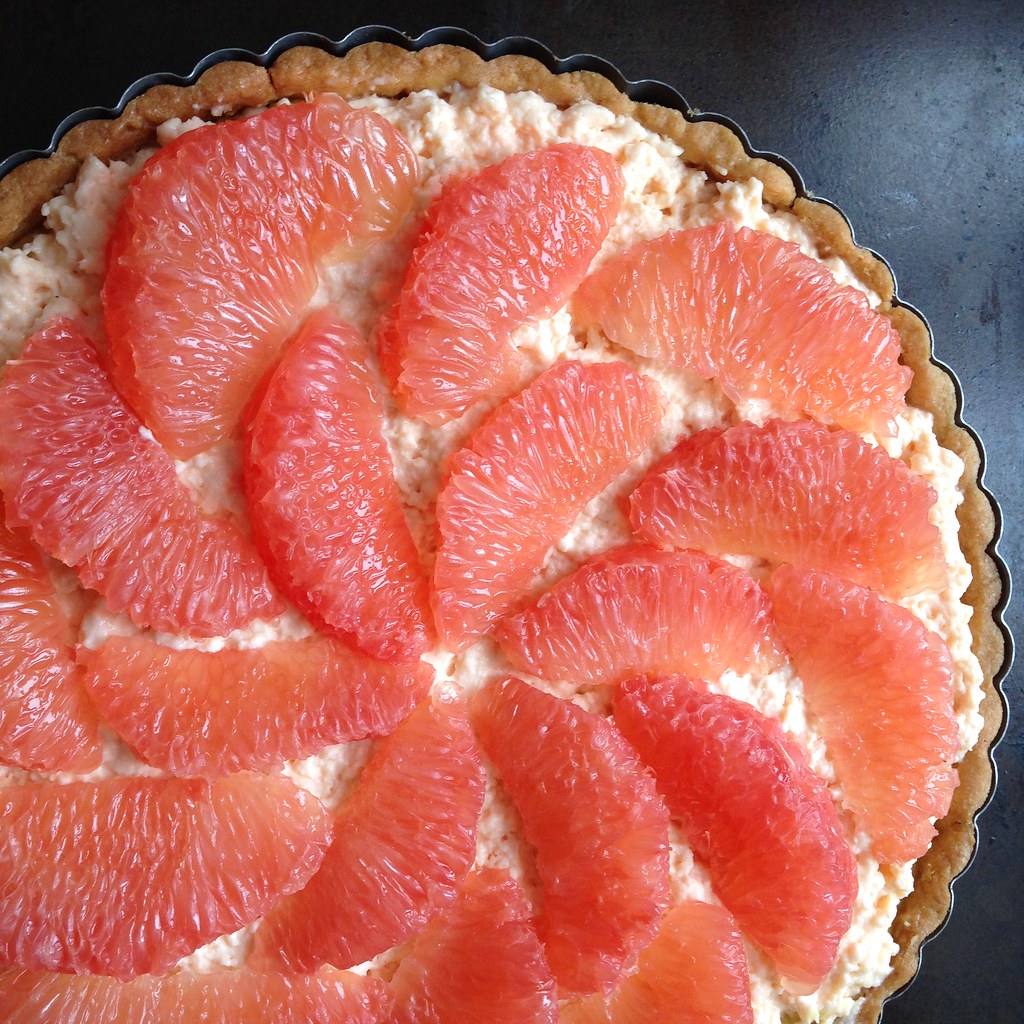
There are two things I tell my friends to get when they go to Paris: the mango passion caramels from Jacques Genin and this pink grapefruit tart from Hugo & Victor. So when I saw a recipe for the tart in Dorie Greenspan's Baking Chez Moi, I was ecstatic! I even bought a $25 bottle of Campari just so I could have the 2 1/2 tablespoons needed to make the grapefruit crémeux because I wanted to follow the recipe as close as possible.
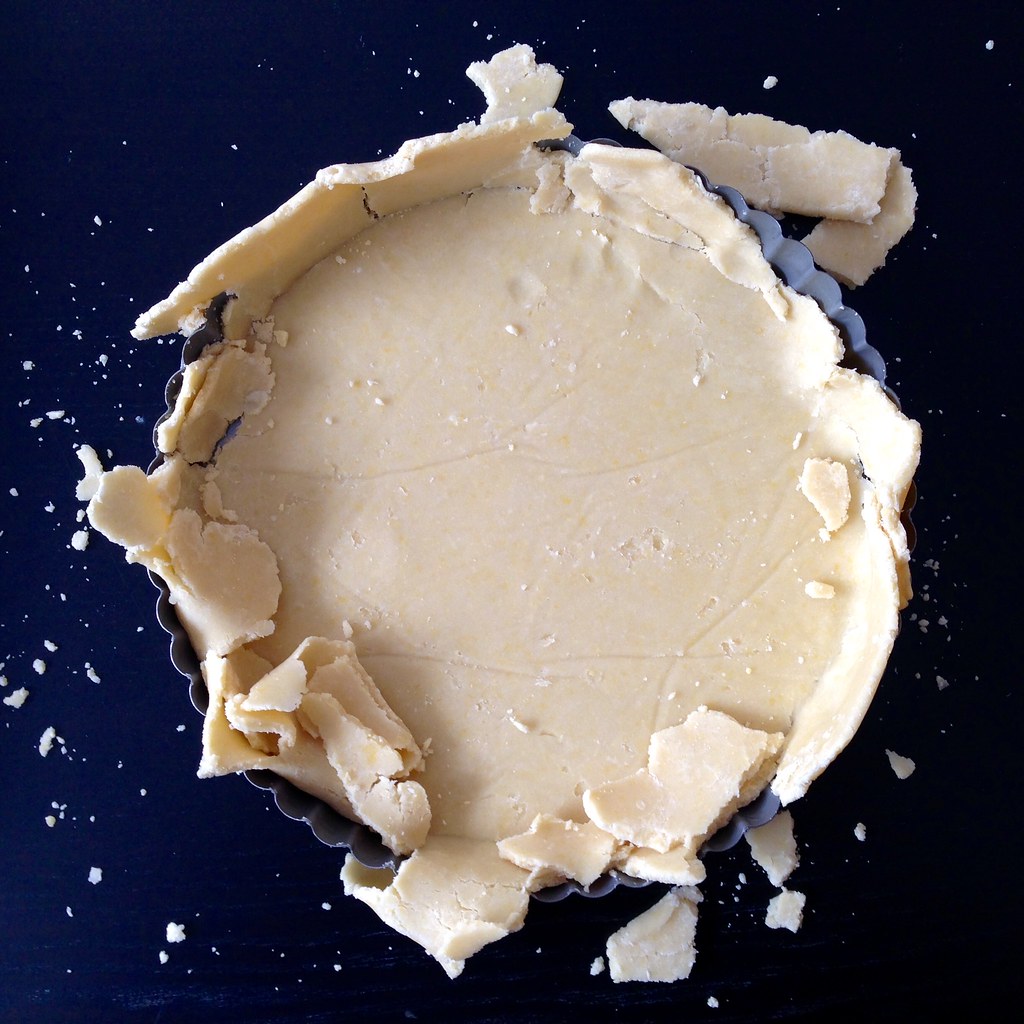
And yet so many things went wrong, mostly because I was impatient. First the sweet tart dough shattered when I tried to fit it into the tart pan because I hadn't waited long enough for it to warm up a bit after letting it chill in the freezer. Luckily, this was pretty easy to fix because you could just patch up the cracks but pressing the extra dough in. (next time I'll just fit the crust into the tart pan after rolling it out and then chill it, which is how I wrote the recipe below.)
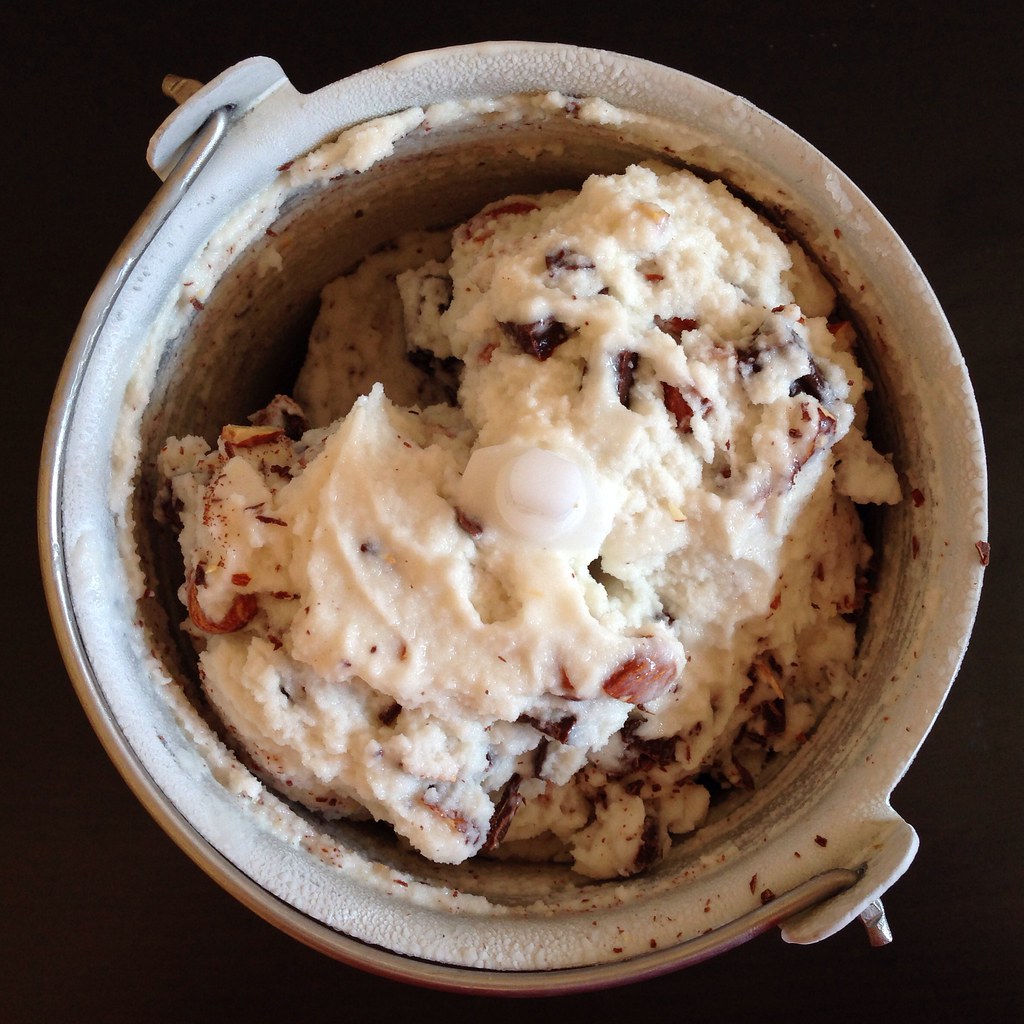
Then, when it was time to add the grapefruit crémeux (which I think is just a fancy French word for gelatinous cream), I didn't whisk it long enough so it was still kind of curdy when I spread it on. Again, I was kind of fortunate because the grapefruit topping hides most of it, and the texture doesn't affect the taste at all.
That said, please learn from my mistakes and take plenty of time to make this tart. I'd definitely start the sweet tart dough and maybe the grapefruit crémeux the day before. There's lot of chilling the dough, then blind baking it, then cooling it, then baking it again (with the lemon-almond cream), and cooling it again before topping it with the crémeux and grapefruit topping and then chilling it one last time to set before serving.
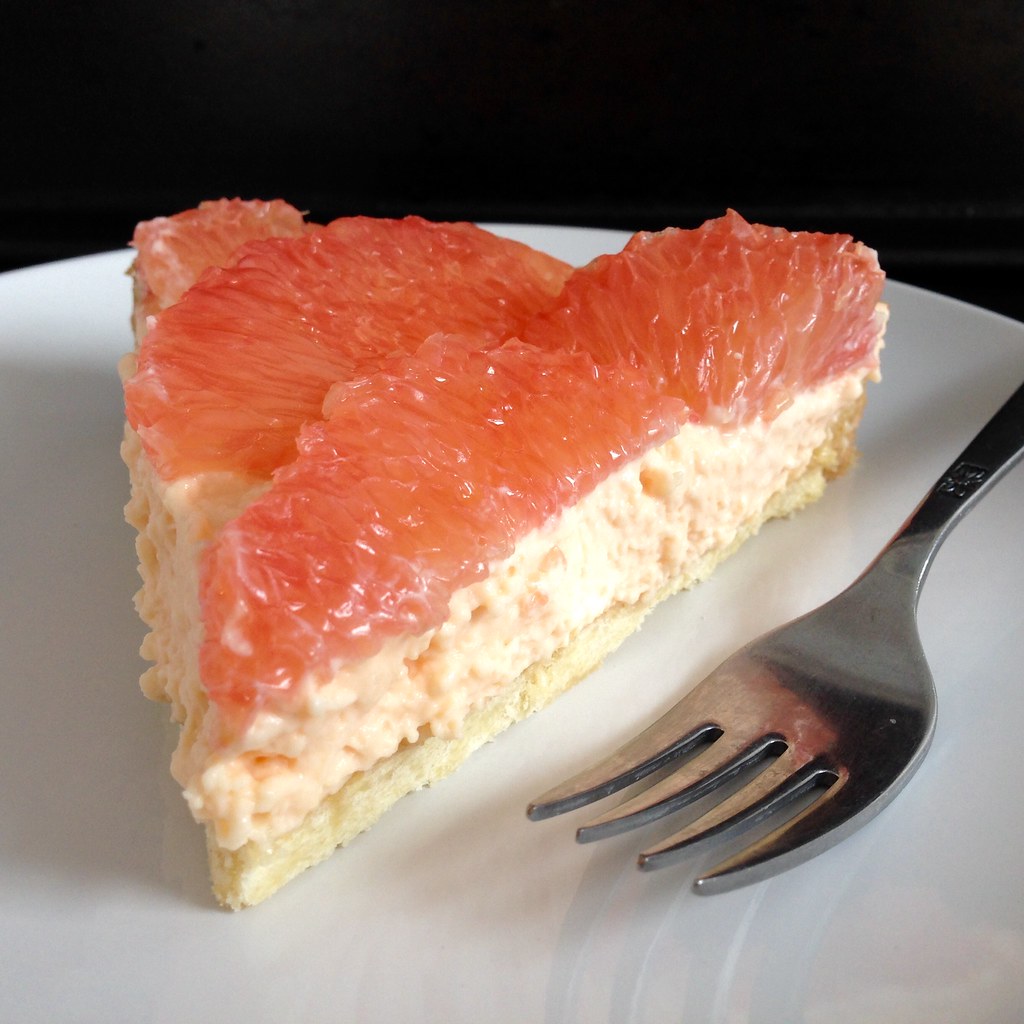
But it's worth it! Not only is it totally beautiful to look at, it tastes incredible. Even people who don't like grapefruit love this tart! I think it helps that you've done some of the hard work by removing all the membrane from the grapefruit segments already so that all you have to do is take a bite, and you get the tartness of the fruit, a hint of bitterness from the Campari, sweetness from the fillings, and lots of buttery richness from the snappy crust.
Hugo & Victor's Pink Grapefruit Tart (adapted from Dorie Greenspan's Baking Chez Moi)
makes 1 tart
For the sweet tart dough:
1 1/2 cups (204 g) all-purpose flour
1/2 cup (60 g) confectioners' sugar
1/4 teaspoon kosher salt
9 tablespoons very cold unsalted butter
1 large egg yolk
Put the flour, confectioners' sugar, and salt in a food processor and pulse a few times to blend. Cut the butter into small pieces and scatter over the dry ingredients. Pulse until the butter is cut in coarsely.
Stir the yolk just to break it up and drizzle over the rest of the ingredients. Pulse until the egg is incorporated, then process in longer pulses, about 10 seconds each, until the dough forms clumps and curds. Finish blending the dough by turning it out onto a work surface and smearing small amounts across the surface with the heel of your hand.
Shape the dough into a disk and place between two sheets of parchment or wax paper. Roll the dough out evenly until it is about 12" in diameter. Carefully fit into a buttered tart pan and trim the excess dough. Chill in the refrigerator for at least 2 hours, or if you're short on time, for 1 hour in the freezer.
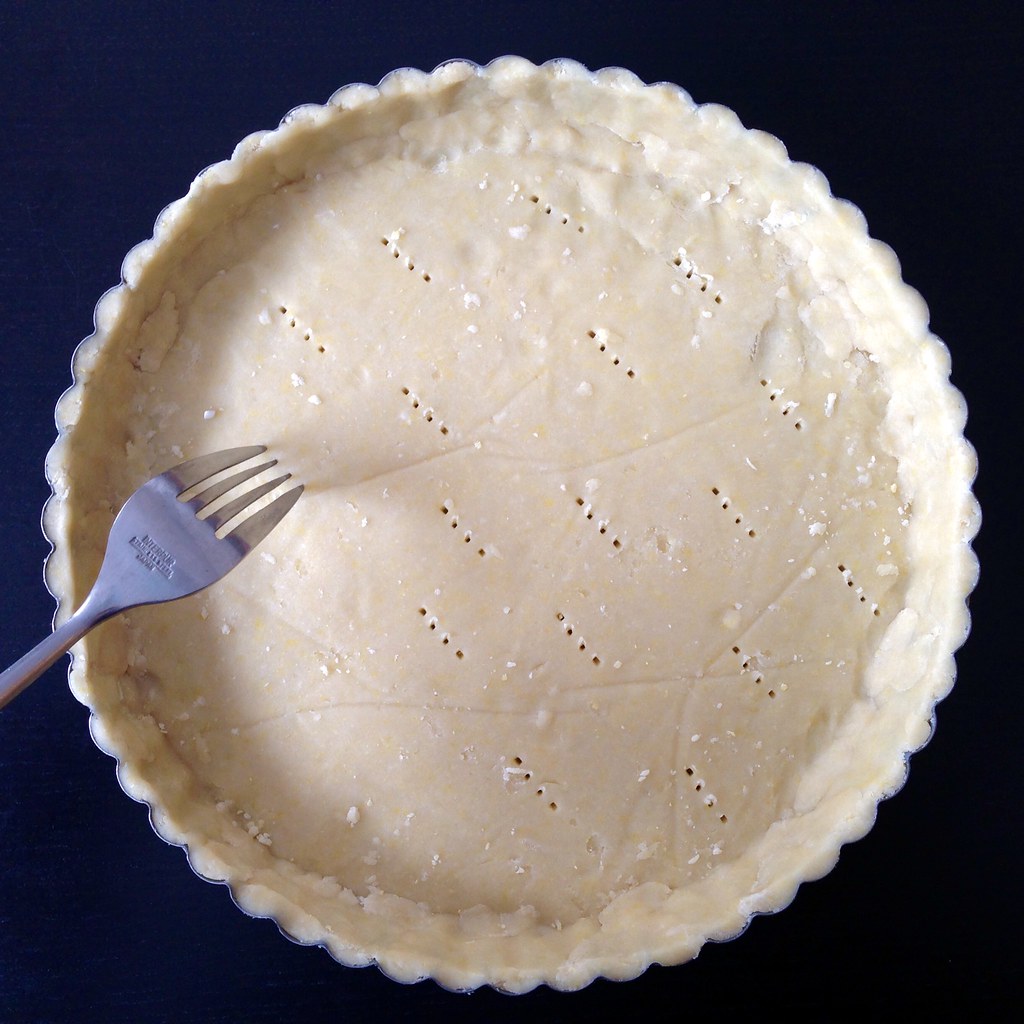
Preheat the oven to 400°F. Prick the crust all over with a fork. Butter the shiny side of a piece of aluminum foil and fit snugly on top of the crust. Fill with pie weights (you can use dried beans, rice, etc.). Bake the crust for 25 minutes, then carefully remove the foil and weights. Bake for another 7-10 minutes, until firm and golden brown. Cool the crust completely.
For the grapefruit crémeux:
2 teaspoons powdered gelatin, bloomed in 1 1/2 tablespoons cold water
3/4 cup (150) g sugar
2 large pink grapefruits
3 large eggs
14 tablespoons unsalted butter, at room temperature
2 1/2 tablespoons Campari
Put the sugar in a 2- to 3-quart heavy-bottomed saucepan and grate the grapefruits over it. Rub the sugar and zest together with your fingertips until the sugar is moist. Squeeze the juice from the grapefruits into a measuring up until you have 3/4 cup of juice. Add the eggs to the sugar and start whisking immediately. Continue to whisk as you add the juice.
Place the saucepan over medium heat and continue whisking. Eventually, after 7-9 minutes, the custard will start to thicken. When it reaches 180°F (or when the first bubble pops at the surface), remove from the heat and strain into a blender.
Allow the custard to sit in the blender for about 5 minutes, pulsing a few times to help the cooling process. Heat the bloomed gelatin in the microwave for 15 seconds to liquefy, then add to the blender. Blend on high, and start adding the butter, two tablespoons at a time. After all the butter has been incorporated, add the Campari and blend until homogenous in color. Scrape the crémeux into a bowl, press a piece of plastic wrap to the surface, and refrigerate for at least 6 hours.
For the topping:
2 large pink grapefruits
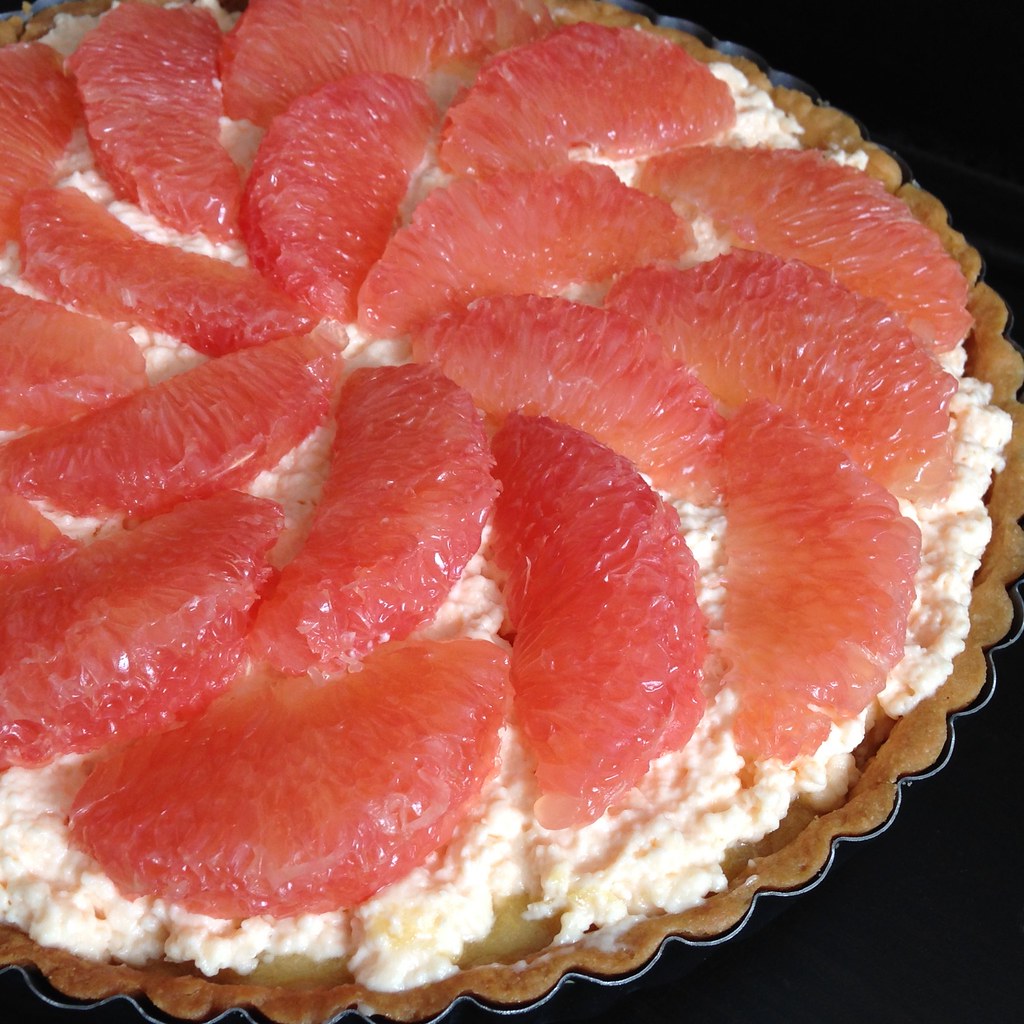
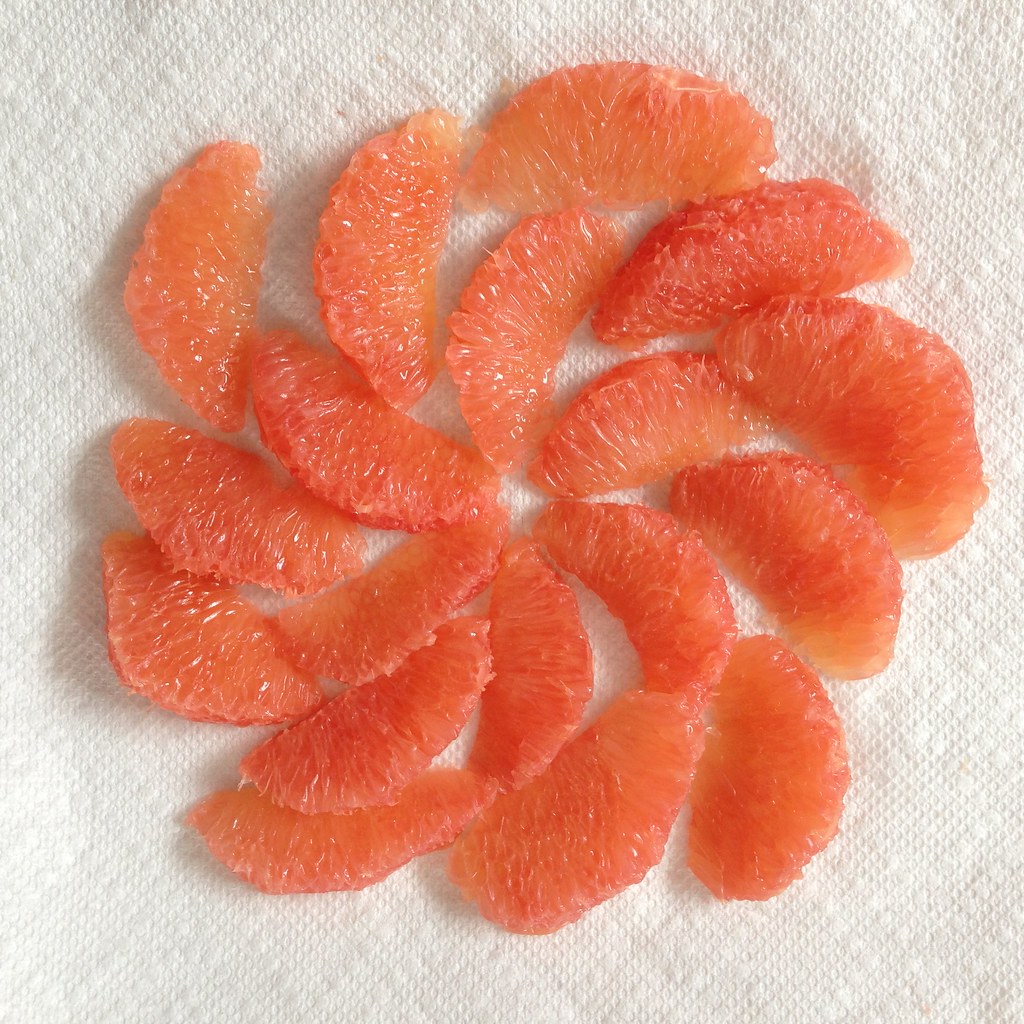
About 3 hours (or up to 8 hours) before you want to serve the tart, cut off all the peel and pith away from the tart. You want to carefully cut through the outer membrane of the grapefruit, too. Then, using a small paring knife, cut on either sides of the membranes in between each section to release each section. There should be no membrane left on the sections. Place the segments on several layers of paper towels, cover with more paper towels, and allow to dry at room temperature. At this point, you can try arranging the segments to see if you'll have enough to cover the surface of the tart.
For the lemon-almond cream:
3 1/2 tablespoons unsalted butter, at room temperature
2 tablespoons packed light brown sugar
1/2 cup (50 g) almond flour
Finely grated zest of 1 lemon
1 large egg, at room temperature
Beat butter until smooth and creamy, about 3 minutes. Beat in the brown sugar for a minute, and then beat in the almond flour and grated zest until smooth again. Add the egg and beat until fully incorporated. Refrigerate for at least an hour.
Assembling the tart:
Preheat the oven to 375°F. Whisk the chilled lemon-almond cream until it is spreadable. Spread the cream over the bottom of the tart crust and bake for 6-7 minutes, until the cream is set. Cool the tart completely before the next step.
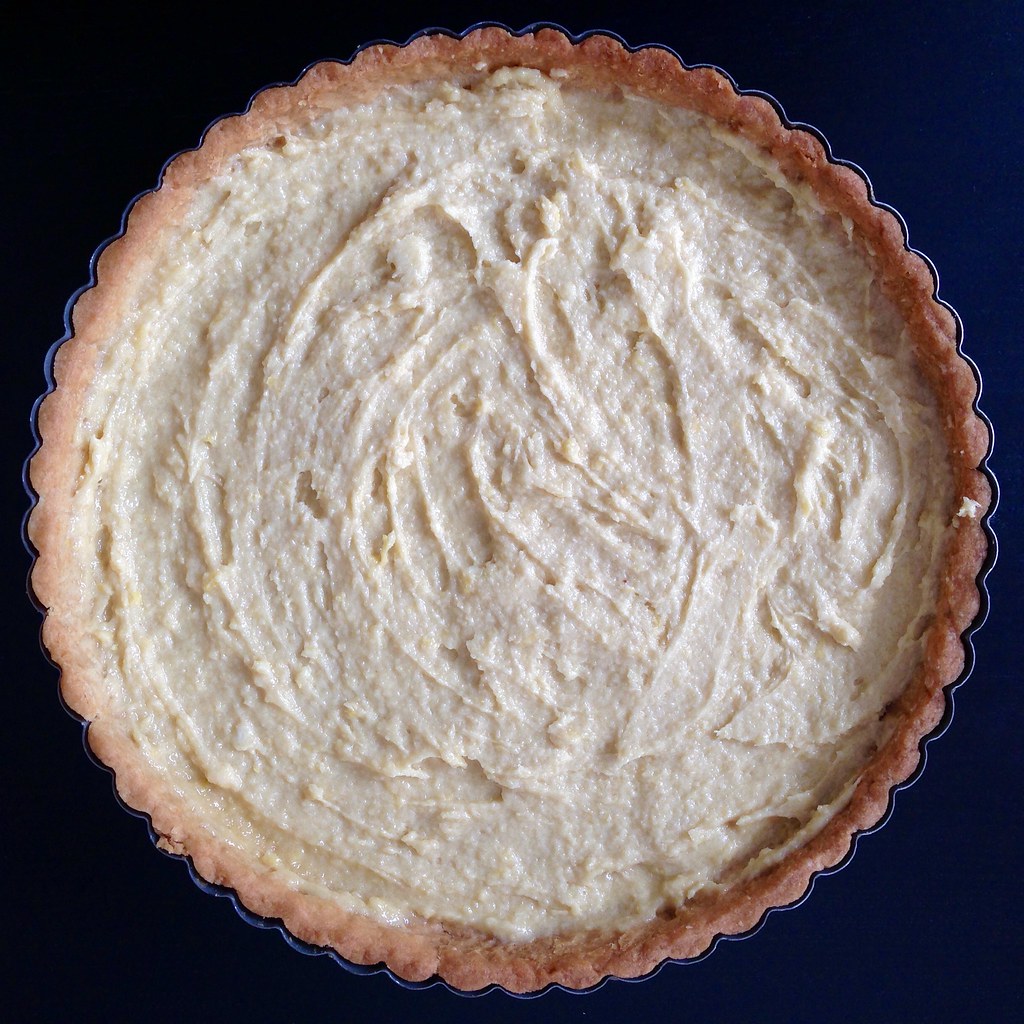
About 2 hours before you want to serve the tart, whisk the grapefruit crémeux until it's smooth (unlike the picture above). Spread over the lemon-almond cream. Arrange the grapefruit segments on top of the crémeux. Chill the tart for another 2-8 hours before serving.
Next: Matcha Financiers with White Chocolate Centers
Previously: First Night in Florence Spaghetti
Two Years Ago: Cauliflower Steak with Cauliflower Purée
Six Years Ago: Boston Cream Cupcakes
Monday, June 9, 2014
Vegan Almond Joy Ice Cream and Bon Bons
I've made coconut ice creams and coconut sorbets before, but when I saw this recipe on The Kitchn for a vegan coconut milk-based ice cream, I was pretty excited. As someone who loves making ice cream but has a lot of lactose intolerant friends, it would be awesome to have a dairy-free homemade ice cream base to work with.
Since the recipe included chocolate and almonds, I decided to go full Almond Joy and amplify the coconut and almond flavors by adding in some coconut and almond extract and toasting the almonds. I found the end product to be quite delicious and refreshing. It's lighter and not as creamy as regular ice cream, but it's not icy, either. Toasting the almonds really makes a huge difference, too!
I also decided to try making bon bons out of some of the coconut ice cream I saved before mixing in the chocolate and almonds. Topped with an almond and enrobed in homemade magic shell, it kind of looks like a fun-size Almond Joy! I especially like how the texture of the ice cream almost looks like the coconut filling in an actual Almond Joy.
Vegan Almond Joy Ice Cream (adapted from The Kitchn)
makes about 1 quart
2 (15-ounce) cans full-fat coconut milk
1/2 cup honey or agave nectar
1/4 teaspoon kosher salt
2 tablespoons cornstarch
1 1/2 teaspoons coconut extract
1/2 teaspoon almond extract
3 ounces (85 grams) raw almonds (about 1/2 cup)
4 ounces vegan chocolate chunks or chips
Shake the cans of coconut milk thoroughly before opening. Pour the coconut milk into a medium saucepan, leaving about 1/2 cup in one of the cans. Add the agave or honey and salt to the saucepan. Bring to a simmer over medium-low heat until the sweetener thins and is easily mixed into the coconut milk, about 2 minutes.
Whisk the cornstarch in the remaining 1/2 cup of coconut milk until well combined. Stir into the warm coconut milk base and cook over medium heat until the mixture begins to thicken — enough so that it coats the back of a spoon, 6 to 8 minutes. Do not to allow the mixture to boil.
Remove from the heat and pour the coconut base into a separate bowl. Allow to cool on the counter for 30 minutes, then stir in the coconut and almond extract. Cover with plastic wrap and chill in the refrigerator for 4 to 5 hours; you need the base to be very cold before you process it in the ice cream machine.
While the ice cream base is chilling, toast the almonds for about 10 minutes in a preheated 350°F oven. Coarsely chop and store in the freezer until it is time to mix it in to the ice cream. Put the chocolate in the freezer, too.
Churn the mixture in your ice cream machine following the manufacturer’s instructions. (If you want to make the bon bons, skip the next step.) Add the chopped almonds and chocolate chunks at the very end. When thickened to an soft-serve ice cream consistency, pack the ice cream into a storage container. Seal with an airtight lid and freeze until firm, at least 4 hours.
Almond Joy Ice Cream Bon Bons
Coconut ice cream
Whole almonds
Homemade magic shell
Line a tray with parchment paper and chill in the freezer.
After the ice cream has hardened, scoop out small balls of the ice cream onto the parchment-lined tray, making sure to pack in the ice cream tightly so there won't be any holes in the bon bons.
Place an almond on top of each scoop. Inset a toothpick at an angle right next to the almond. Return the tray to the freezer and allow the ice cream balls to harden for at least 30 minutes.
Working quickly, carefully lift the ice cream balls off the parchment paper using the toothpicks and coat with the magic shell. I used a spoon to pour the magic shell over the ice cream, but you may have better luck dipping it. Return the bon bon to the tray, remove the toothpick, and drizzle a little more magic shell over the hole where the toothpick was. After you are done coating all the bon bons, return the tray to the freezer and allow to harden for at least an hour.
I wish I had let the ice cream balls harden longer in the freezer before I tried to dip them because of the 7 I scooped out, only these 5 made it intact. And looking back, I think it would have looked nicer if I had taken the time to re-dip the bon bons again to smooth out the inconsistencies and produce a thicker coat of chocolate. C'est la vie, they were still freaking delicious. =)
Next: Sesame-Crusted Tofu
Previously: Overnight Oats in a Jar
Last Year: Spaghetti Carbonara for One
Five Years Ago: Kale Chips
Thursday, June 5, 2014
Overnight Oats in a Jar
I recently started a new job where I no longer work from home but have to go into an office every day when I'm not traveling. Unfortunately, the office is too small to have a great cafeteria so I've had to figure out how to bring breakfast and lunch to work for pretty much the first time in my life. (I know, I've been spoiled.)
Now that I'm not able to make myself candied bacon chocolate chip pancakes every morning (just kidding!), I was kind of lost with what to do until I remembered the wonder that is overnight oats. Basically, you just soak dry oats in any kind of liquid overnight in the refrigerator. For regular rolled oats, you can use a 1:1 ratio of oats to liquid. For something thicker like steel cut oats, the ratio should be closer to 1:2 oats to liquid. In the morning, the oats have softened enough to eat as is. It sounds kind of boring, but the fun comes in customizing your oats!
To make what I call New England Morning Overnight Oats, I added real maple syrup and freeze-dried blueberries (available from Trader Joe's) to 1/3 cup of steel cut oats in a small Mason jar and filled it up to the top with vanilla soy milk. Put the lid on, shake it up to make sure everything is mixed, and let it sit overnight in the fridge. That's it! The next morning, I just grab the jar on the way to work and eat the oats straight from the jar at my desk.
I've also made Almond Joy Overnight Oats (not pictured) by adding cocoa powder, sliced almonds, and shredded coconut to the oatmeal. Other ideas for toppings include raisins, dried cranberries, sliced bananas, fruit purees or preserves, yogurt, other nuts, cinnamon, honey, and nut butters. I prefer to use either soy, almond, or coconut milk for the liquid.
My current favorite combination is to use Trader Joe's Quick Cook Steel Cut Oats and add freeze-dried strawberries (also available from Trader Joe's), sliced almonds, shredded coconut, and chia seeds. The quick cook steel cut oats are not as chewy as regular steel cut oats (sometimes my jaw would hurt from having to chew so much!) but not as mushy as regular rolled oats. And the chia seeds give the overnight oats a thicker, more pudding-like consistency (they're also packed with omega-3s!).
It doesn't look very photogenic, but it's super yummy and only takes a minute to make the night before. I've pretty much been packing this every day for breakfast whenever I have to go into the office, along with a travel mug full of magical cold brew coffee, which I also prepare the night before. Just two less things to think about every morning!
Next: Vegan Almond Joy Ice Cream and Bon Bons
Previously: Homemade Ginger Beer
Last Year: Rosemary Honey and Lemon Frozen Yogurt
Monday, August 12, 2013
Almond Pesto Pizza
It had been a while since I had made a margherita pizza, and my basil plant was getting a little full so I decided to make some pesto pizza. I didn't have any pine nuts, though, so I decided to substitute in some slivered almonds which I already had instead.
Add the basil, spinach, garlic, Parmesan reggiano, and almonds to a food processor. While processing, stream in the olive oil until a smooth puree is formed. Season with salt to taste. Transfer to a small container and allow to settle.
Stretch the dough onto a parchment paper-lined flexible cutting board.
Spoon out some of the olive oil that has settled to the top of the pesto and spread over the pizza dough.
Drop dollops of pesto around the dough. Top with the torn mozzarella. Stretch and top the second ball of pizza dough.
Slide one of the pizzas and parchment paper onto the pizza stone and bake for 5 minutes.
After 5 minutes, turn the oven to broil and broil for 1-2 minutes. Bake until the cheese is completely melted and the crust is golden with spots of brown and a few small spots of char.
Use tongs to slide the pizza with the parchment paper from the pizza stone onto a cutting board. Slice and serve!
Next: Shakshuka Pizza
Previously: Matcha Green Tea Ice Cream with Matcha Mochi Bits
Don't they kind of look like pine nuts anyways? I also threw in some baby spinach leaves as suggested by Kenji from Serious Eats to "add some more green without overwhelming the other flavors with excess basil." Normally I probably would've been afraid that the spinach would add its own unwanted flavor, but after my experience with adding spinach to green smoothies, I've realized how innocuous spinach leaves can be when mixed with other ingredients.
Almond Pesto Pizza
makes two 10" pizzas
2 8 oz. balls of pizza dough
1 cup loosely packed basil leaves
1 cup loosely packed spinach leaves
1 small garlic clove
1-2 tablespoon Parmesan reggiano, grated
2 tablespoons raw slivered almonds
1/3 cup olive oil
Kosher salt, to taste
6 oz. fresh mozzarella, torn into chunks
Place a pizza stone on an oven rack set at the top 1/3 of the oven. Preheat the oven to 550°F.
Add the basil, spinach, garlic, Parmesan reggiano, and almonds to a food processor. While processing, stream in the olive oil until a smooth puree is formed. Season with salt to taste. Transfer to a small container and allow to settle.
Stretch the dough onto a parchment paper-lined flexible cutting board.
Spoon out some of the olive oil that has settled to the top of the pesto and spread over the pizza dough.
Drop dollops of pesto around the dough. Top with the torn mozzarella. Stretch and top the second ball of pizza dough.
Slide one of the pizzas and parchment paper onto the pizza stone and bake for 5 minutes.
After 5 minutes, turn the oven to broil and broil for 1-2 minutes. Bake until the cheese is completely melted and the crust is golden with spots of brown and a few small spots of char.
Use tongs to slide the pizza with the parchment paper from the pizza stone onto a cutting board. Slice and serve!
Next: Shakshuka Pizza
Previously: Matcha Green Tea Ice Cream with Matcha Mochi Bits
Thursday, January 17, 2013
Almond Croissants
If you managed not to immediately consume all the croissants you've made and have some leftover, this is a great way to use them to create an equally, if not more, delicious pastry. If you're deliberately saving some croissants for this, I would choose the runts of the litter since you will barely be able to see the croissant underneath the almonds anyways. This could probably work on non-homemade croissants, too, but you might as well just buy almond croissants then.
Almond Croissants (adapted from Bouchon Bakery)
makes 6
Almond Cream
73 g almond meal
7 g all-purpose flour
73 g unsalted butter, at room temperature
73 g powdered sugar
1 large egg
Almond Syrup
75 g sugar
75 g water
15 g almond meal
6 day-old traditional croissants
2 1/4 cups sliced blanched almonds
For the almond cream: Whisk almond meal and flour together in a small bowl.
Place the butter in the bowl of a stand mixer with the paddle attachment and mix on medium-low until the butter is the consistency of mayonnaise and holds a peak when the paddle is lifted. Sift in the powdered sugar and mix on the lowest speed until incorporated, then increase the speed to low and mix until fluffy, about 2-3 minutes. Add the almond mixture in 2 additions, pulsing to combine and then mixing on low speed for 15-30 seconds after each one.
Add the egg and mix on low speed until combined and smooth, about 30 seconds. Transfer to a covered container and press a piece of plastic wrap against the surface to prevent a skin from forming. Refrigerate until cold, about 2 hours. The almond cream can be kept in the fridge for up to 4 days.
For the almond syrup: Combine the sugar, water, and almond meal in a small saucepan and bring to a simmer over medium heat, stirring to dissolve the sugar. Remove from heat and let steep 1 hour. Strain into a small bowl. The almond syrup can be kept in a covered container in the fridge for up to 1 month.
Preheat the oven to 350°F. Line a baking sheet with a Silpat or parchment paper. Spread the sliced almonds out in a shallow bowl or dish.
Cut the croissants in half horizontally.
Liberally brush each cut side with the almond syrup.
Spread about 2 tablespoons of the almond cream onto the bottom half of a croissant. Place the top half back on and gently press.
Spread about 1 1/2 tablespoons almond cream on the top of the croissant.
Dip the tops of the croissant into the almonds, coating the almond cream generously, and press down to compact. Arrange the croissants on the prepared baking sheet.
Bake for 18-20 minutes, until the nuts are golden brown.
Set the baking sheet on a rack and cool completely.
These are best eaten the day they are made but can be stored in a covered container for up to 1 day.
Next: Pains au Chocolat (Chocolate Croissants)
Previously: Traditional Croissants
Three years ago: Kalua Pork
Four years ago: Mayonnaise Shrimp with Candied Walnuts, Char Siu Bao
Thursday, March 5, 2009
Panna Cotta, Take 2
This is my second attempt at a panna cotta version of the traditional Chinese dessert, almond tofu. As you may recall, last time the major issue was that the panna cotta barely jelled. As a minor issue, I didn't like the way the white wine reduction turned out because I had been hoping the dried cherries would have pureed more to thicken the reduction. Instead it ended up being a muddy reddish-brownish liquid that the pears ended up being immersed in on top of the panna cotta. Not terribly pretty to look at, but fortunately still rather tasty.
I basically used the same recipe as before, except I only had 1 1/3 cups milk and a little more than 1 cup of heavy cream. Since my issue last time was that the panna cotta didn't set enough, I figured I'd try using the same 1 tablespoon of gelatin and hope it wouldn't get too hard. And after seeing Tartelette's beautiful panna cottas, I figured I'd try something a little different for the pears.
Red Wine Poached Pears Puree
makes enough for 6 panna cotta servings
1/2 vanilla bean
Zest from one orange
1 cup red wine (it was all I had left)
1/2 cup sugar
2 D'anjou pears
Split the vanilla bean lengthwise in half with a knife and scrape out the seeds.
makes enough for 6 panna cotta servings
1/2 vanilla bean
Zest from one orange
1 cup red wine (it was all I had left)
1/2 cup sugar
2 D'anjou pears
Split the vanilla bean lengthwise in half with a knife and scrape out the seeds.
Add the vanilla seeds and pod and orange zest to the red wine and sugar in a medium saucepan. Bring to a boil and stir until the sugar is completely dissolved. Reduce to a simmer.
Peel the pears, leaving the stem intact. Slice off the bottom 1/8" of each pear to create a flat, stable base.
Add the pears to the simmering poaching liquid, laying them on their sides. Cook, turning pears occasionally so they become saturated on all sides, until they are just tender when pierced with a fork, about 7 minutes.
Allow pears to cool completely in their poaching liquid.
After the pears have cooled, remove the core and stem and roughly chop the pear. Add just enough braising liquid to cover and let sit until the pear reaches the desired color. (I only gave it about 15 minutes.) Drain as much of the liquid as possible and reserve.
Using an immersion blender or regular blender, puree the pears.
To assemble the panna cotta, I divided the pear puree equally between 6 ramekins (oh what I wouldn't give for the cute glasses that Tartelette uses!).
Carefully pour the panna cotta mixture (after the gelatin has been added to it) through a sieve on top of the puree. I was not so careful on my first attempt and pretty much lost the bottom layer.
The other ramekins fared a little better.
There was still some of the puree that ended up floating on top of the panna cotta mixture, but I wasn't too worried because there was going to be a third layer. But before that, let the panna cotta sit in the fridge for at least 3 hours, until firm. In the meantime, heat the red wine braising liquid (you didn't throw it out, did you?) in a small saucepan and reduce to about 1/3 cup volume.
Once the panna cotta has set, spoon the wine reduction on top. For a final touch, place a peeled mandarin orange section on top as garnish.
I found that this time the panna cotta was actually a little firmer than I wanted. I also noticed that when I was straining the mixture into the ramekins that there was a fair amount of gelatin left in the strainer. According to Tartelette's recipe, she strains the mixture before adding the gelatin, so maybe the first time I made the recipe the reason it wasn't set enough was because I was leaving too much gelatin in the strainer. At the same time, I don't really want heterogeneous bits of hard gelatin settling at the bottom of the panna cotta. I guess next time I make this (yes, there will be a next time!) I will try dissolving the gelatin in a bit of reheated cream mixture before adding it to the rest of the cooled mixture.
Subscribe to:
Posts (Atom)