Showing posts with label cinnamon. Show all posts

Saturday, October 21, 2017

Deep Fried Apple Dumplings with Miso Caramel Dipping Sauce


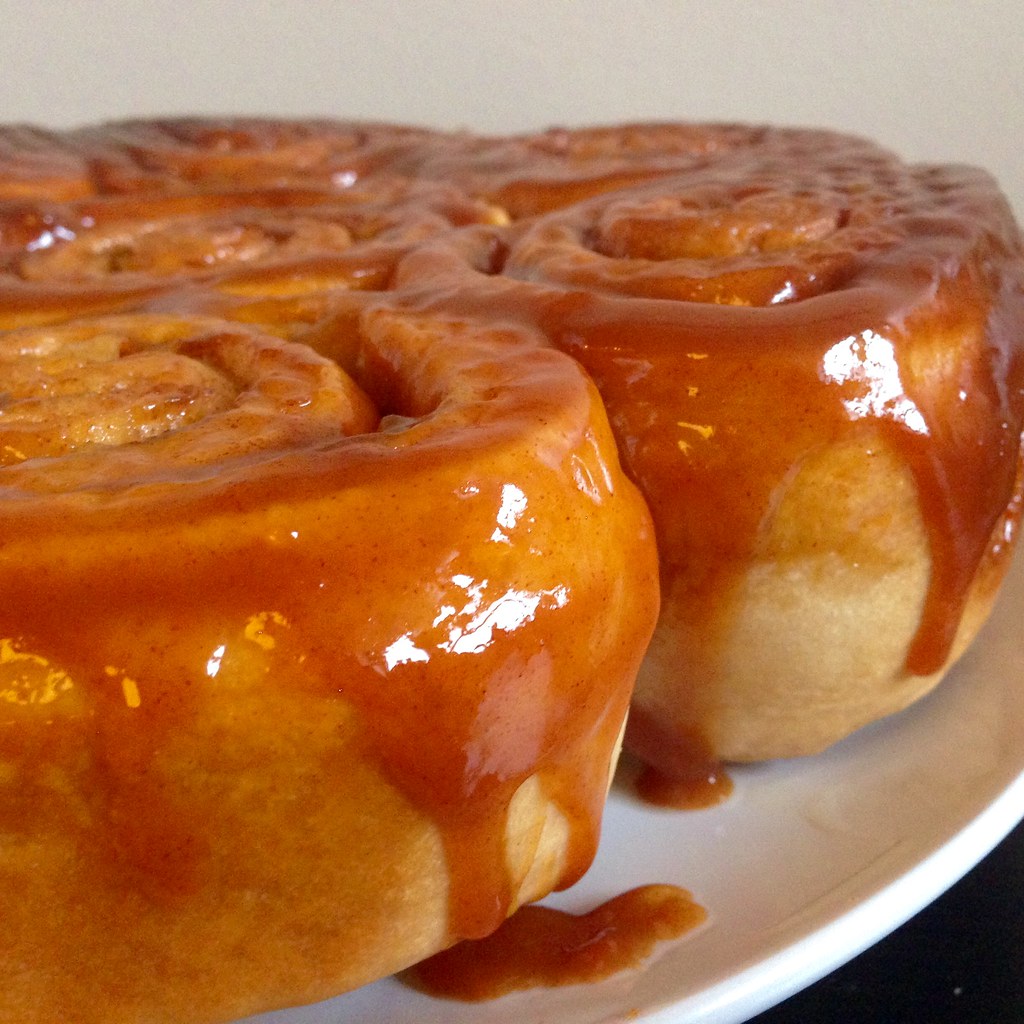
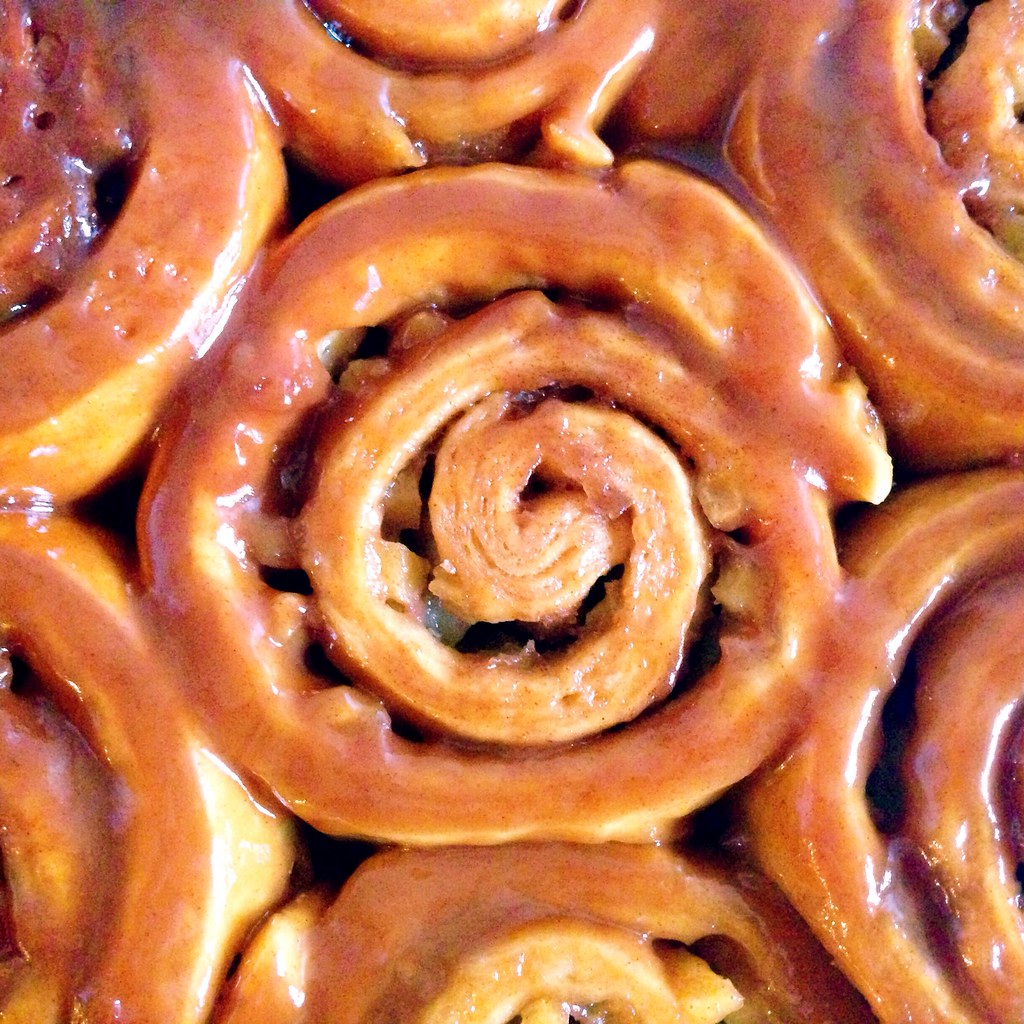
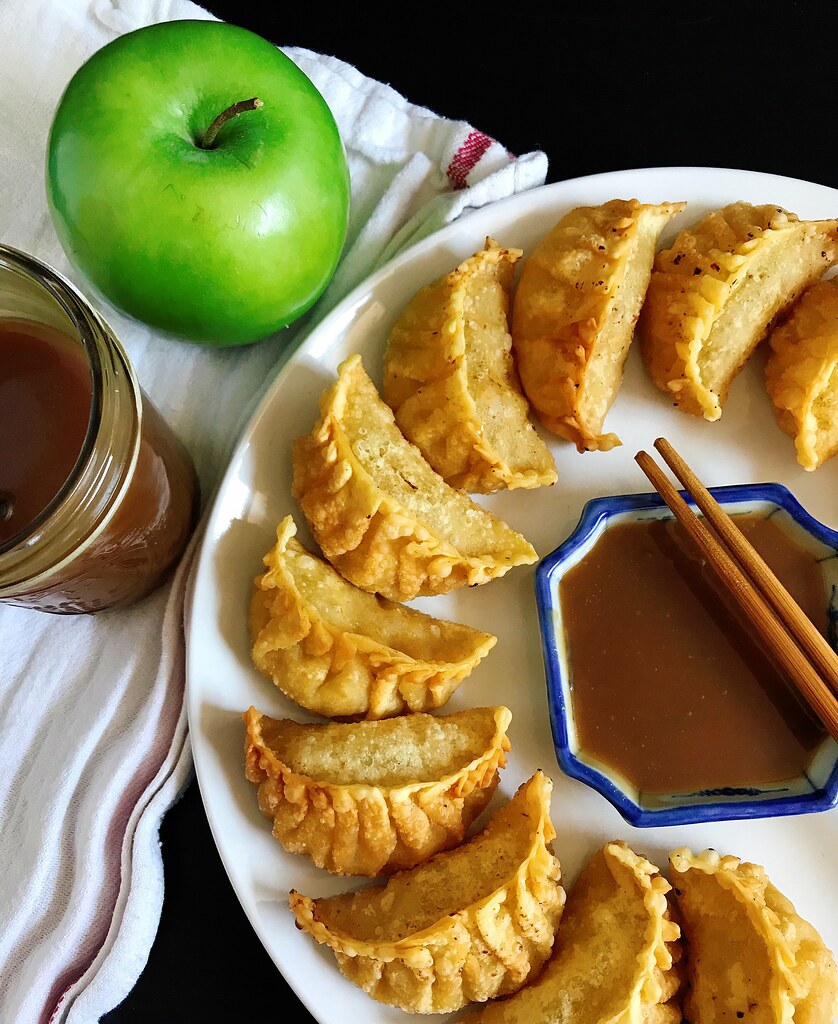
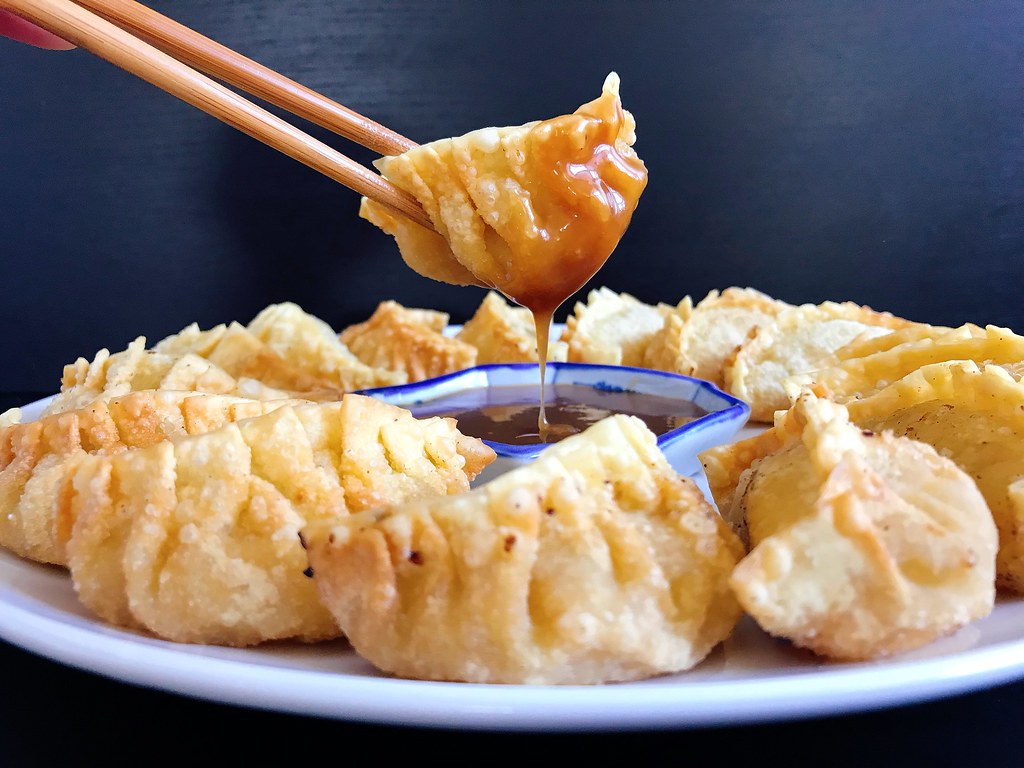
You know how sometimes something is really, really hyped up and you're just like, "uh huh, okay, but it can't actually be that amazing."  Well, I just wanted to let you know that miso caramel is *actually* that amazing!  I first heard about it on Food52, but then I noticed that some of my favorite food bloggers were also incorporating it into their apple pies and raving about it.  It is rather rich and strong so it might not be for everyone, but if you like salted caramel and miso, you'll probably love this caramel too.  The best way I can describe it is "flavor bomb".  Try it on ice cream, in apple pies, with apple slices, or just straight out of the jar!


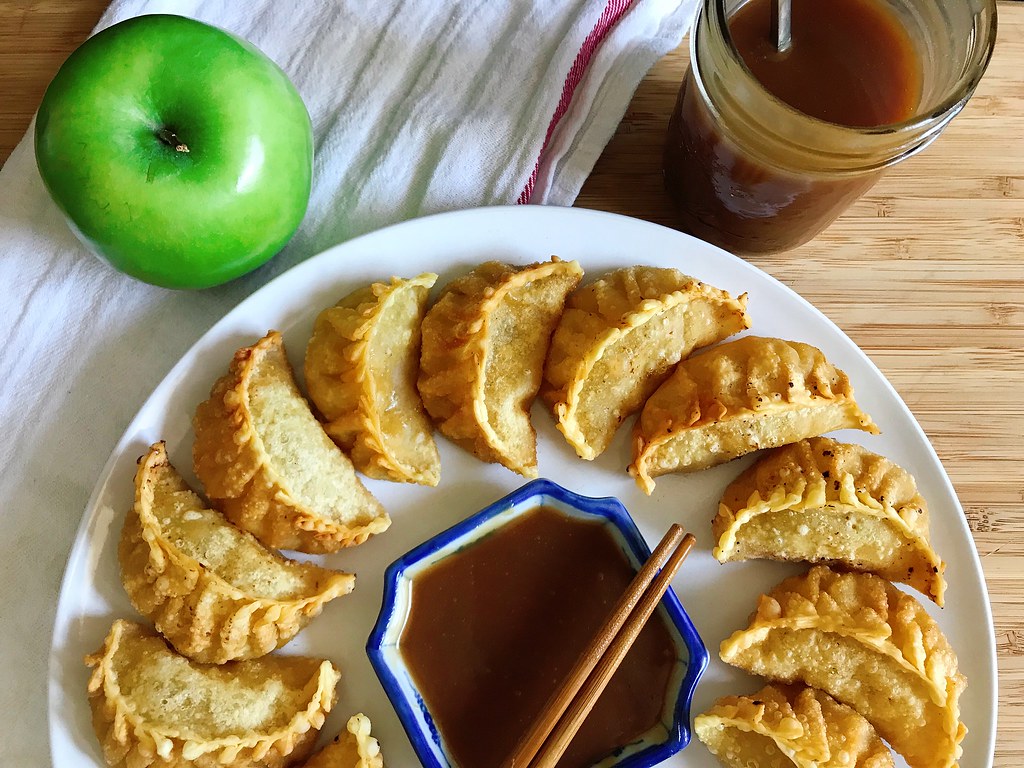
The reason I even decided to make miso caramel is because I was invited by Rebecca and Ruth from Square Meal Round Table to join a fall collaboration with a bunch of other Instagrammers/food bloggers centered around the prompt #Aisforalltheapples.  I had the idea to make apple dumplings, but not the American baked kind using pastry dough; I wanted to make them with Hong Kong style dumpling skins and shape them like pot stickers.  Get it?  Instead of pan-frying them, though, I was going to deep fry them like McDonald's used to fry their apple pies!  And I figured to continue with the Asian twist, I'd pair the apple dumplings with miso caramel sauce.


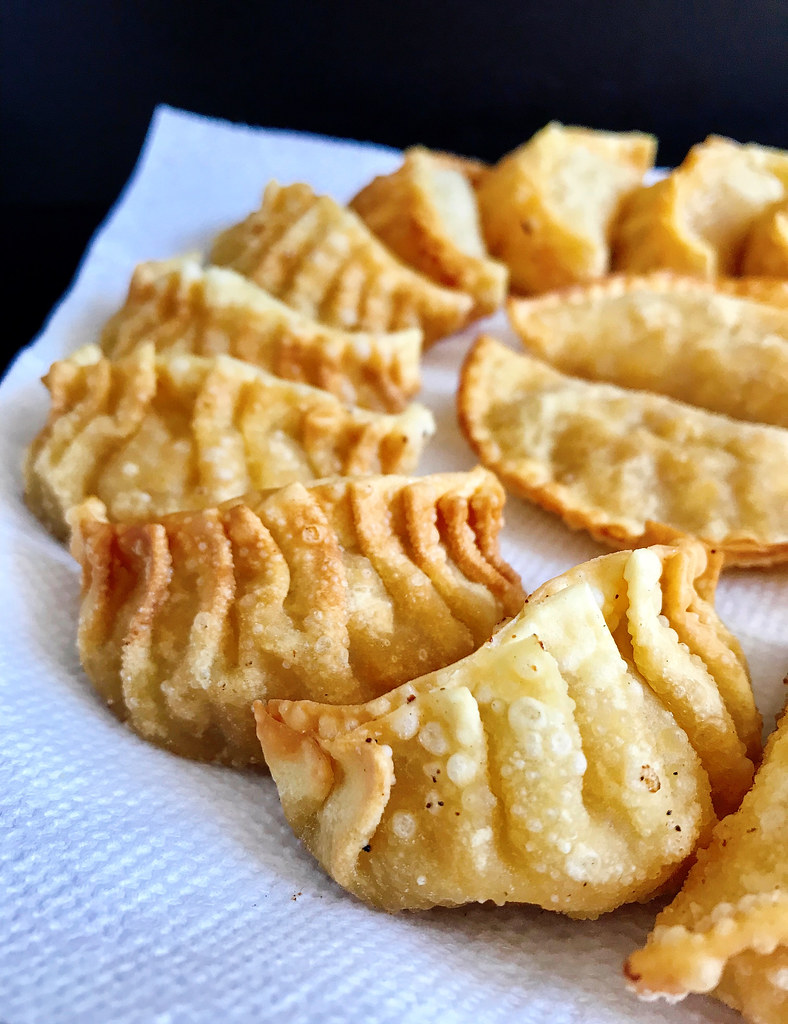
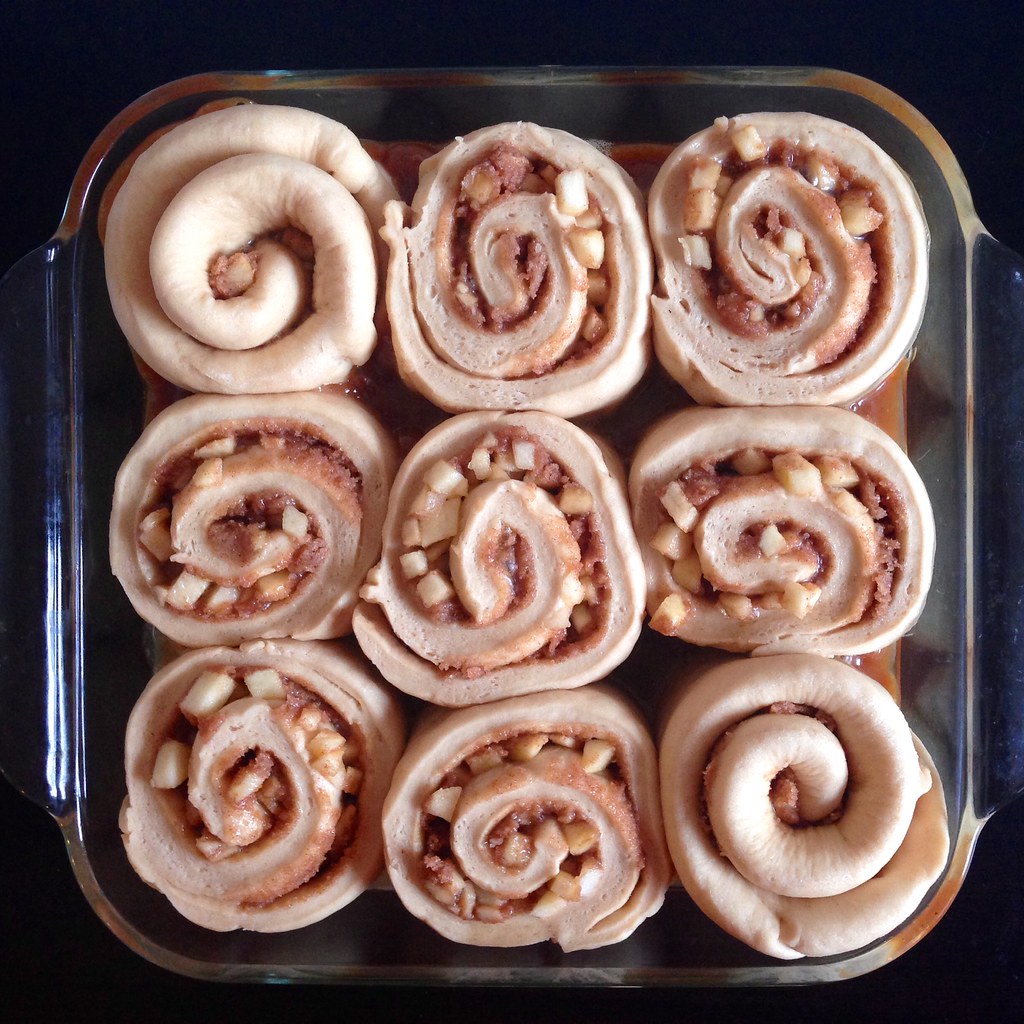
When it came time to shape the dumplings, I decided to go a little crazy with the pleating since I knew I wasn't making that many, but it's entirely unnecessary to do that many pleats.  In fact, I also experimented with making a couple that were just folded in half, sealed, and then crimped with a fork so that the looked like little hand pies (see above).  This shape was actually the easiest to fry evenly and dip in the caramel, so I'd probably make them this way in the future, unless I specifically wanted the pot sticker shape.


Deep Fried Apple Dumplings
makes about 2 dozen

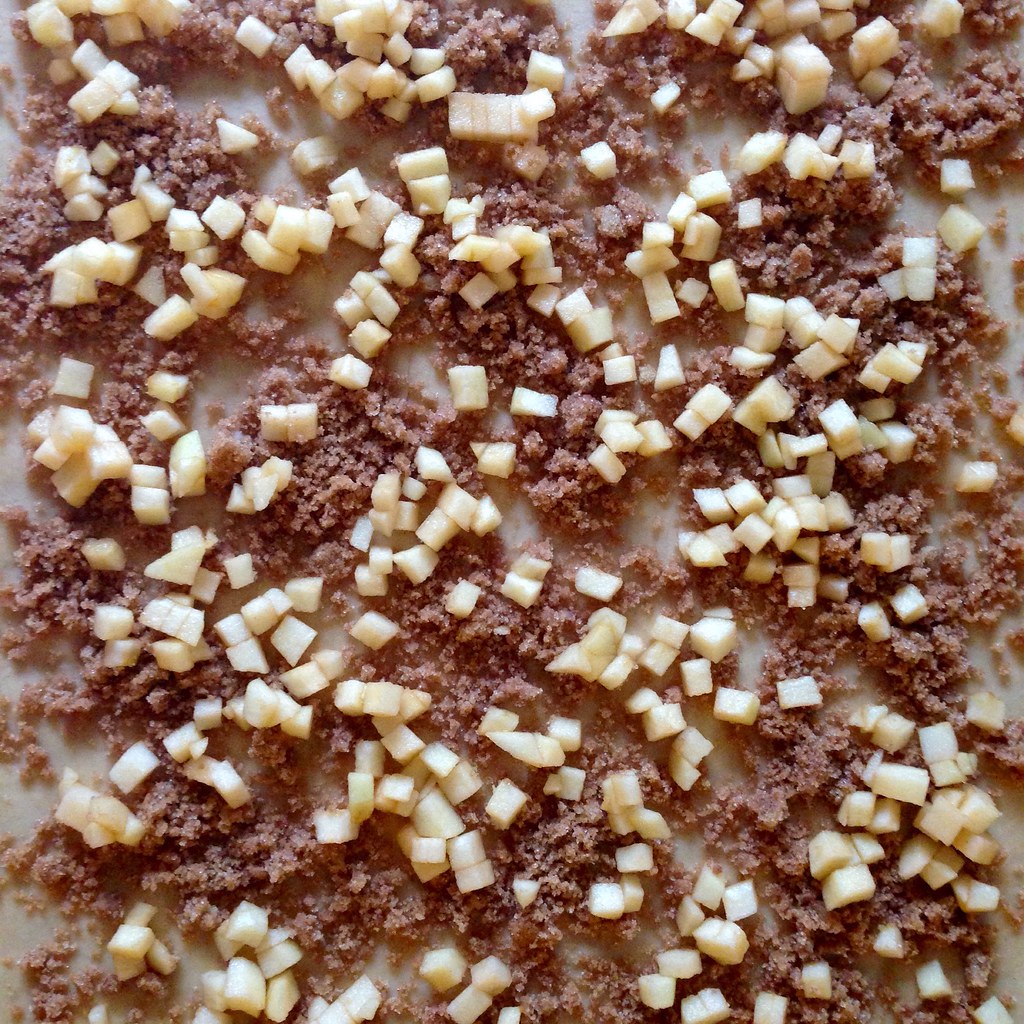
2 apples (I used gala but fuji or pink lady would work too)
3 tablespoons brown sugar, packed
1/2 teaspoon ground cinnamon
1/4 teaspoon cornstarch
Pinch of salt
Dumpling skins
Oil for frying

Peel the apples and finely dice.  Mix with the brown sugar, cinnamon, cornstarch, and salt in a small saucepan.  Heat over medium-low heat for about 5 minutes, until the apples are tender and liquid starts to form.  Transfer to a bowl and allow to cool to room temperature.

Wet the edges of the dumpling skins and fill with the apple mixture.  Seal tightly.

Heat the oil in a pot to 350°F.  Fry the dumplings until golden brown and drain on a paper towel-lined plate.  Serve immediately with the miso caramel dipping sauce (recipe below).

Miso Caramel Dipping Sauce (from Minxeats via Food52)
makes 1 pint

3/4 cup granulated sugar
1/4 cup water
1/2 cup heavy cream
2 tablespoons white miso

Heat the sugar and water over medium-high heat in a medium saucepan.  Bring to a boil and continue to cook without stirring until it turns a medium amber and wisps of smoke just start to appear.  Immediately remove from heat and whisk in the heavy cream.  If the caramel seizes, just return the pan to low heat and continue to whisk until everything is liquid again.  Whisk in the miso.  Pour into a glass jar and store in the refrigerator if not using immediately.  Rewarm briefly in the microwave before using after refrigeration.


Check out the rest of the entries in this collaboration below!

Next:  Slow-Roasted Ginger Scallion Salmon
Previously:  Crane Rangoons
Last Year:  Pear Apple Cranberry Slab Pie
Two Years Ago:  Pad Thai
Three Years Ago:  Mochi Donuts and Pon de Rings
Four Years Ago:  Bahian Style Moqueca (Brazilian Fish Stew)
Five Years Ago:  Magical Pumpkin Spice Latte

Tuesday, July 26, 2016

My Mom's Beef and Broccoli Stir Fry

https://www.flickr.com/photos/joyosity/27932366904/in/dateposted-public/

This is one of the original recipes in the cookbook that I made for my mom's Christmas gift 8 years ago.  I would've shared it earlier, except I thought I'd shared it already!  It's a classic dish to order from a Chinese restaurant--velvety strips of marinated beef stir fried with tender crisp broccoli in a flavorful brown sauce--and perfect served over steamed white rice.

To keep the beef tender and not chewy, it's important to slice the strips against the grain.  The addition of cornstarch in the marinade further helps improve the texture of the beef.  Since the broccoli takes a lot longer to cook than the beef, it is cooked separately while the beef is marinating and then added back in at the end.  You'll want to use a large pan with a lid so that you can steam the broccoli after a quick stir fry.

https://www.flickr.com/photos/joyosity/28421948532/in/dateposted-public/

My favorite part about this recipe is the marinade which ends up becoming the sauce upon stir frying with the beef.  It is already quite fragrant due to the soy sauce, garlic, and sesame oil, but my mom adds a secret ingredient that really brings it over the top:  cinnamon!  Only a tiny amount is added that you can't really taste it, but the aromatic spice somehow boosts all the other flavors in the sauce in a way you wouldn't expect.

https://www.flickr.com/photos/joyosity/28549364325/in/dateposted-public/

My Mom's Beef and Broccoli Stir Fry
serves 4

1 lb. flank or sirloin steak, sliced thinly against the grain
1/4 cup soy sauce
2 tablespoons cornstarch
1/4 cup rice wine
1 teaspoon sesame oil
1 1/2 tablespoons sugar
2 garlic cloves, minced
1/4 teaspoon ground cinnamon
3 tablespoons vegetable oil, divided
6 cups broccoli florets
Salt, to taste
1 cup water, divided

Whisk together the soy sauce, cornstarch, rice wine, sesame oil, sugar, minced garlic, and cinnamon.  Toss with the sliced steak and marinate for at least 30 minutes.

In a large wok, heat 1 tablespoon of oil on high and add the broccoli florets.  Season with salt and stir fry until bright green.  Add 1/2 cup water and cover.  Steam until the broccoli is done.  Transfer the broccoli to a bowl, and wipe down the wok.

Add another 2 tablespoons of oil and heat on high again.  Add the steak and marinade to the wok.  Rinse out the container you used to hold the beef with 1/2 cup of water and add to the wok.  Stir fry until the beef is just done and no longer red.  Add the broccoli back into the wok and continue to stir fry for another minute or two to combine.  Serve hot.

https://www.flickr.com/photos/joyosity/28265304420/in/dateposted-public/

Next:  Zucchini Pizza
Previously:  How to Make an American Flag Cake
Two Years Ago:  Cleveland Cassata Cake (Bonus:  In a Jar!)
Three Years Ago:  Backyard Mint Ice Cream with Dark Chocolate Freckles
Six Years Ago:  Slow Cooker Bolognese Sauce
Seven Years Ago:  Curried Carrot Soup

Thursday, November 6, 2014

Caramel Apple Cinnamon Rolls

https://www.flickr.com/photos/joyosity/15706357572/

As soon as I saw this recipe on Use Real Butter, I knew I needed to make it.  Combining soft, warm cinnamon rolls with ooey, gooey caramel sauce and diced apples is a totally irresistible combination!

I didn't have two round pans, so I ended up baking half the rolls in a round pan and half in a square pan.  Because of the shapes of the pans, I decided to make the suggested 7 rolls in the round pan and 9 smaller rolls in the square pan.  I would definitely take the suggestion to place a sheet pan or aluminum foil underneath the pans while baking to catch any caramel that might spill over.

Reducing the apple cider and making the caramel takes a bit of time and monitoring, so you can do those steps the day before if you like.  You could even make everything up to the point where you place the shaped buns in the baking pans and refrigerate them overnight to bake the following morning after they've come to room temperature and doubled in size.

I underestimated the amount of all-purpose flour I had on hand when I started making this and had to replace half the amount of flour with white whole wheat flour.  I don't think it affected the flavor too much, but it was probably less fluffy and soft as it could have been.  I also halved the amount of butter used in the filling because I didn't think I needed a full stick in there.  I like to think of my version as "half-healthy".

https://www.flickr.com/photos/joyosity/15085119054/

Caramel Apple Cinnamon Rolls (adapted from Use Real Butter)
makes 14 large or 18 smaller rolls

For the dough:
6 1/2 cups all-purpose flour
4 1/2 teaspoons active dry yeast
2 cups milk
1/4 cup sugar
1/4 cup butter
1 1/2 teaspoons salt
1 egg
Vegetable oil

For the filling:
1/2 cup packed brown sugar
1/2 cup granulated sugar
1/4 cup all-purpose flour
1 tablespoon ground cinnamon
1/4 cup butter
2 cups apple, peeled, cored, and small dice

For the apple cider caramel:
2 cups apple cider
1 cup heavy cream
3/4 cup granulated sugar
1/2 teaspoon ground cinnamon
2 teaspoons vanilla extract
1/4 teaspoon sea salt

Combine 2 1/2 cups of flour and the yeast in the mixing bowl of a stand mixer. Place the milk, 1/4 cup sugar, 1/4 cup butter, and 1 1/2 teaspoons salt in a medium saucepan over medium heat. Stir together to dissolve the sugar until the mixture is just warm (the butter should be just melted). Pour the milk mixture into the mixing bowl containing the flour and yeast. Add the egg. Beat with paddle attachment for 30 seconds on low speed. Beat on high speed for 3 minutes. Stir in as much of the remaining flour as the dough can take. Knead 3-5 minutes until the dough is smooth and elastic (you can do this with a dough hook and finish by hand or knead by hand). Grease a large bowl with the vegetable oil. Shape the dough into a ball and place in the large greased bowl. Turn the dough over to coat the entire thing with oil. Cover and let rise in a warm place for 45-60 minutes or until the volume has doubled.

In a medium bowl, combine the brown sugar, 1/2 cup granulated sugar, 1/4 cup all-purpose flour, and 1 tablespoon cinnamon. Cut 1/2 cup butter into the mixture until it resembles coarse crumbs. Set aside.

Pour the apple cider into a medium saucepan and warm over medium-high heat. Let the cider boil down until it has reduced to 1/4 cup in volume (doesn’t have to be exact, but no more than 1/3 cup), about 20 minutes.  Measure out the cream into a microwaveable measuring cup and microwave for 30 seconds .  Place the sugar in a clean medium saucepan over medium heat. When the sugar begins to melt, gently swirl it around to distribute the rest of the unmelted sugar. When completely melted, let the liquid sugar turn a medium to dark amber color. Slowly pour the hot cream into the caramelized sugar while stirring. It will splatter and bubble, that’s okay, keep stirring. Return the pan to low heat and stir until all of the hard caramelized sugar has melted and your sauce has thickened, about 20 minutes. Stir in the reduced apple cider, 1/2 teaspoon cinnamon, 1/4 teaspoon sea salt, and vanilla.

Punch the dough down and turn it out onto a lightly-floured large (bigger than 24×16 inches) work surface. Alternatively, you can halve the dough and work on a smaller surface, which is what I did.  Cover with a damp cloth and let rest for 10 minutes. Butter two 9-inch round pans or two 8-inch square pans. Pour half of the apple cider caramel in each pan. Set aside. Roll the dough out into a 24×16-inch rectangle, if you're working with all the dough at once.  If you're only working with half, roll out into a 12x16-in rectangle. Sprinkle the cinnamon-sugar filling evenly over the rectangle, leaving a 1-inch margin bare along the long side furthest from you (this is to make sure you can pinch it closed when you roll it up). Do the same with the diced apple.

https://www.flickr.com/photos/joyosity/15519462948/

Roll up the dough incrementally to ensure that the filling stays put.  Pinch the clean edge onto the roll to seal it. Cut the roll into 14 equal-width pieces if you are using the round pans and 18 equal-width pieces if you are using the square pans. Set the slices cut-side down in the baking pans, cover and let rise for 45 minutes until doubled in volume.

https://www.flickr.com/photos/joyosity/15519579757/

Preheat oven to 350°F. Uncover the rolls and bake for 45 minutes until lightly browned. If using 2-inch high pans, you may want to set foil or a baking sheet under the rack to catch any caramel drips. Invert the baking pans onto a serving plate and serve warm.

https://www.flickr.com/photos/joyosity/15706358332/

Next:  Spatchcock Chicken with Roasted Root Vegetables
Previously:  Raindrop Cake
Two Years Ago:  Cereal Milk Panna Cotta with Cornflake Crunch

Tuesday, October 8, 2013

Apple Cider Donuts

Cider donuts from Honeypot Hill

One of my favorite things about fall is apple cider donuts.  They have to come fresh from an apple orchard from New England, though, preferably on a brisk, sunny day.  I've tried the ones they sell at super markets and even the state fair, but they're just not the same.

If you've never had one before, you might be disappointed to hear that they don't really taste like apple cider.  That said, they're still incredibly delicious and pair perfectly with a nice, cold glass of cider.  I like my cider donuts on the small side, coated with cinnamon and sugar, and, most importantly, fresh from the fryer so that they're still warm and crispy.  The interior should be cakey, but not dry, and never, ever greasy.

Luckily, even if you don't live in New England, you can make your own as long as you can get your hands on some real apple cider:  the cloudy, unfiltered kind that burns just a little bit on the way down your throat, not the weak, see through stuff they sell off-season.


Apple Cider Donuts (from Food52)
makes 10-12 donuts

1 cup apple cider
2 3/4 cups cake flour
1 teaspoon baking powder
1 teaspoon salt
1/4 teaspoon freshly grated nutmeg
2/3 cups sugar
2 tablespoons non-hydrogenated shortening
1 egg
1 egg yolk
1/3 cup buttermilk
canola oil, for frying
1/2 cup sugar, for topping
2 teaspoons cinnamon, for topping

Bring the apple cider to a boil over high heat and cook it until it has reduced to 1/3 cup, 7-10 minutes. Set aside to cool while you prepare the rest of the donuts.

   
Sift the cake flour, baking powder, salt and nutmeg.

   
In the bowl of a stand mixer, mix the shortening and sugar together on medium speed until sandy. Add in the egg and egg yolk and mix on high until light and thickened, about 5 minutes.
  
Mix the reduced apple cider and buttermilk together. Then add the flour mixture, alternating with the milk mixture to the mixer in three additions mixing until just combined. The dough will be soft and sticky much like cookie dough.

  
Transfer the mixture to a clean bowl and cover with plastic wrap. Refrigerate the dough for at least one hour or overnight.
   
When you are ready to roll and fry the donuts, heat a large pot or dutch oven with at least 2 inches of oil over medium heat until the oil reaches 370ºF on a candy thermometer.


Gently roll the chilled dough out onto a generously floured board or piece of parchment paper into a circle about 1/2'' thick and about 8'' wide.


Cut as many donuts as possible, making sure to flour the cutters before each cut.  If at any time the dough becomes too soft to handle, just put it in the refrigerator for a few minutes. Place the cut donuts on a parchment lined baking sheet and refrigerate for 15 minutes until they are slightly firm and easier to handle. While the donuts are chilling, stir together the cinnamon and sugar for the topping in a shallow, wide bowl.

   
Brush off any excess flour and fry the donuts for about 1 minute per side, being careful not to crowd the pan.  When the donuts are deep golden brown on each side, remove them from the oil, gently blot off excess oil and toss immediately in the cinnamon sugar.


I had a couple of issues with this version:  the finished product was a little too dense for my liking, the outside was only barely crispy, even fresh out of the fryer, and I had a hard time getting the cinnamon and sugar to stick to the donut.  My friends who got to try them liked them enough, though, so I probably just have really high standards when it comes to cider donuts.  Next time I might try Smitten Kitchen's version, which are fried in Crisco.


Next:  Pluot Lambic Sorbet
Previously:  Salted Butter Caramel Apple Pie with Vodka Pie Crust
Last year:  Caramelized Onion and Swiss Chard Quiche

Monday, February 4, 2013

Vanilla & Cinnamon Marshmallows

I begged my friend, Andy, to throw a "Winter Warmer" just so I could have an excuse to make these marshmallows.  They're perfect for dunking in hot chocolate, toasting over a flame, or even just eating by themselves.

Cinnamon marshmallows
 
Vanilla & Cinnamon Marshmallows (adapted from Smitten Kitchen)
Makes about 96 1-inch cubed marshmallows

About 1 cup confectioners sugar
3 1/2 envelopes (2 tablespoons plus 2 1/2 teaspoons) unflavored gelatin
1 cup cold water, divided
2 cups sugar
1/2 cup light corn syrup
1/4 teaspoon salt
2 large egg whites, at room temperature
1 tablespoon vanilla
Ground cinnamon

Oil bottom and sides of a 13- by 9- by 2-inch rectangular metal baking pan and dust bottom and sides with some confectioners’ sugar.

P1223221
 
In bowl of a standing electric mixer or in a large bowl sprinkle gelatin over 1/2 cup cold cold water, and let stand to soften.  (It's not written in the SK recipe, but see how the top layer of gelatin powder doesn't get wet?  Don't leave it like that; stir it around a little so that it's all combined, which I failed to do with this batch, although if you forget, it's not the end of the world.)

P1223223
 
In a 3-quart heavy saucepan cook granulated sugar, corn syrup, second 1/2 cup of cold water, and salt over low heat, stirring with a wooden spoon, until sugar is dissolved. Increase heat to moderate and boil mixture, without stirring, until a candy or digital thermometer registers 240°F, about 12 minutes. Remove pan from heat and pour sugar mixture over gelatin mixture, stirring until gelatin is dissolved.  (At this point it's going to smell really bad, and you're going to wonder if the marshmallows will even be edible.  They will be, trust me.)

P1223228
 
With standing mixer beat mixture on high speed until white, thick, and nearly tripled in volume, about six minutes.

P1223229
 
In separate medium bowl with cleaned beaters beat egg whites until they just hold stiff peaks. Beat whites and vanilla into sugar mixture until just combined.

P1223231
 
Pour mixture into baking pan. Sift 1/4 cup confectioners sugar evenly over top.

P1223234
 
Chill marshmallow, uncovered, until firm, at least three hours, and up to one day.

P1223235
 
Run a thin knife around edges of pan and invert pan onto a large cutting board. Lifting up one corner of inverted pan, with fingers loosen marshmallow and ease onto cutting board. With a large knife cut marshmallow into roughly one-inch cubes. (An oiled pizza cutter works well here too.)

Coating the marshmallows
 
Sift remaining confectioners’ sugar back into your now-empty baking pan, and roll the marshmallows through it, on all six sides, before shaking off the excess and packing them away.  (I found it was easiest to do this in batches rather than all at once.)

Vanilla marshmallows
 
Marshmallows keep in an airtight container at cool room temperature 1 week.

This is where the recipe from Smitten Kitchen stops.  I tasted the marshmallows at this point, and they were perfect in texture--springy and fluffy just like she promised.  The taste was just a little too...one dimensional for me, though.  Vanilla in its other definition.  It was too late to add any wet ingredients like another flavor extract, but then I thought, what if I just toss it with some cinnamon?  Cinnamon and sugar are such a great flavor combination already (think cinnamon toast or snickerdoodles), it couldn't hurt to try.  So I plopped a few marshmallows in a gallon-sized Ziploc bag and sprinkled in a few dashes of ground cinnamon.  A few shakes later, the cinnamon was pretty evenly distributed.

Cinnamon marshmallows
 
It came down to the taste test:  would it be enough?  Too strong?  It turned out perfect!  The cinnamon added just enough spicy heat to give the marshmallows some depth while still remaining light and airy.  Unfortunately I didn't measure out how much cinnamon I tossed in there; it was literally just a couple of shakes.  I'd say start off with a little, shake, and taste.  If you want, you can always add more, but it's pretty hard to remove the cinnamon if you add too much.

Next:  Passion Fruit Marshmallows
Previously:  Homemade Bagels
Four years ago:  Toasted Coconut Ice Cream with Sesame Brittle and Crystallized Ginger

Monday, October 15, 2012

Magical Pumpkin Spice Latte

PA113109

Now that I had my morning magical coffee routine down pat, I wanted to see if I could make a pumpkin spice latte with the magical coffee.  There's quite a few recipes on-line which use pumpkin puree, sugar, and store bought pumpkin spice, but I decided to mix it up a little and use pumpkin butter (I got mine from Trader Joe's) instead of the puree and sugar and make my own pumpkin spice since I had all the ingredients already.

PA113117

For the pumpkin spice, I ground up a tablespoon of cinnamon, a half teaspoon of nutmeg, and a half teaspoon of cloves and added a teaspoon of ground ginger.

Pumpkin Spice

For an easy, iced magical pumpkin spice latte, I cold brew a half cup of coffee with a teaspoon of pumpkin spice, 2 tablespoons of brown sugar, and 2 cups of water.

Pumpkin Butter

Then I spoon some of the pumpkin butter into a mug, add a dash of the magical coffee and stir so that the pumpkin butter is dissolved.  I add more coffee and vanilla soy milk, and if I'm feeling decadent, some coconut whipped cream and top it off with a little more pumpkin spice.

PA113129

When I want a hot pumpkin spice latte, I make an extra strong cold brew since I'm going to be diluting it with a lot of hot milk.  I heat up vanilla soy milk and pumpkin butter until it just starts to simmer and then whip it up so it's nice and frothy.

PA113130

Transfer the pumpkin milk to a mug and add the extra strong magical coffee, topping off with coconut whipped cream and pumpkin spice.

Pumpkin Spice Latte

Since the pumpkin butter, vanilla soy milk, and magical coffee already contain sugar, I find that I don't need to add any more, but feel free to add more sweetener to taste.  I like that this homemade pumpkin spice latte isn't super sickening sweet like the Starbucks' one and doesn't have that weird fluorescent orange color either.

Pumpkin Spice Latte

As another option, you can make a pumpkin spice frappuccino by blending ice with extra strong cold brew, pumpkin butter, and milk.  I've found that the pumpkin butter is also excellent on toasted amnesty bread.  =)

Monday, October 1, 2012

Magical Cold Brew Coffee

P9293152 

One big change that happened this summer is that I got to start working from home full time.  When I was given the option, I hesitated at first because all I could think about was the fact that I wouldn't be able to get free coffee at work anymore.  It's not super great coffee or anything, but it's there.  And it's free.  And I need coffee in the morning.  Then I remembered cold brew coffee.

I've known about it since last summer when this article came out, but never got around to trying it out myself, mostly because I don't have any coffee filters.  Now that I had the motivation, I grabbed a box of filters from Trader Joe's and started cold brewing away.  I discovered that cold brew coffee was smoother than hot brewed coffee and super convenient to keep in the fridge for whenever I wanted some iced coffee.  Life was good.

Then I came across this recipe for Magical Coffee and my life changed.  This coffee isn't just good or better; this coffee is MAGICAL.  It's like there's a party in my cup and everyone is invited.  The flavors sing, the aromas dance.  I used to use coffee to wake me up in the morning.  Now I wake up in the morning to taste this coffee.

Magical Cold Brew Coffee
makes 2-3 servings

1/2 cup coffee beans
1/2 teaspoon cinnamon
1 pinch fresh ground nutmeg (optional)
2 tablespoons brown sugar
2 cups water

P9283130

Grind the coffee to a medium-fine texture (stop before you get to espresso fine).

P9283140

In a French press, add the ground coffee, cinnamon, nutmeg, and brown sugar.

Pour in 2 cups of cold water, stir, and wait 2 minutes for the coffee to float and "bloom".

Stir again and cover.  At this point you can put it in the fridge to steep or leave it on the counter at room temperature.  If I want to drink it in less than 8 hours, I'll leave it on the counter.  Let steep overnight or longer, up to 24 hours.

P9293147
 
Press the grinds and pour through a coffee filter.  You can store this coffee base in the refrigerator for a week.

To serve, pour over ice cubes and add cream, milk, or half & half if you like.  I prefer vanilla soymilk.

Die of happiness.

P9293151

I tweaked the proportions a bit from the original recipe because I like to add a lot of soymilk to my coffee so I wanted the coffee base to be a little stronger.  Now that it's getting colder, I may end up using the French press to brew hot coffee but I'll still probably add the cinnamon, nutmeg, and brown sugar.

Check out how to make magical pumpkin spice latte here!

Update:  I just tried making this with a small handful of torn mint leaves, and it totally reminds me of Philz' Mint Mojito Iced Coffee!