Saturday, September 19, 2020

General Tso's Tofu

I previously posted this recipe in an Instagram post, but since I make it so much, I figured it would be easier to find here for future reference.  The sauce recipe is adapted from Lev Grossman's Best General Tso Tofu recipe on Food52, and the idea to use sweet potato starch as the coating for the tofu came from my friend Rebecca.  If you don't have sweet potato starch, you can use regular potato starch or cornstarch or even just fry the tofu without any coating.
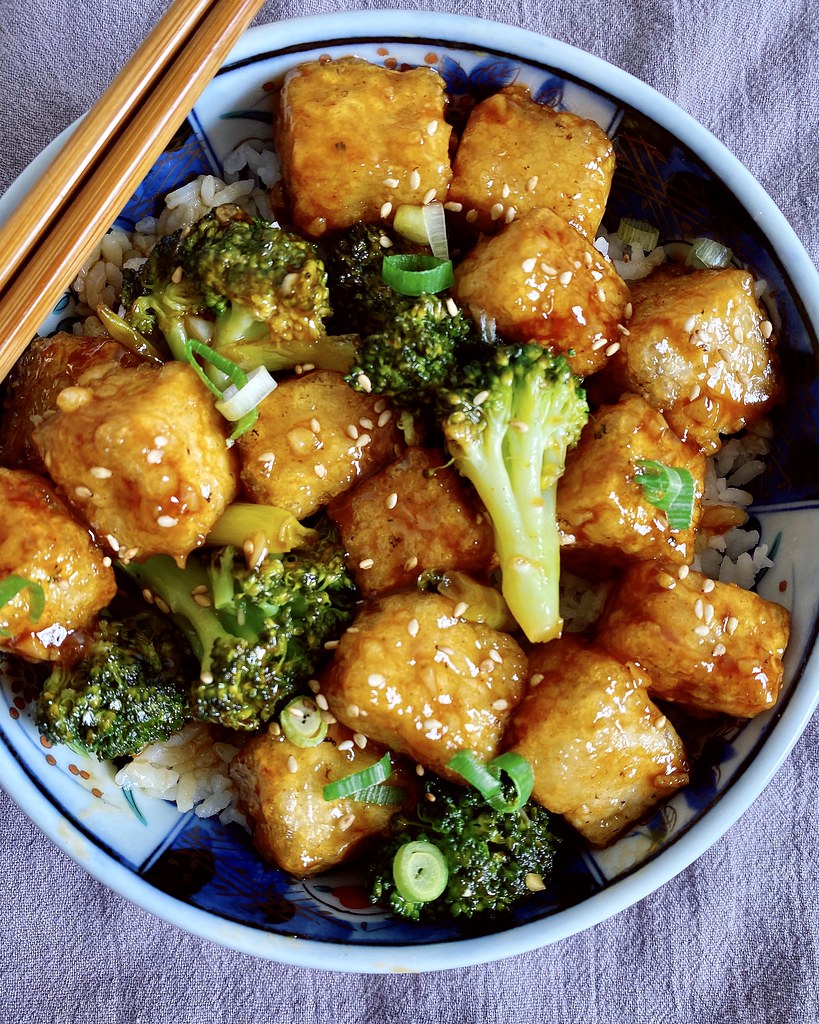
General Tso's Tofu
makes 2-3 servings

14-16 oz. firm or extra-firm tofu
1 large head of broccoli
3 garlic cloves, minced and divided
Oil for frying
Kosher salt, to taste
Sweet potato flour for coating
3 tablespoons sugar
1 tablespoon cornstarch
3 tablespoons soy sauce
2 tablespoons Shaoxing wine
2 tablespoons rice vinegar
3 tablespoons chicken stock
Gochujang or sriracha, to taste
1 inch fresh ginger, thinly sliced
Handful of scallions, chopped into 1" sections

Steamed rice

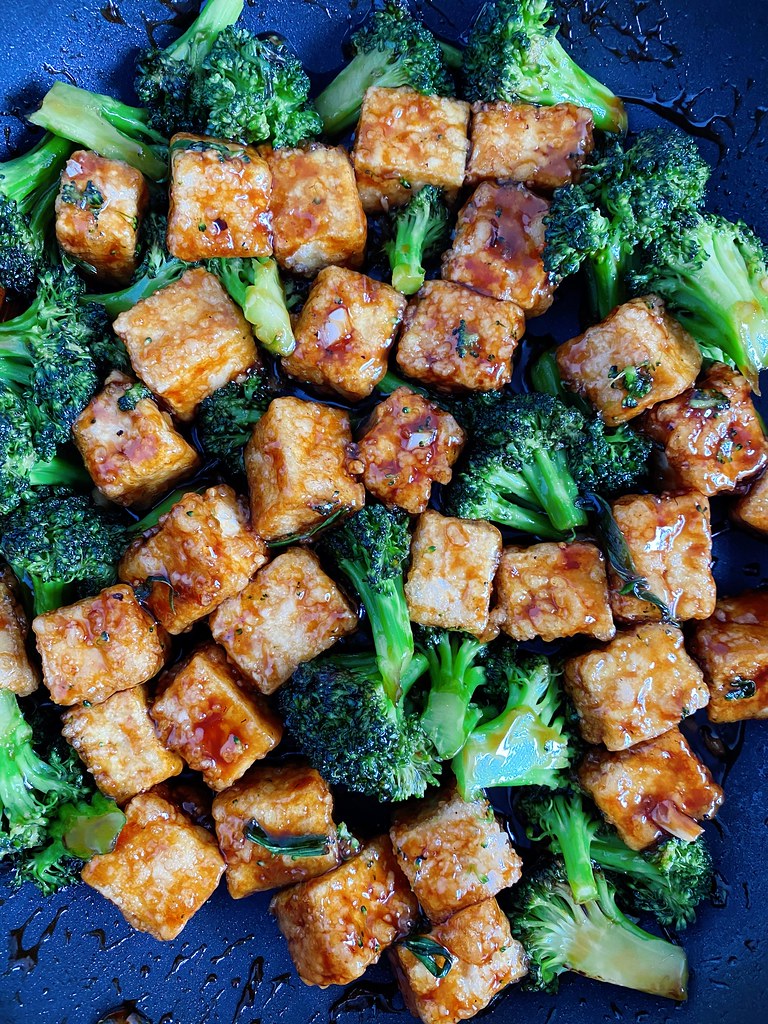
Drain and cut tofu into cubes (no need to press!). 

Heat oil in a large skillet and add 1 minced clove of garlic. Add broccoli florets, season with salt, and stir fry until bright green. Add ~1/3 cup water, cover, and steam until broccoli is tender. Remove from pan and wipe down the pan.

Cover bottom of skillet with 1/4" oil and heat over medium. Toss tofu cubes in sweet potato flour and fry in batches until all sides are golden brown. Remove to a paper towel-lined plate. While tofu is frying, stir together the sugar, cornstarch, soy sauce, Shaoxing wine, rice vinegar, chicken stock, and gochujang to taste.

Stir fry the remaining 2 minced cloves of garlic, ginger slices, and scallions in remaining oil. Add the sauce and cook until thickened. Add the fried tofu and broccoli back in and stir to coat. Serve with steamed rice.


Next:  No Knead Sourdough Focaccia
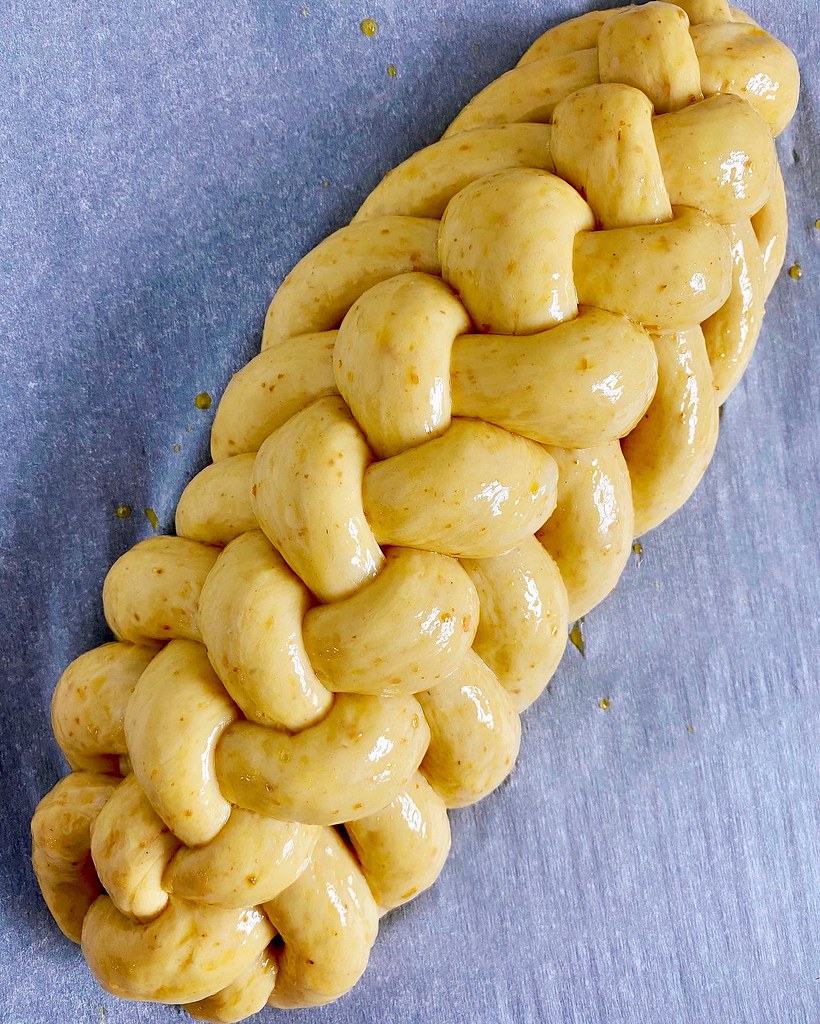
Previously:  My Sourdough Challah 

Sunday, September 13, 2020

My Sourdough Challah

I learned recently that there are at least 2 different kinds of challah:  the sweet, eggy Ashkenazi version which is probably what most people think of when they think of challah, and the Sephardic version, which is found in the Breaking Breads and Pastry Love cookbooks.  I've made both versions, but I like making the Sephardic version more because the dough is a lot easier for me to work with.


My go-to challah recipe is based off of the one from Pastry Love, except I substitute 50 g of my 100% hydration sourdough starter for 25 of flour, 25 g of water, and half the yeast.  The resulting bread doesn't have the full sourdough tang, but I find it easier to digest than the kind made with just commercial yeast.  If you have a very active starter, you might be able to get away with using less yeast or even forgoing it altogether, but I'm usually using starter that's been left to ferment on my counter overnight so it's not at its most active which is why I add some commercial yeast for insurance.


My Sourdough Challah
makes 1 loaf

50 g sourdough starter, 100% hydration
95 g warm water
4 g active or instant yeast
40 g sugar
2 large eggs (1 for the dough, 1 for the egg wash)
45 g vegetable oil
325 g all-purpose flour
7 g kosher salt

Mix the starter and water together in the bowl of a stand mixer.  Sprinkle on the yeast and allow to dissolve before adding the sugar, 1 egg, oil, and flour.  Knead using the dough hook on low for about 5 minutes until the dough comes together.  Cover and let rest for 10 minutes.  Sprinkle on the salt and knead on low for 8 more minutes.  Cover again and let rest for 90 minutes at warm room temperature.

Uncover the dough and punch down.  Fold over the 4 corners of the dough, recover and let rest another 90 minutes.  

While the dough is fermenting, make an egg wash by whisking together the 2nd egg, 1 scant tablespoon of water, and a pinch of salt.  Mix well but try not to make too many air bubbles.

Punch down the dough again and divide into even portions (the number will depend on how many strands you want; for reference, the first two pictures in this post are a 7-strand braid and the last two are an 8-strand braid).  Working one at a time, press each portion into a rough rectangle.  You want to try to remove any large air bubbles at this point because they will form weak points in your strand.  To form the strand, you will be rolling over the long side of the rectangle like a jelly roll.  To help maintain tension in the dough, use your fingertips to gently push the portion you just rolled over back into the dough all along the length of the dough.  (I highly suggest you watching my IGTV video which shows you how to form the strands since it's much easier to show you than explain how to do it.)  When you get to the bottom of the dough, pinch the seam together and roll the log out a couple of times on the work surface to create a taut surface and start shaping it into a long strand.  At this point you can also taper the ends if you want.  Set aside and work on the next strand.

Once you've shaped all the strands into logs, start with the first log you formed and roll it out into a longer snake.  Set aside and work on the next one.  Once you've roll them all out into longer snakes, give them one last roll to their final length.  Allowing the dough to rest in between the 3 shaping rounds lets the dough relax a little and not shrink back so much.  Braid and form the strands into your desired shape.  Transfer to a parchment paper lined baking sheet.  

Brush on a thin, even layer of the egg wash, trying not to let too much settle in between the strands.  Let rest for 90-120 minutes in a warm, draft-free area (I use my microwave).  Preheat the oven to 350℉.

When the dough is nice and puffy, turn it 180° from the position it was when you applied the egg wash and brush on another thin, even layer.  Turning the loaf helps ensure that you don't miss any of the surface.  Bake the loaf for 30-35 minutes, turning once halfway, until it is evenly browned.  Let completely cool before slicing.  Store in a paper bag for up to 3 days.

Previously:  Sourdough Belgian Waffles
Next: General Tso's Tofu

Saturday, August 1, 2020

Sourdough Belgian Waffles


Well this is my first post in almost a year, so you know these are worth making!  I've been trying to find a sourdough waffle recipe that I like as much as Smitten Kitchen's essential raised waffles, but none of the ones I tried really had the flavor or texture I was looking for.

Then two things happened:  my friend Arthur sold me his Belgian waffle maker, and I tried making a half batch of  The Kitchen McCabe's sourdough Belgian waffles, only I started the first part of the batter late at night and didn't realize until the following morning that I had only used like a tablespoon of my sourdough starter in the batter instead of a full cup.  But the waffles were AMAZING.  Light and lacy, crispy on the outside and custardy on the inside, with enough flavor that you could eat it without any syrup or butter.


I needed to make sure I could replicate the waffles again, so I asked for testers on my Instagram page, and thankfully quite a few people responded.  Out of ~50 testers, 80% loved the waffles whereas the rest were less impressed.  The chief complaint was that they never got crispy or lost their crispiness too soon.  When I tried the recipe again myself, I noticed the same thing, but I did find that reheating the waffles in my toaster oven made them much crispier.

Another comment was that they were too salty.  I realized that I had listed the kosher salt by volume instead of weight, and since I use Diamond Crystal kosher salt, another other kind of salt was going produce a must saltier waffle.  Lesson learned!

Since such a small amount of starter is used in the recipe, it doesn't seem to matter much what kind of starter you use, but for what it's worth, my starter I keep is 100% hydration and fed with half AP flour and half whole wheat flour.  I tested these waffles once with more sourdough starter and once with milk instead of water.  I couldn't really tell too much of a difference with the former but found the latter to be even softer than the ones with water and with no added flavor.

All in all, I'd say these are the perfect waffles for someone who doesn't particularly like the flavor of sourdough in their waffles, but has sourdough starter and no milk, haha.  Since such a small amount of starter is used in the batter and it's such a runny batter, the rise you get is more from the baking soda in the waffle iron than from the sourdough.  It seems to help if you have one of those Belgian waffle makers that you flip too, but people had success with regular waffle irons, too.  This recipe doubles quite easily too, if you have more mouths to feed.


Sourdough Belgian Waffles
makes about 3-4 Belgian waffles, depending on the size of your waffle iron

10-50 g sourdough starter (does not need to be active starter; discard is fine)
120 g (1/2 cup) room temperature water
90 g flour (I like to use 25 g whole wheat flour + 65 g all-purpose flour)
42 g (3 tablespoons) melted butter, slightly cooled
1 g (1/2 teaspoon) Diamond Crystal kosher salt
15 g (1 tablespoon) honey
1 large egg, lightly beaten
4 g (1 teaspoon) vanilla extract
1/4 teaspoon baking soda

The night before, mix together the sourdough starter, water, and flours.  Cover and let sit at room temperature overnight.

In the morning, add the melted butter, salt, honey, egg, and vanilla extract.  Start heating up your waffle iron.  When it is ready, stir the baking soda into the waffle batter and mix well.  Lightly grease the iron and add ~1/2 cup batter to the iron and cook until golden brown.  Serve immediately or freeze.


P.S  If you'd like a really simple recipe for blueberry syrup, you can find it in the caption of this Instagram post.

Previously:  Snowskin Cake Truffle Mooncakes