Friday, July 2, 2010

Slow Cooker Bolognese Sauce

P6123021

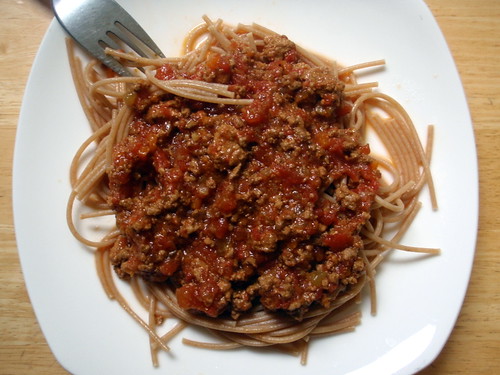
A few weeks ago I had eaten some pasta with bolognese sauce at Basta Pasta in Cambridge, and afterwards, I was totally craving more of the savory meat sauce. I remembered that The Kitchen had posted a recipe for making it using a slow cooker which sounded perfect, since I didn't really want to have to deal with hours in front of a hot stove during the summertime. Even so, you do need to spend some time sweating the vegetables, browning the meat, and reducing the liquids, but the end result is so totally worth it. The only changes I made to the original recipe is that instead of adding 1 cup of the reserved tomato juices, I reduced all the tomato juice from the 2 cans until there was only about 1 cup of liquid left and added that to the slow cooker. Also, I used a pound of ground beef and a pound of ground pork instead just ground beef.
Slow-Cooked Bolognese Sauce (from The Kitchn)
makes 6 cups
1 tablespoon olive oil
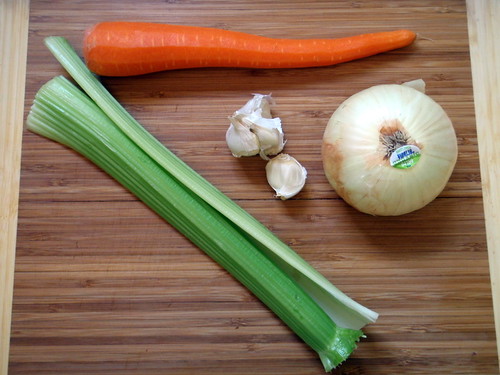
1 medium onion, finely chopped
2 celery stalks, finely chopped
1 medium carrot, finely chopped
3 cloves of garlic, minced
1 pound ground beef
1 pound ground pork
1/8 teaspoon nutmeg
1 teaspoon salt
1/2 teaspoon pepper
1 cup milk (whole or 2-percent)
1 cup white wine
2 28-ounce cans of whole peeled tomatoes, drained and finely chopped (juices reserved)
1 cup reserved tomato juices
Mirepoix ingredients plus garlic
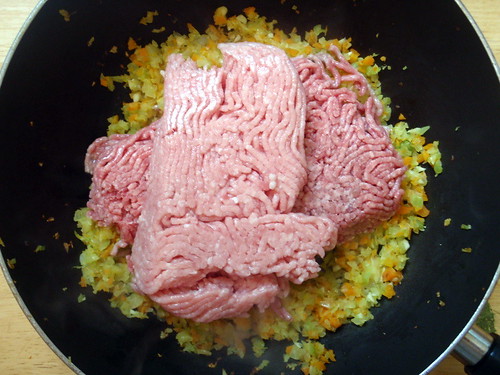
Heat the olive oil in a large saucepan over medium heat. Add the onion, celery, and carrot and cook until the onion is translucent and all the vegetables have softened. Add the garlic and cook until fragrant, about 30 seconds. Add the pork and beef, breaking it apart with your spoon and cooking until it is just browned. Season with nutmeg, salt, and pepper.
Add ground pork and beef
Stir in the milk and bring it to a rapid simmer. Continue simmering until the milk has reduced completely and very little liquid remains, about 10 minutes. Stir in the wine and simmer again until reduced completely, about 10 minutes. Transfer the beef mixture to the slow cooker.
In the same, now-empty pot, reduce the reserved tomato juices until you have about 1 cup left.
0 hours in slow cooker
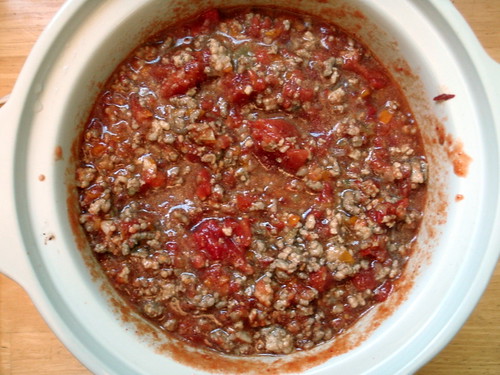
Add the chopped tomatoes and reduced tomato juices to the slow cooker. Stir to combine. Cover and cook on HIGH for 6 hours or LOW for 8 hours.
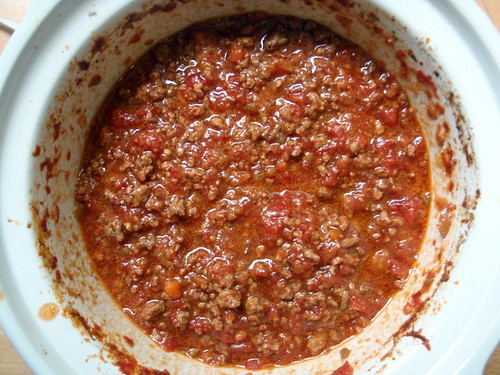
In the last half hour of cooking, remove the lid to allow any excess liquid to evaporate and reduce the sauce. The finished sauce should be chunky and creamy without being soupy.
P6123040
Serve over spaghetti with a hunk of crusty bread for mopping up the sauce!
P6123017

Thursday, July 1, 2010

Coconut Lime Sorbet

Every once in a while I'll scan Craigslist to see if anyone's selling an ice cream maker with its own compressor. They're usually several hundred dollars, so it's something that would be nice to have, but definitely not necessary, especially since I have such a reliable Cuisinart ICE-20. But a couple of weeks ago, I found one being sold for only $80. I was a little suspicious so I asked the seller why he was selling it, and he said that he was getting married, and his wife-to-be wanted him to get rid of stuff. Well, I was more than happy to help him out. It was a nice surprise when he included four ice cream sundae glasses, an ice cream scoop, and two ice cream recipe books with it as well!

The ice cream maker in question is a Lello 4070 Gelato Junior, and I love it! No more needing to pre-freeze the canister; I don't even need to chill the ice cream base before starting up the machine! The only thing I miss about my Cuisinart is that I can't really get any good pictures of the ice cream as it's churning....

One recipe I really wanted to try out in my new ice cream maker was this one for coconut lime sorbet. It's definitely one of my all-time favorite ice creams to make, and even won the ice cream thrown down I participated in a couple of years ago. But it doesn't always freeze well. There's definitely been a couple of times when the Cuisinart canister started melting before the sorbet was done churning. So I knew that it would be a good way to test how well the Lello ice cream maker worked.

coconut lime sorbet

Coconut Lime Sorbet (from epicurious)
makes about 1 pint

15-ounce can cream of coconut (preferably Coco Lopez)
3/4 cup water
1/2 cup fresh lime juice

In a bowl whisk together ingredients. Freeze mixture in an ice-cream maker. Transfer sorbet to an airtight container and put in freezer to harden.

coconut lime sorbet

I love the fact that there are only three ingredients for this sorbet; two, if you don't count the water. Also, you don't need to heat or chill the base before freezing. In fact, you shouldn't chill the base because then the coconut fat would solidify out of the mixture. What I think is kind of interesting is that it does harden when you're churning it, but since it's dissipated throughout the sorbet, it almost forms chips of coconut fat, adding a little bit of texture. I think it's almost a misnomer to label this treat a sorbet because, even though it doesn't contain any dairy, it's so super rich! The sweetness from the cream of coconut and the tartness from the fresh lime juice is also really intense.

I've used bottled lime juice before in a pinch when I didn't have any fresh limes, and it tasted just as good. I would definitely NOT substitute coconut milk for the cream of coconut, though. Cream of coconut is a lot sweeter and fattier than coconut milk; if you use coconut milk instead it just won't have the right amount of sweetness or texture. Trust me on this one. One last thing, just as this sorbet doesn't freeze well, it also melts rather quickly, so make sure you take it out only right before you want to serve it.

coconut lime sorbet

Monday, June 28, 2010

Bruschetta

I went to Trader Joe's Friday night intending to just pick up some sugar and something for dinner when I got stopped by the gorgeous display of basil plants outside on sale. I'd had a couple of basil plants before, but because I travel so much and they need regular watering, I'd never managed to keep them alive for long. But these were so cheap, I justified getting another one by reasoning that it would have cost just as much to get a package of fresh basil leaves, and these could have the chance of being sustainable.

Having your own basil plant not only means needing to water it regularly (by the way, how often is "regularly" anways?) but also needing to cook a lot more with basil since the plant is so prolific! I was going to the beach on Saturday, so I decided I'd make a bruschetta topping and pack some marinated mozzarella balls and bagel chips (both also from TJ's) for lunch. I used the grape tomatoes and garlic I got in my Boston Organics delivery and just added 4 other ingredients: olive oil, balsamic vinegar, salt, and pepper. I liked using the grape tomatoes because they have a lot of flavor, are a little sweeter, and are almost never mealy like salad tomatoes can get.

P6263117

Bruschetta
makes about 4 servings

1 pint grape tomatoes
Handful of fresh basil leaves
1 large garlic clove
3 tablespoons olive oil
1 1/2 tablespoons balsamic vinegar (I used white)
Salt and pepper

P6263120

Chop up the grape tomatoes using a serrated knife. Depending on the size of the tomato, I cut them into 4, 6, or 8 pieces each. Chop up the basil and throw it in with the tomatoes.

P6263121

Crush the garlic clove using a garlic press (or mince it by hand) and add to the tomatoes as well.

P6263122

Drizzle with the olive oil and vinegar. Mix well and salt and pepper to taste. Let sit for a bit to macerate. Serve with slices of toasted French bread or bagel chips.

P6263124

These pictures are of the bruschetta right after it's been mixed together. It gets a lot more liquidy and wilted but starts to taste better and better as the flavors mix. Unfortunately, I didn't get any pictures of the bruschetta once it got to that point because I had gone to get a popsicle, and when I came back, the bruschetta was all gone. I think Jenny was even trying to lick the plastic container clean.

P6263131

Wednesday, June 23, 2010

Bacon Caramel Maple Ice Cream

Bacon Caramels

I wasn't planning on doing another post on bacon and caramel after posting about bacon fat caramels and bacon caramel corn. But then I met the girl behind 3am Confections, Erika, and she started telling me about the bacon caramels that she makes, and I just knew I had to have some. These actually aren't on her website, but she made me a batch anyways and even hand-delivered them to me! Like the caramels I made, they're topped with Maldon salt and diced bacon. Unlike mine, they're butter based instead of made with bacon fat, which means they're not as soft at room temperature. Another huge difference is that she fries the bacon with a secret ingredient that gives the bacon a subtle kick.

Bacon Caramels

After eating four of these in a row (because I couldn't stop myself), I decided to assert some self control because I wanted to immortalize these in an ice cream. At first I was thinking of just dicing them up and adding them to a sweet cream base so as to really highlight the caramels themselves. But then I came up with the idea of adding them to a maple ice cream since I do so love dipping my bacon slices in maple syrup. I based the maple ice cream on the maple walnut ice cream recipe from Ben & Jerry's Homemade Ice Cream & Dessert Book.

Bacon Caramel Maple Ice Cream

Bacon Caramel Maple Ice Cream
makes about 1 pint

1 large egg
4 tablespoons sugar
1/2 cup milk
1 cup heavy cream
4 tablespoons maple syrup, grade B
1/2 cup 3am Confections bacon caramels, diced (about 8 caramels)

Whisk egg until light and frothy. Add sugar, a little at a time and whisk to dissolve. Add heavy cream, milk, and maple syrup. Cover and chill.

Freeze mixture in ice cream maker until almost firm, then fold in caramels. Transfer ice cream to an airtight container and put in freezer to harden.

Bacon Caramel Maple Ice Cream

I found the maple flavoring to be really subtle; if I had some, I probably would add some maple extract to the ice cream base to bring out the maple flavor even more. The recipe in the Ben & Jerry's book suggests using a grade C maple syrup which would probably help as well.

The caramels get pretty hard, but not to the point where it will crack your teeth or anything. If it's something you're wary of, though, I'd suggest dicing the caramels finely so that you don't get a big hard gob in your mouth.

Bacon Caramel Maple Ice Cream

Amnesty Bread

P6153051

After a post about World Peace Cookies, it only seems appropriate to follow up with a post on Amnesty Bread. The idea for the name came from David Lebovitz's Amnesty Cookies, which are really Compost Cookies. But the theory is that you declare a day of amnesty for your fridge and pantry and just throw everything you want to get rid of into this bread. I had a zucchini, a pear, and two bananas from my Boston Organics delivery that needed to be used up plus some leftover dried cranberries and walnuts. If I had had carrots I would've grated those up and thrown them in here, too. Raisins, chocolate chips, white chocolate chips, and other types of nuts would certainly have worked just as well in here. If you make any substitutions, I'd recommend trying to keep it a total of 2 cups of grated veggies or fruits and 1 cup total of dried fruits, nuts, or chocolate.

P6143044

Amnesty Bread
makes 2 loaves or 24 muffins

3 eggs
3/4 cup vegetable oil
2/3 cup packed brown sugar
1/2 cup white sugar
1 zucchini, grated
1 pear, peeled, cored, and grated
2 bananas, mashed
2 teaspoons vanilla extract
3 cups all-purpose flour, divided
1 tablespoon ground cinnamon
1 1/2 teaspoons baking powder
1 teaspoon baking soda
1 teaspoon salt
1/2 cup dried cranberries
1/2 cup chopped walnuts

Preheat oven to 325°F. Grease and flour two 8"x4" bread loaf pans, a 10" tube pan, or line 24 muffin tins.

In a large bowl, beat eggs until light yellow and frothy. Add oil, brown sugar, white sugar, grated zucchini, pear, bananas, and vanilla; blend together until well combined. Stir in 2 3/4 cups of the flour, cinnamon, baking powder, baking soda, and salt.

Toss the remaining 1/4 cup flour with the cranberries and nuts and mix in with the rest of the batter. Divide the batter evenly between the two prepared loaf pans or muffin tins.

Bake in the preheated oven until a toothpick inserted in the center comes out clean, about 50 minutes for the loaf pans and tube pan and 35 minutes for the muffins.
P6153063-1

It's not the prettiest of breads or muffins, but it certainly does its job, which is to use up all those ingredients in a yummy way. It's quite moist, thanks to all the zucchini and fruits, but also a sturdy enough bread that you could slice and toast it and serve it with some butter.

Monday, June 21, 2010

World Peace Cookies

P6123034

The story behind these cookies is that Dorie Greenspan's neighbor had told her that the cookies were so good that, "in our house, we call them World Peace Cookies, because we're convinced that a daily dose of the cookies is all that's needed to ensure planetary peace and happiness." I've been meaning to make these cookies for quite a while, but it wasn't until the Boston Dragon Boat Festival dock staff kept bugging me for some homemade cookies that I finally decided to make them to appease the two Petes.

These are basically chocolate shortbreads, or sables, with chocolate chunks and a dash of salt. I made a whole batch, meaning to bring them to a party, but they were so good I decided to keep most of them for myself. They're perfect eating with a glass of cold milk, and if I had had any vanilla ice cream on hand, I would have totally made ice cream sandwiches with them.

World Peace Cookies (from Dorie Greenspan's Baking: From My Home to Yours)
makes about 36 cookies

1 1/4 cups all-purpose flour
1/3 cup unsweetened cocoa powder
1/2 teaspoon baking soda
1 stick plus 3 tablespoons (11 tablespoons) unsalted butter, at room temperature
2/3 cup (packed) light brown sugar
1/4 cup sugar
1/2 teaspoon fleur de sel or 1/4 teaspoon fine sea salt
1 teaspoon pure vanilla extract
5 ounces bittersweet chocolate, chopped into chips, or a generous 3/4 cup store-bought mini chocolate chips

Sifting flour, cocoa, and baking soda
Sift the flour, cocoa and baking soda together.
Cocoa turds
Working with a stand mixer, preferably fitted with a paddle attachment, or with a hand mixer in a large bowl, beat the butter on medium speed until soft and creamy. Add both sugars, the salt and vanilla extract and beat for 2 minutes more.
Chopping up the chocolate
Turn off the mixer. Pour in the dry ingredients, drape a kitchen towel over the stand mixer to protect yourself and your kitchen from flying flour and pulse the mixer at low speed about 5 times, a second or two each time. Take a peek — if there is still a lot of flour on the surface of the dough, pulse a couple of times more; if not, remove the towel. Continuing at low speed, mix for about 30 seconds more, just until the flour disappears into the dough — for the best texture, work the dough as little as possible once the flour is added, and don't be concerned if the dough looks a little crumbly. Toss in the chocolate pieces and mix only to incorporate.
Cooking dough log
Turn the dough out onto a work surface, gather it together and divide it in half. Working with one half at a time, shape the dough into logs that are 1 1/2 inches in diameter. Wrap the logs in plastic wrap and refrigerate them for at least 3 hours. (The dough can be refrigerated for up to 3 days or frozen for up to 2 months. If you've frozen the dough, you needn't defrost it before baking — just slice the logs into cookies and bake the cookies 1 minute longer.)
Center a rack in the oven and preheat the oven to 325°F. Line two baking sheets with parchment or silicone mats.
Using a sharp thin knife, slice the logs into rounds that are 1/2 inch thick. (The rounds are likely to crack as you're cutting them — don't be concerned, just squeeze the bits back onto each cookie.) Arrange the rounds on the baking sheets, leaving about 1 inch between them.
Bake the cookies one sheet at a time for 12 minutes — they won't look done, nor will they be firm, but that's just the way they should be. Transfer the baking sheet to a cooling rack and let the cookies rest until they are only just warm, at which point you can serve them or let them reach room temperature.
P6123029

Tuesday, June 15, 2010

Elote (Mexican Grilled Corn)

P5312955

I tried elote for the first time a while ago at La Verdad, but I wasn't totally blown away. Then I tried it at Toro a couple of weeks ago, and wow, I couldn't get enough of it! (As an aside, I had always assumed that Toro was a Japanese sushi place because to me, toro = fatty bluefin tuna belly. So I was a little surprised to find out it was actually a tapas restaurant, where toro = Spanish for bull.)

P5312960

A couple days later I was going to a bbq, so I decided to look up how to make it myself. What I came up with is an amalgam of what I found and a few adjustments to make the corn more similar to how I remember they made it at Toro. I chose to pre-cook the corn before grilling it so that I could ensure that the corn was cooked all the way through and also so that I wouldn't be hogging up time and space on the grill. I also added some raw garlic and the spices to the mayonnaise since I remember there was a garlicky taste in their sauce, which was pink. I found the cotija cheese, a mild, aged cheese, at Whole Foods, but if you can't find it, you can substitute either grated Parmesan or crumbled feta cheese.

Elote (Mexican Grilled Corn)
makes 12 servings

12 ears of corn
1 cup mayonnaise
2 garlic cloves
4 limes
Cayenne pepper
Chili powder
Paprika
1 cup crumbled cotija cheese

Preheat oven to 350 °F. Place corn in husks directly on the middle rack of the oven for 30 minutes, or until corn is soft to the touch. After it has cooled, remove the silk and husks. If you like, you can break the ears in half.

P5312947

Run the garlic cloves through a garlic press (or mince well) and add to the mayonnaise. Add the juice from half of a lime and quarter the rest of the limes. Mix in cayenne pepper, chili powder, and paprika to taste.

P5312952

Grill the corn on a hot grill until lightly charred. Top with the mayonnaise sauce and crumbled cotija cheese. Sprinkle on more cayenne pepper and/or chili powder as desired, and serve with lime wedges.

P5312957

Monday, June 14, 2010

Homemade Dulce de Leche and Dulce de Leche Ice Cream

Hola! Did you miss me? Sorry for the unexpected break, but the last month has been full of exciting happenings including bumping into the cast of Glee on a flight from Chicago to New York, racing in the Boston Dragon Boat Festival with The Boat for Kids Who Don't Paddle Good, and a vacation to Argentina and Brazil.

P5302932

It was down in Buenos Aires that I fell in love with dulce de leche. I used my Marriott points to stay at the Marriott Plaza Hotel, and because I'm a Gold Elite member, we got to eat breakfast in the Concierge Lounge each morning. And each morning they put out little jars of dulce de leche to spread on the pastries. It was so good, I ended up putting some in my coffee, too! I just knew I had to try to make some at home, and luckily, there is a rather easy (and safe*) method. Basically all you do is put a can (or two or three) of sweetened condensed milk in a crock pot, fill it with water, turn it on low, and let it cook for 8 hours. That's it! Obviously, you'll want to wait for the cans to come back down to room temperature before attempting to open them, or else you'll risk having hot dulce de leche squirting out of the can.

P5302931

I'll admit that it doesn't taste quite as good as the real thing, but for how easy it was to make, it's pretty darn close. Now my only problem was what to do with the dulce de leche. See, while it was great spreading it all over pastries and stirring into my coffee, I don't really have pastries just sitting around at home, nor do I usually make coffee at home. So I figured I'd look for a recipe to make dulce de leche ice cream. I came across this one on Epicurious with the following description: "This is not just the best dulce de leche ice cream we've ever had, it's one of the best ice creams we've ever had, period." With a testimonial like that, how could I not try to make it?

Dulce de Leche Ice Cream with Toasted Pecans (from Epicurious)
makes about 1.5 quarts

2 cups whole milk
1 cup heavy cream
1 pound dulce de leche (this ended up being a little more than 1 can of homemade dulce de leche)
1/8 teaspoon pure vanilla extract
3/4 cup chopped pecans (2 1/2 to 3 oz), toasted

Bring milk and cream just to a boil in a 3-quart heavy saucepan over moderate heat, then remove from heat and whisk in dulce de leche until dissolved. Whisk in vanilla and transfer to a metal bowl. Quick-chill by putting bowl in a larger bowl of ice and cold water and stirring occasionally until cold, 15 to 20 minutes.

P5312934

Freeze mixture in ice cream maker until almost firm, then fold in pecans.

P5312939

Transfer ice cream to an airtight container and put in freezer to harden, at least 1 hour.

P5312946

To be honest, I still think the passion fruit ice cream was the best ice cream I ever made. But this one is definitely high up on the list. The addition of the toasted pecans almost made it taste like butter pecan ice cream, but with a richer, caramelized flavor. Probably the hardest part of making this was making sure the pecans didn't burn when toasting them. I almost always end up throwing out the first batch because I forget about them and soon I'm left with blackened, useless pecans. So make sure you keep a careful eye on the pecans! The added flavor from toasting them is so worth the extra effort.

*Safe because the alternative way to make this is to add a can of sweetened condensed milk to boiling water and boiling it for several hours, which could possibly lead to exploding cans. One of my friends from Taiwan used to call this, "Danger Pudding" for that reason.

Tuesday, May 4, 2010

Passion Fruit Ice Cream

P4302890

I still had a lot of passion fruit pulp left over from making the lilikoi malasadas so I thought I'd try to make some passion fruit ice cream. This recipe uses whole eggs just like my favorite strawberry ice cream recipe. I noticed that when cooking the custard, it doesn't get as thick as the yolk-only custards before it threatens to curdle. So make sure you don't look for it to coat the back of your spoon and take it off the heat as soon as it reaches 170°F.

Because I only had one cup of heavy cream, I divided all the ingredients by a third except for the passion fruit. Quite a few of the comments for the recipe mentioned adding more pulp so I added more proportionally.

Passion Fruit Ice Cream (adapted from the recipe on epicurious)
makes about a pint

1/2 cup sugar
1 large egg
1 cup heavy cream
1/2 cup passion fruit pulp

Whisk together sugar and egg. Heat cream in a small heavy saucepan over moderate heat until it just reaches a boil, then add hot cream to egg mixture in a slow stream, whisking. Pour custard into saucepan.

Cook custard over moderately low heat, stirring constantly, until it registers 170°F on an instant-read or candy thermometer (do not let boil). Pour custard through a fine sieve into a clean bowl and cool completely. Stir in passion fruit pulp, then chill, covered, until cold. 

P4262885

Freeze custard in ice cream maker. Transfer to an airtight container and put in freezer to harden.

Can I just say, I really, really love this ice cream. It's light and tart and sweet and tropical sunshine on a spoon. It's so super delicious I only need a couple of spoonfuls to be happy. Just knowing that I have some sitting in my freezer waiting for me makes me happy. You should definitely make this ice cream so you can be happy, too. =)

P4302889

Thursday, April 29, 2010

Compost Cookies

P4242817

When my friend, Stephen, turned 30, I asked him what he'd like me to make for his birthday party, and he replied, "I am a fan of all types of cookies." Which was great, because I've been wanting to make Momofuku Milk Bar's Compost Cookies for a long time now, but I kind of needed the right occasion to make them because there was no way I was going to be able to eat them all by myself. And these cookies deserve an audience.

Sure, the name might cause people to pause, but I'm guessing the reason behind it is that you throw a little bit of everything into these cookies: potato chips, pretzels, chocolate chips, etc. If you're a fan of the sweet and salty, you'll love these cookies. I ended up making a batch of the 6 oz. cookies and a batch of cookies where I portioned out the dough into 1" balls, which ended up giving me about 50 "normal" sized cookies. And to save time, I alternated between using a parchment lined stoneware baking sheet and a silpat lined metal baking sheet, both of which worked well in protecting the cookies from getting burnt.

P4242829

Compost Cookies (from here)
makes 15 big cookies or 50 smaller cookies

1 cup unsalted butter
1 cup sugar
3/4 cup light brown sugar
1 tablespoon corn syrup
1 teaspoon vanilla extract
2 large eggs
1 3/4 cups AP flour
2 teaspoons baking powder
1 teaspoon baking soda
2 teaspoons kosher salt
1 1/2 cups your favorite baking ingredients! (I used semi-sweet chocolate chips and Heath toffee bits)
1 1/2 cups your favorite snack foods (I used Wavy potato chips and peanut butter pretzel sandwiches)

P4242803

In a stand mixer with the paddle attachment, cream butter, sugars and corn syrup on medium high for 2-3 minutes until fluffy and pale yellow in color. Scrape down the sides of the mixing bowl with a spatula.

On a lower speed, add eggs and vanilla to incorporate. Increase mixing speed to medium-high and start a timer for 10 minutes. During this time the sugar granules will fully dissolve, the mixture will become an almost pale white color and your creamed mixture will double in size.

P4242804

When time is up, add the flour, baking powder, baking soda, and salt. Mix by hand just until your dough comes together and all remnants of dry ingredients have incorporated. Scrape down the sides of the mixing bowl with a spatula.

P4242805

Add in the hodgepodge of your favorite baking ingredients and mix until they are evenly incorporated into the dough. Add in your favorite snack foods last, until they are just incorporated.

P4242807

Portion cookie dough into 6 oz. mounds onto a plate. Wrap portioned cookie dough tightly with plastic wrap and refrigerate for a minimum of 1 hour or up to 1 week.

DO NOT BAKE your cookies from room temperature or they will not hold their shape.

Preheat the conventional oven to 400°F.

P4242827

When the oven reads 400°F and your cookie dough has been chilled at least an hour, roll the cookie dough mounds into balls and arrange on a parchment or silpat-lined sheet pan a minimum of 4" apart in any direction.

Bake 9-11 minutes. While in the oven, the cookies will puff, crackle and spread.

P4242834

At 9 minutes the cookies should be browned on the edges and just beginning to brown towards the center. Leave the cookies in the oven for the additional minutes if these colors don't match up and your cookies stills seem pale and doughy on the surface.

Cool the cookies completely on the sheet pan before transferring to a plate or an airtight container or tin for storage. At room temperature, cookies will keep fresh 5 days. In the freezer, cookies will keep fresh 1 month.

P4242818