Monday, March 30, 2015

Chocolate Mochi Snack Cake

https://www.flickr.com/photos/joyosity/16306102183/

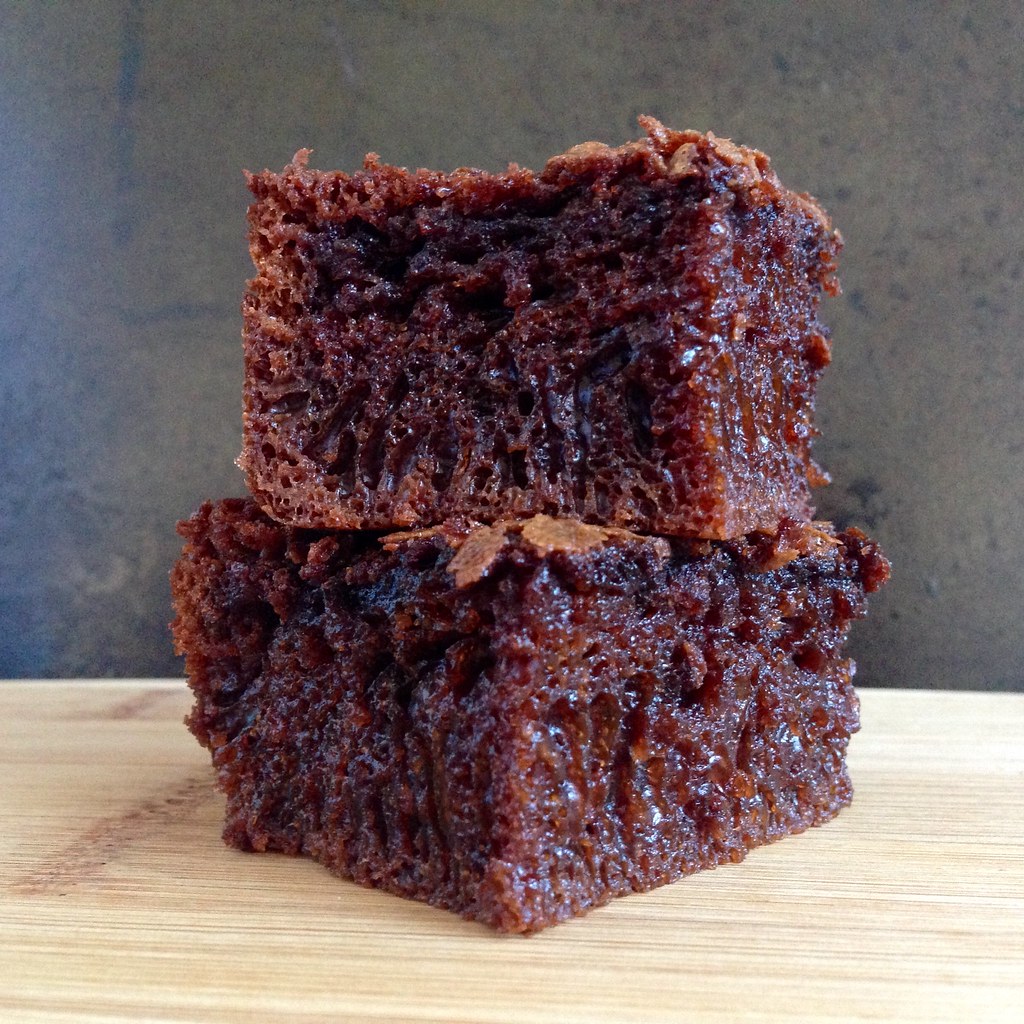
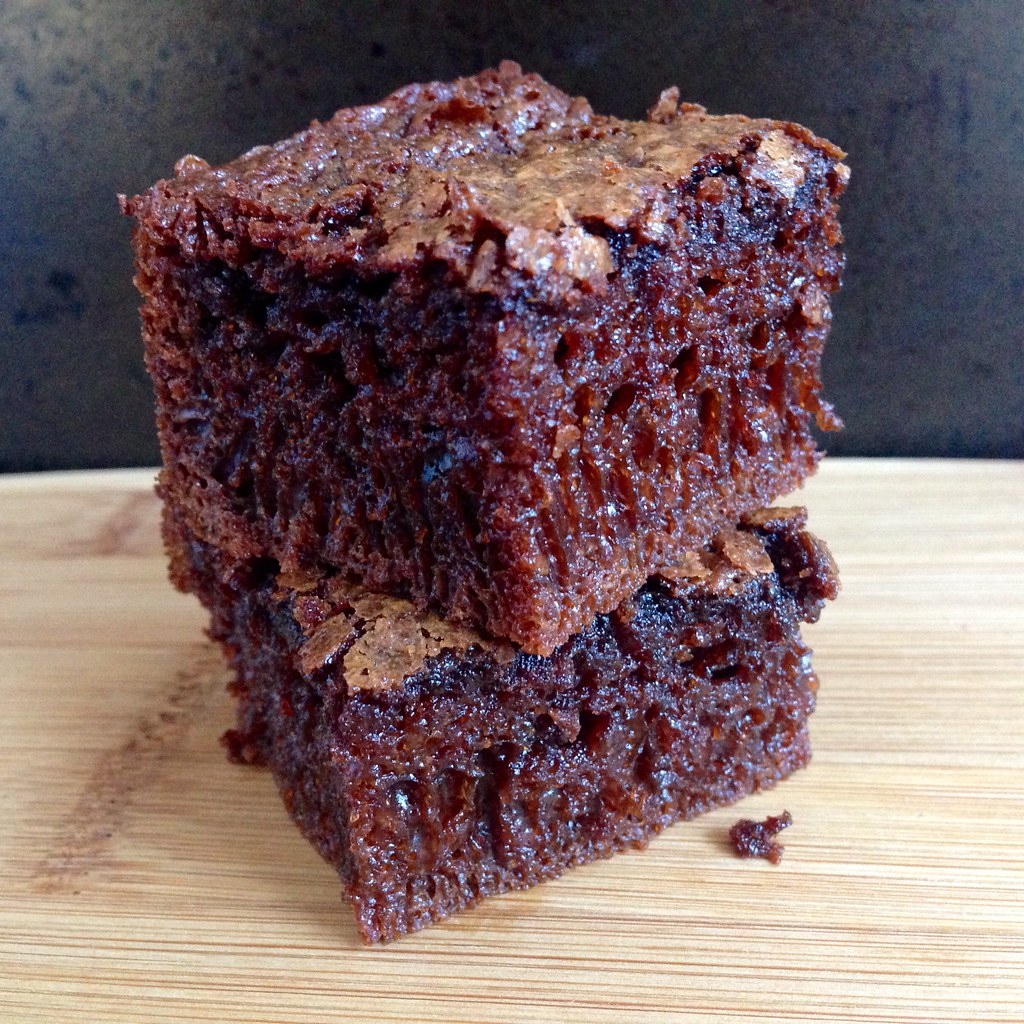
Bouncy.  Chewy  Springy.  Squishy.  These are probably not words you usually associate with a chocolate cake, and yet this Chocolate Mochi Snack Cake is all of those things.  Just looking at this cake you'd think it would be dense and crazy sweet like a brownie, but it's actually rather light and just sweet enough that you keep wanting another bite.  It reminds me of a steamed cake, like the kind you get at dim sum.

https://www.flickr.com/photos/joyosity/16738691150/

I found the recipe on Food52 and modified the directions a bit by melting the butter and chocolate right in the metal bowl of a stand mixer over a pot of simmering water.  This way you don't have to worry about possibly burning the chocolate and it's one less transfer to worry about.  If you don't have a stand mixer, you can melt the butter and chocolate in a metal bowl set over a pot of simmering water and proceed with an electric beater.  I also mixed the eggs with the evaporated milk and vanilla extract before adding to the melted butter/chocolate mixture to help prevent the eggs from cooking and curdling. 

Since this cake is made with rice flour, it is totally gluten free!  I'm not sure how you could make this without the eggs to make it vegan, but I bet you could substitute coconut milk and coconut oil for the evaporated milk and butter to make it dairy free.  Update:  I tried making the dairy free version, and it was awful. 

https://www.flickr.com/photos/joyosity/16738691000/

Chocolate Mochi Snack Cake (adapted from Food52)
makes one 9" x 13" cake

2 cups glutinous rice flour
2 scant cups sugar
1 tablespoon baking soda
1/2 cup (1 stick) unsalted butter, cut into pieces
1 cup semisweet chocolate chips
24 oz. evaporated milk
2 teaspoons vanilla extract
2 eggs, beaten

Preheat the oven to 350°F and grease a 9" x 13" baking pan.
   
Whisk together the flour, sugar, and baking soda in a large bowl.  Whisk together the evaporated milk, vanilla extract, and eggs in another bowl.  Set aside.

Melt the butter and the chocolate chips together the metal bowl of a stand mixer set over a pot of simmering water, stirring frequently until you have a smooth mixture. 
   
Remove the bowl from the pot and set it back in the stand mixer with the paddle attachment.  With the mixer running on low, add the evaporated milk, vanilla, and eggs mixture and mix until incorporated.
   
Add the dry ingredients and mix on low until the batter is smooth and lump free. Pour into the prepared pan and bake for 45 to 55 minutes, until the cake no longer jiggles. Remove from oven and let cool before serving.
   
This cake should be stored at room temperature rather than refrigerated.

https://www.flickr.com/photos/joyosity/16738468798/

Next:  Gordon Ramsay's Sublime Scrambled Eggs
Previously:  Homemade Squid Ink Pasta
Five Years Ago:  Duck Fat French Fried with Rosemary, Maldon Salt, and Truffle Oil, Apple Tarte Tatin
Six Years Ago:  Cincinnati Chili, Hong Kong Style Pan-Fried Noodles

Monday, March 23, 2015

Homemade Squid Ink Pasta

https://www.flickr.com/photos/joyosity/16898807432/

I've been wanting to make my own squid ink pasta ever since I first had it in Venice, so I was pretty excited when I finally found some squid ink at DiLaurenti on my last trip to Seattle.  It came in these little pricey packets, but a little goes a long way.

https://www.flickr.com/photos/joyosity/16887462805/

I pretty much followed my recipe for a better homemade pasta, but I substituted squid ink for one of the egg yolks.  Because this recipe produces a drier dough, you don't have to dust the pasta with any additional flour to keep it from sticking, and it also lets the color of the squid ink pasta shine through.

https://www.flickr.com/photos/joyosity/16700059530/

I found that I could really smell and taste the brininess of the squid ink compared to the dried squid ink pasta I had bought from Venice.  I ended up using this pasta to make the First Night in Florence Spaghetti, and it just made that already fantastic dish even better.

https://www.flickr.com/photos/joyosity/16699830358/

Homemade Squid Ink Pasta
makes 2 servings

1 cup all-purpose flour
1 large egg
2 large egg yolks
8 grams (about 1 1/2 teaspoons) squid ink

On a large, rimmed baking sheet, make a pile with the flour and dig a well in the middle.  Crack the egg into the well and add the egg yolks and squid ink.

Using a fork, start stirring the liquids and slowly incorporating more and more of the flour into the well until you have a nice, thick paste.  Combine with the rest of the flour and start kneading with your hands.  If the dough is too dry, wet your hands as many times as you need just for it to all come together.

Continue kneading by hand or in a stand mixer (with the dough hook attachment) until you have a smooth, uniform dough.  Cover tightly with plastic wrap and let rest for at least 20 minutes.  At this point you can refrigerate the dough, well wrapped, overnight and bring it back to room temperature the next day before continuing.

Cut the dough in half.  Run one half through the pasta machine set at its widest setting.  Fold the dough in thirds and run through the machine again, repeating 3 times.  Then, run the dough halfway through and pinch the ends together so it forms a loop.  Adjust the setting to one notch thinner and roll through, continuing to adjust the setting one notch thinner each time the loop has gone all the way around.  When the dough looks almost transparent, stop and cut the dough out of the machine and then in half.  Repeat the whole process with the other half of the dough.

If your dough is feeling tacky at this point, let it dry a bit on some tea towels.  Otherwise, you can go ahead and fold the dough in half three times so you have a manageable width to cut.  Using a sharp knife, cut the noodles into the width you desire.  Shake out the noodles and let them dry some more on the tea towel.

Bring a pot of salted water to a rolling boil.  Add the pasta and stir occasionally so that the noodles don't stick to each other.  The pasta is done when they float to the surface.  Remove from the water immediately to preserve its perfect al dente texture.  Toss with the sauce of your choice.

https://www.flickr.com/photos/joyosity/16680119357/

Next:  Chocolate Mochi Snack Cake
Previously:  Cacio e Pepe for One
Last Year:  Dan Bing (Taiwanese Egg Crepe)
Five Years Ago:  Mama Huang's Secret Beer Duck Recipe
Six Years Ago:  Carrot Cake Cupcakes with Cream Cheese Frosting

Monday, March 16, 2015

Cacio e Pepe for One

https://www.flickr.com/photos/joyosity/16708089082/

I love macaroni and cheese, but sometimes I just want to make enough for one serving.  Or I don't have any milk in the refrigerator.  Or I'm starving and and need something that only takes a few minutes to make.  Luckily, this recipe for cacio e pepe meets all those requirements!

Italian for "cheese and pepper", this dish comes together in a flash and uses ingredients you probably already have in your pantry and refrigerator.  Pecorino Romano is the traditional cheese used for cacio e pepe, but in a pinch, you could also use parmesan or another hard, grated cheese.

https://www.flickr.com/photos/joyosity/16523023239/

The first time I made this, I used the fresh pasta I had made in the previous post, but I've also since made this with regular dried spaghetti.  Obviously, the fresh pasta was better, but the version made with the dried pasta was still pretty decent, and much better than anything that comes out of a blue and orange box.  I like mine slightly gooey and with less pepper, but if you like it creamier, you can add more pasta water, and feel free to use as much pepper as you like!

https://www.flickr.com/photos/joyosity/16523023239/

Cacio e Pepe for One
serves one (duh) but can be easily doubled

Kosher salt
1 serving of uncooked pasta, dried or fresh
1 tablespoon unsalted butter or olive oil
Freshly ground black pepper, to taste
50 g (about 3/4 cup) freshly grated Pecorino Romano

Bring a pot of salted water to boil.

Add the butter and pepper to a skillet large enough to hold all the pasta.  If using fresh pasta, turn the heat on once you add the pasta to the boiling water.  If using dried pasta, wait until there is 1 minute left before the pasta is done to turn on the heat.  Toast the pepper over medium-low heat.

When the pasta is done, transfer it to the skillet using tongs or a pasta scooper.  Toss with the butter and pepper, then start adding the grated cheese, alternating with some of the pasta water.  Continue tossing until the cheese has melted and coated all the pasta.  Season to taste with additional pepper and salt.

https://www.flickr.com/photos/joyosity/16523022149/

Next:  Homemade Squid Ink Pasta
Previously:  A Better Homemade Pasta
Last Year:  Miso-Glazed Eggplant
Two Years Ago:  Happiness Cake
Five Years Ago:  Momofuku's Crack Pie
Six Years Ago:  Korean Pancake Face Off

Tuesday, March 3, 2015

A Better Homemade Pasta Recipe

https://www.flickr.com/photos/joyosity/16670047286/

I had three egg yolks left over from making the matcha financiers, so it was perfect timing that I came across this recipe which needed 3 egg yolks (plus 1 whole egg) for making homemade pasta.  I've posted about making pasta before, but even then I commented on how it didn't look like the homemade pasta I had eaten in Italy.  I had hopes that using more egg yolks would make a difference, giving me something closer in looks and taste.

https://www.flickr.com/photos/joyosity/16509852739/

I'm going to share two tips I use when making pasta:  one I came up with on my own, and one I learned from Lady and Pups.  First, instead of making the dough straight on your counter- or tabletop, make it in a rimmed baking sheet.  That way if the eggs accidentally spill over your flour well (like mine did), it won't run all over the place.

https://www.flickr.com/photos/joyosity/16508591810/

Second, I love this genius tip from Lady and Pups:  seal the ends of your dough together once you're ready to roll your pasta thinner in a pasta machine so that you don't have to refeed the dough in every time you change the setting.  It makes the dough so much easier to work with, especially once the dough gets super thin and long!

https://www.flickr.com/photos/joyosity/16695980185/

This dough is pretty dry, so you might want to wet your hands while kneading it just until everything comes together.  Then you can take the easy way out and throw it into your stand mixer (with the dough hook attachment) to continue kneading, if you have one.  If not, keep kneading until it's nice and glossy; it will take a while, but you'll get there eventually.

https://www.flickr.com/photos/joyosity/16694677671/

After you've rolled out the dough so that it's so thin it's almost transparent, you can cut it into any width you want:  super wide for pappardelle, wide for fettuccine, thin for tagliatelle, or super thin for bavettine.  This pasta is so good you'll just want to toss it with a really simple sauce so you can really appreciate the noodles.  Here I've made it aglio e olio, with just some garlic and olive oil, and a pinch of salt and red pepper flakes.  Buon appetito!

https://www.flickr.com/photos/joyosity/16508595100/

A Better Homemade Pasta Recipe (adapted from Food52)
makes 2 servings

1 cup all-purpose flour
1 large egg
3 large egg yolks
A pinch of salt

On a large, rimmed baking sheet, make a pile with the flour and dig a well in the middle.  Crack the egg into the well and add the egg yolks and salt.

Using a fork, start stirring the eggs and slowly incorporating more and more of the flour into the well until you have a nice, thick paste.  Combine with the rest of the flour and start kneading with your hands.  If the dough is too dry, wet your hands as many times as you need just for it to all come together.

Continue kneading by hand or in a stand mixer (with the dough hook attachment) until you have a smooth, uniform dough.  Cover tightly with plastic wrap and let rest for at least 20 minutes.  At this point you can refrigerate the dough, well wrapped, overnight and bring it back to room temperature the next day before continuing.

Cut the dough in half.  Run one half through the pasta machine set at its widest setting.  Fold the dough in thirds and run through the machine again, repeating 3 times.  Then, run the dough halfway through and pinch the ends together so it forms a loop.  Adjust the setting to one notch thinner and roll through, continuing to adjust the setting one notch thinner each time the loop has gone all the way around.  When the dough looks almost transparent, stop and cut the dough out of the machine and then in half.  Repeat the whole process with the other half of the dough.  You will end up with 4 sheets of pasta dough.

If your dough is feeling tacky at this point, let it dry a bit on some tea towels.  Otherwise, you can go ahead and fold the dough in half three times so you have a manageable width to cut.  Using a sharp knife, cut the noodles into the width you desire.  Shake out the noodles and let them dry some more on the tea towel.

Bring a pot of salted water to a rolling boil.  Add the pasta and stir occasionally so that the noodles don't stick to each other.  The pasta is done when they float to the surface.  Remove from the water immediately to preserve its perfect al dente texture.  Toss with the sauce of your choice.

https://www.flickr.com/photos/joyosity/16076036413/

A few suggestions for sauces:
Next:  Cacio e Pepe for One
Previously:  Matcha Financiers with White Chocolate Centers
Last Year:  Mushroom Marsala Pizza
Two Years Ago:  Peking Duck Pizza
Five Years Ago:  Bacon Fat Caramels
Six Years Ago:  Potato Leek Soup with Bacon