I recently started a new job where I no longer work from home but have to go into an office every day when I'm not traveling. Unfortunately, the office is too small to have a great cafeteria so I've had to figure out how to bring breakfast and lunch to work for pretty much the first time in my life. (I know, I've been spoiled.)
Now that I'm not able to make myself candied bacon chocolate chip pancakes every morning (just kidding!), I was kind of lost with what to do until I remembered the wonder that is overnight oats. Basically, you just soak dry oats in any kind of liquid overnight in the refrigerator. For regular rolled oats, you can use a 1:1 ratio of oats to liquid. For something thicker like steel cut oats, the ratio should be closer to 1:2 oats to liquid. In the morning, the oats have softened enough to eat as is. It sounds kind of boring, but the fun comes in customizing your oats!
To make what I call New England Morning Overnight Oats, I added real maple syrup and freeze-dried blueberries (available from Trader Joe's) to 1/3 cup of steel cut oats in a small Mason jar and filled it up to the top with vanilla soy milk. Put the lid on, shake it up to make sure everything is mixed, and let it sit overnight in the fridge. That's it! The next morning, I just grab the jar on the way to work and eat the oats straight from the jar at my desk.
I've also made Almond Joy Overnight Oats (not pictured) by adding cocoa powder, sliced almonds, and shredded coconut to the oatmeal. Other ideas for toppings include raisins, dried cranberries, sliced bananas, fruit purees or preserves, yogurt, other nuts, cinnamon, honey, and nut butters. I prefer to use either soy, almond, or coconut milk for the liquid.
My current favorite combination is to use Trader Joe's Quick Cook Steel Cut Oats and add freeze-dried strawberries (also available from Trader Joe's), sliced almonds, shredded coconut, and chia seeds. The quick cook steel cut oats are not as chewy as regular steel cut oats (sometimes my jaw would hurt from having to chew so much!) but not as mushy as regular rolled oats. And the chia seeds give the overnight oats a thicker, more pudding-like consistency (they're also packed with omega-3s!).
It doesn't look very photogenic, but it's super yummy and only takes a minute to make the night before. I've pretty much been packing this every day for breakfast whenever I have to go into the office, along with a travel mug full of magical cold brew coffee, which I also prepare the night before. Just two less things to think about every morning!
Next: Vegan Almond Joy Ice Cream and Bon Bons
Previously: Homemade Ginger Beer
Last Year: Rosemary Honey and Lemon Frozen Yogurt
Showing posts with label breakfast. Show all posts
Thursday, June 5, 2014
Wednesday, May 7, 2014
Candied Bacon Chocolate Chip Pancakes
Last month for Easter my church decided to throw its first Pancake Breakfast! I've always had a secret desire to be a line cook and man a griddle, churning out pancake after pancake. I guess I wanted to see if I could handle the pressure, a la MasterChef or Top Chef. Well let's just say that it was fun and I can't wait do it again next year, but only if I had a second person to help me pour out the batter. I was too busy to get a picture of the pancakes, but here's a shot of just some of the bacon we made to go with the pancakes.
The recipe we used was based on Alton Brown's "Instant" Pancake Mix, and it produced the lightest, fluffiest pancakes I've ever had. Even after making several hundred of those puppies, I couldn't believe how good they were when I finally got to eat one.
I was going to just post about the recipe we used, but then I started thinking about all the variations I could make: blueberry pancakes, banana brulee pancakes, and then it hit me. I needed to make bacon chocolate chip pancakes. Better yet, candied bacon chocolate chip pancakes. Boom! I think I just won at life.
Candied Bacon Chocolate Chip Pancakes
makes six 5" pancakes
2 strips of bacon
1/2 tablespoon brown sugar
1 cup all-purpose flour
1/4 teaspoon baking soda
1/2 teaspoon baking powder
1 teaspoon sugar
1 egg
1 cup buttermilk
2 tablespoons melted butter (or 1 tablespoon melted butter and 1 tablespoon melted bacon fat)
3 tablespoons chocolate chips
Butter or bacon fat for greasing
Real maple syrup
Preheat oven to 325°F. Evenly sprinkle the brown sugar onto the bacon and bake for 20 minutes or until just crisp. Allow bacon to cool and then chop. Save the bacon fat if you like (I was able to pour off about 1 tablespoon of bacon fat which I used in the pancake mix along with the melted butter).
Mix the flour, baking soda, baking powder, and sugar in a medium bowl. Separate the egg white and egg yolk into two small bowls. Mix the buttermilk with the egg whites and the melted butter (and bacon fat, if using) with the egg yolks. Make sure the melted butter/fat isn't too hot or else you'll end up cooking the egg yolks. Mix the buttermilk and egg yolk mixtures together. Pour the liquids onto the dry ingredients and mix with a whisk until just combined; there will be some small lumps. If the batter if too thick, you can thin it out with a few tablespoons of milk if you like.
Heat up your pan or griddle. Lightly grease with butter or bacon fat and wipe off with a paper towel. Because of the high content of fat in the batter, you will probably only need to grease the pan this one time.
Pour 1/3 cup of batter onto the pan. Scatter about some chocolate chips and chopped candied bacon on top. Cook until the edges are dry and the bottom is golden brown. Flip the pancake and cook the other side until dry. It's better not to overcook the second side since the chocolate might burn. In between each pancake, wipe off any melted chocolate with a paper towel.
Serve warm with real maple syrup.
Lots of real maple syrup.
Oh, yeah....
Next: Serendipitous Chocolate Chip Cookies
Previously: Easy Chilaquiles with Fried Egg and Avocado
Five years ago: Coconut Curry Noodles with Collard Greens and Broccoli
Monday, May 5, 2014
Easy Chilaquiles with Fried Egg and Avocado
Happy Cinco de Mayo! Confession: I don't really know anything about Cinco de Mayo except that it's the day after Star Wars Day and is Mexican in origin. But that's enough for me to know that I can post about chilaquiles, the best thing I ate in Mexico. I didn't really expect the breakfast buffet at the CasaMagna Marriott Cancun to have good local food, but this dish was so yummy I went back for thirds!
It doesn't look like much, which is maybe why I was so pleasantly surprised, but it's ridiculously loaded with flavor and texture. Basically, it's just stale corn tortillas which are cut and fried, then cooked in salsa and topped with whatever you want. Traditional toppings may include cilantro, cotija cheese, queso fresco, crema, and onions. Since I think cilantro is the devil's weed and didn't have any of those cheeses, I used shredded Monterey Jack, chopped green onions, avocado, and a fried egg. I chose to use jarred salsa instead of making my own sauce, which is why this is an "easy" recipe. You can use pretty much use whatever salsa you want--spicy, mild, green, red--just choose your favorite one!
Easy Chilaquiles with Fried Egg and Avocado
makes 1 serving
6 small corn tortillas, stale or left out overnight
2 tablespoons corn or vegetable oil
Kosher salt
1/2 cup of your favorite salsa
1 egg
A handful of shredded Monterey Jack
Chopped green onion and/or cilantro
Chopped avocado
Stack the tortillas and cut into wedges. Heat the oil in a pan on medium-high. Cook the tortilla wedges in batches, flipping them over until both sides are golden brown. Transfer to a plate lined with paper towels and lightly salt. Once all the tortillas are fried, transfer most of the oil to another pan (in which you will fry the egg).
Add the salsa to first pan and heat on medium low. Toss in the fried tortilla wedges until they are well coated.
While the chilaquiles is cooking, fry an egg in the other pan. Once the egg is almost done, top the chilaquiles with the shredded cheese and chopped onions and/or cilantro. Slide the fried egg on top and serve with chopped avocado.
If you're not a fan of runny egg yolks and prefer scrambled eggs, you can also beat the egg first and mix it in with the fried tortilla wedges when they are cooking in the salsa. In fact, I think that's how they made them at the resort, but it's not nearly as photogenic. =)

Next: Candied Bacon Chocolate Chip Pancakes
Previously: Nutella Mini Crepe Cakes
Four Years Ago: Passion Fruit Ice Cream
Five Years Ago: Carrot Cake Ice Cream
Monday, March 24, 2014
Dan Bing (Taiwanese Egg Crepe)
I've been traveling for work a lot recently, and while I definitely can't complain about being able to expense all my meals, sometimes I just want something simple. Comforting. That I made myself. This morning I woke up and had a craving for dan bing, a Taiwanese breakfast dish that's basically a thin crepe with an egg on top. I used to buy it all the time from street vendors when I lived in Taiwan, but I'd never tried to make it myself.
A quick Google search brought me to this translation of a Taiwanese recipe. I took one of the commenter's suggestion and added some sesame oil to the egg mixture. It's a good thing the recipe was for 3 crepes because I needed 3 tries to get a good one.
On my first try, when I tried to flip the crepe, it was so soft that it just collapsed into a sticky mess on the pan. The second time, instead of trying to flip with a spatula, I just dumped the crepe upside-down onto a plate and then slid it back onto the pan. It worked well enough but then I ended up overcooking the crepe so that it was too hard to roll up without cracking (above left). Finally, on the third try, I ended up with a pretty decent looking and tasting dan bing!
Dan Bing (Taiwanese Egg Crepe)
makes 3 crepes
1/2 cup bread flour
2 tablespoons corn starch
1 cup water
Salt
3 eggs
3/4 teaspoon sesame oil
3 heaping tablespoons chopped scallions
Soy paste and sweet chili sauce (optional)
Mix the bread flour and corn starch together in a small mixing bowl. Add the water and a pinch of salt and mix well. Let the batter rest for about 10 minutes while you assemble the rest of the ingredients.
For each crepe, beat 1 egg with 1/4 teaspoon of sesame oil, 1 tablespoon of water, a pinch of salt, and a heaping tablespoon of chopped scallions.
Start heating a non-stick pan on medium heat and lightly oil. Once the pan is hot, stir the batter again (it may have separated slightly) and add a third of the batter (about 1/2 cup) to the pan. Swirl the pan around to coat the bottom with a thin layer. Cook the crepe until the top is set and the edges pull easily away from the pan. Flip the crepe onto a plate and slide the crepe back onto the pan, cooked side up.
Pour the egg mixture on top of the crepe, and carefully spread it out with a spatula. Try not to have any of the egg go over the edge of the crepe if possible.
Continue cooking until the egg is mostly set and then flip (the crepe will be sturdy enough to flip with a spatula now). Cook for 10-20 seconds and then flip the crepe egg side up onto a plate or cutting board.
Quickly roll the crepe into a long, rectangular roll.
Cut into sections and serve hot with soy paste and/or sweet chili sauce.
Soy paste and sweet chili sauce are the more traditional sauces, but you can also try oyster sauce, hoisin sauce, or even ketchup. You can also eat this on the go by spreading the sauce on the egg before you roll it up and eating it like a wrap or burrito. Feel free to try different fillings in the egg mixture (e.g. chopped ham, crumbled bacon, corn) or on top of the cooked egg before rolling it up (e.g. shredded cheese, rou song [pork floss], cilantro), but I wouldn't put too much in because you want to make sure you can still roll it up easily.
Next: Nutella Mini Crepe Cakes
Previously: Miso-Glazed Eggplant
Four Years Ago: Duck Fat French Fries with Rosemary, Maldon Salt, and Truffle Oil
Five Years Ago: Cincinnati Chili
Wednesday, October 3, 2012
Magical Hot Cereal
While we're on the topic of magical breakfast items, there's this restaurant in Union Square called Neighborhood Restaurant & Bakery that serves the best Cream of Wheat I've ever tasted. It's creamy and just the perfect sweetness with the added depth that comes from a pinch of salt. There's a velvetiness that probably comes from cream and/or butter. And then there's a bright note of citrus and the comfort of vanilla and cinnamon.
I've asked for the recipe, or at the very least the ingredients, but they've never shared it with me. There's whole posts on Chowhound where people try to figure out what's in it. After some experimentation, I think I've found a recipe and method that gets pretty close to the real thing. I use Bob's Red Mill 7 Grain Hot Cereal instead of Cream of Wheat for some extra fiber and protein, but it turns out almost as creamy as Cream of Wheat due to the constant stirring and risotto-style method of adding small amounts of liquid when the previously added liquid has been absorbed.
I use terms like pinch and dash below because I'm not measuring any of the ingredients except the water and hot cereal when I make this for myself since the amounts are so small. Just know that a dash is more than a pinch and you should be all set.
Magical Hot Cereal
makes 1 serving
3/4 cup water
1/4 cup Bob's Red Mill 7 Grain Hot Cereal
1/4 teaspoon orange rind, finely grated
1 dash kosher salt
1 dash ground cinnamon
1 pinch fresh ground nutmeg
4-5 tablespoons vanilla soy milk
2 drops vanilla extract
1 teaspoon butter (I've been using Earth Balance Natural Buttery Spread)
2 tablespoons maple syrup
In a small pot, add orange rind to water and bring to a boil.
Add cereal, salt, cinnamon, and nutmeg and reduce heat.
Stir while cooking and add the soy milk a tablespoon at a time when liquid has been fully absorbed by the cereal.
When the cereal is done, about 6 minutes, add vanilla extract, butter, and maple syrup. Stir to mix and serve hot.
Note that while you can certainly leave out the butter, it just won't be as magical without it.
Monday, October 1, 2012
Magical Cold Brew Coffee
One big change that happened this summer is that I got to start working from home full time. When I was given the option, I hesitated at first because all I could think about was the fact that I wouldn't be able to get free coffee at work anymore. It's not super great coffee or anything, but it's there. And it's free. And I need coffee in the morning. Then I remembered cold brew coffee.
I've known about it since last summer when this article came out, but never got around to trying it out myself, mostly because I don't have any coffee filters. Now that I had the motivation, I grabbed a box of filters from Trader Joe's and started cold brewing away. I discovered that cold brew coffee was smoother than hot brewed coffee and super convenient to keep in the fridge for whenever I wanted some iced coffee. Life was good.
Then I came across this recipe for Magical Coffee and my life changed. This coffee isn't just good or better; this coffee is MAGICAL. It's like there's a party in my cup and everyone is invited. The flavors sing, the aromas dance. I used to use coffee to wake me up in the morning. Now I wake up in the morning to taste this coffee.
Magical Cold Brew Coffee
makes 2-3 servings
1/2 cup coffee beans
1/2 teaspoon cinnamon
1 pinch fresh ground nutmeg (optional)
2 tablespoons brown sugar
2 cups water
Grind the coffee to a medium-fine texture (stop before you get to espresso fine).
In a French press, add the ground coffee, cinnamon, nutmeg, and brown sugar.
Pour in 2 cups of cold water, stir, and wait 2 minutes for the coffee to float and "bloom".
Stir again and cover. At this point you can put it in the fridge to steep or leave it on the counter at room temperature. If I want to drink it in less than 8 hours, I'll leave it on the counter. Let steep overnight or longer, up to 24 hours.
Press the grinds and pour through a coffee filter. You can store this coffee base in the refrigerator for a week.
To serve, pour over ice cubes and add cream, milk, or half & half if you like. I prefer vanilla soymilk.
Die of happiness.
I tweaked the proportions a bit from the original recipe because I like to add a lot of soymilk to my coffee so I wanted the coffee base to be a little stronger. Now that it's getting colder, I may end up using the French press to brew hot coffee but I'll still probably add the cinnamon, nutmeg, and brown sugar.
Check out how to make magical pumpkin spice latte here!
Update: I just tried making this with a small handful of torn mint leaves, and it totally reminds me of Philz' Mint Mojito Iced Coffee!
Friday, January 15, 2010
Banana Bread Yeasted Waffles
When I was originally looking for yeasted waffle recipes, I stumbled across this one for Banana Bread Waffles. I know, right? What an awesomely yummy idea! The more I thought about it, the more I was tempted to skip the waffle face off and just make these. But ordinances must be followed, so I saved this one for last. The only thing I changed was that I added some walnut pieces to the batter right before cooking since I had some lying around, and since I didn't have ground ginger or ground cloves, I added a pinch of allspice. Oh, and I halved the original recipe since I only had 2 bananas.
I found that I needed more than 30 minutes at room temperature for the batter to double, so I stuck it in a slightly warm oven for 15 minutes. In the end, I found these waffles to be more soft than crispy and the flavor wasn't very memorable. In fact, right now I'm thinking that griddling a slice of real banana bread on a waffle iron might be even better....
One year ago: Nian Gao (Mochi Cake), Red Bean Ice Cream
Banana Bread Yeasted Waffles (from seven spoons)
makes 2-3 servings
2 tablespoons unsalted butter, melted
1/2 cup plus 1 tablespoon milk
1/2 teaspoon vanilla extract
1 cup all-purpose flour
1/2 tablespoon dark brown sugar, packed
3/4 teaspoons yeast
1/4 teaspoon salt
1/4 teaspoon ground cinnamon
1/8 teaspoon ground nutmeg
Pinch of allspice
1 egg, beaten lightly
1/2 cup mashed ripe banana, about 1 1/2 bananas
1 tablespoon Greek yogurt
1/4 cup walnut pieces (optional)
In a small bowl, whisk together the butter, milk and vanilla. Set aside, the mixture should be warm but not hot.
In a large mixing bowl, sift or whisk together the flour, brown sugar, yeast, salt and spices. Pour the wet ingredients into the dry, whisking until smooth. Stir in the beaten eggs. Cover the bowl loosely and refrigerate for at least 12 hours, but up to 24.
About 30 minutes before you want to make waffles, take the batter out of the refrigerator to come up to room temperature slightly. It should be doubled in size and the surface will be covered in bubbles.
When ready to begin, stir the sour cream into the mashed bananas and then mix the fruit and walnuts (if using) into the batter. It will deflate, but use a light, quick hand to thoroughly combine.
Heat your waffle iron and bake the waffles as per the manufacturer's instruction.
Serve with maple syrup and additional slices of fresh bananas and walnuts, if desired.
Leftovers can be frozen and then reheated in a toaster or in an oven; keep the heat low and an eye on them though, they brown quickly.
I found that I needed more than 30 minutes at room temperature for the batter to double, so I stuck it in a slightly warm oven for 15 minutes. In the end, I found these waffles to be more soft than crispy and the flavor wasn't very memorable. In fact, right now I'm thinking that griddling a slice of real banana bread on a waffle iron might be even better....
One year ago: Nian Gao (Mochi Cake), Red Bean Ice Cream
Monday, December 28, 2009
Homemade Waffle Face Off
Ever since I tried my first Belgian waffle (with real pearl sugar!) from Mr. Crepes a few weeks ago, I've been wanting to make some waffles. My friend, Nicole, had left me her waffle maker when she moved away this past summer and I had yet to break it out. I was hoping to buy some pearl sugar from Mr. Crepes, but it turns out they no longer sell it there. So I settled for making regular waffles. But oh my, the many different "regular" waffle recipes that existed! I browsed through the waffles on TasteSpotting, The Kitchn, and looked up Alton Brown's recipe. I remembered an episode from Good Eats when he explained that the batter you want for pancakes and the batter you want for waffles are two completely different things since pancakes should be soft and fluffy and waffles should be crispy on the outside. Unfortunately, his recipe for the Basic Waffle included buttermilk as an ingredient, and I didn't really feel like buying something I don't usually use just to make this. But then I found a recipe titled, "Waffle of Insane Greatness". How could you not want to make those?
And then while talking to my friend, Helena, about my plan to make waffles, she recommended Mark Bittman's recipe for Overnight Waffles from How to Cook Everything (thank you, Ellen!), saying they were the best waffles she had ever had. That's when I decided it was time for another face off: Yeasted vs. non-yeasted waffles.
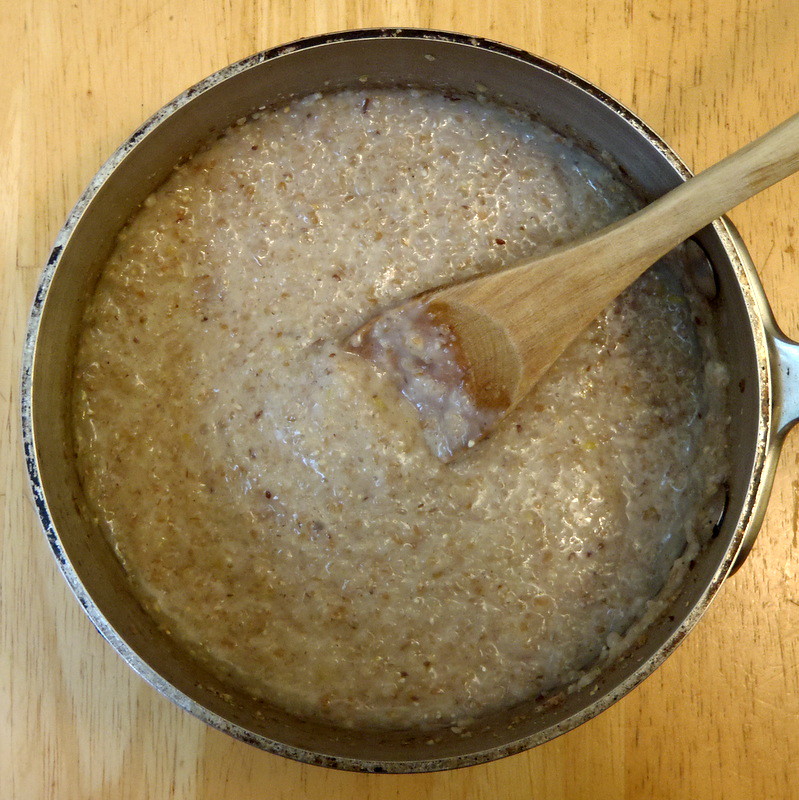
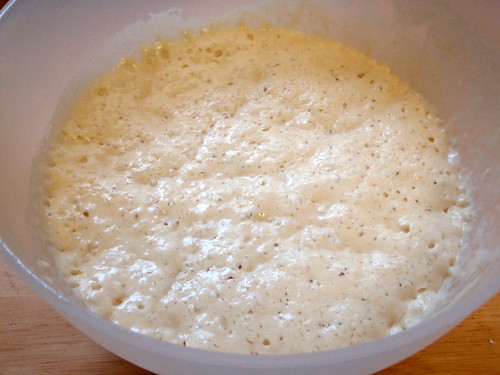
Obviously, as you can tell from the title, the Overnight Waffles need to be started the night before to give the yeast time to do it's thing. There are several steps to the recipe, and I followed everything to the letter (including separating the egg and whipping up the egg whites; is there anything more satisfying than whipping egg whites up to a soft peak by hand?) except that I halved the recipe. Hopefully it didn't alter the outcome too much.
Overnight Waffles (based on Mark Bittman's recipe from How to Cook Everything)
makes 2-3 servings
1/4 teaspoon instant yeast
1 cup all purpose flour
1/2 tablespoon sugar
1/4 teaspoon salt
1 cup milk
4 tablespoons butter, melted and cooled
1/4 teaspoon vanilla
Canola oil (for brushing on waffle iron)
1 egg
The night before, combine dry ingredients and stir in the milk, then butter and vanilla. The mixture will be loose and creamy. Cover and set aside overnight at room temperature.
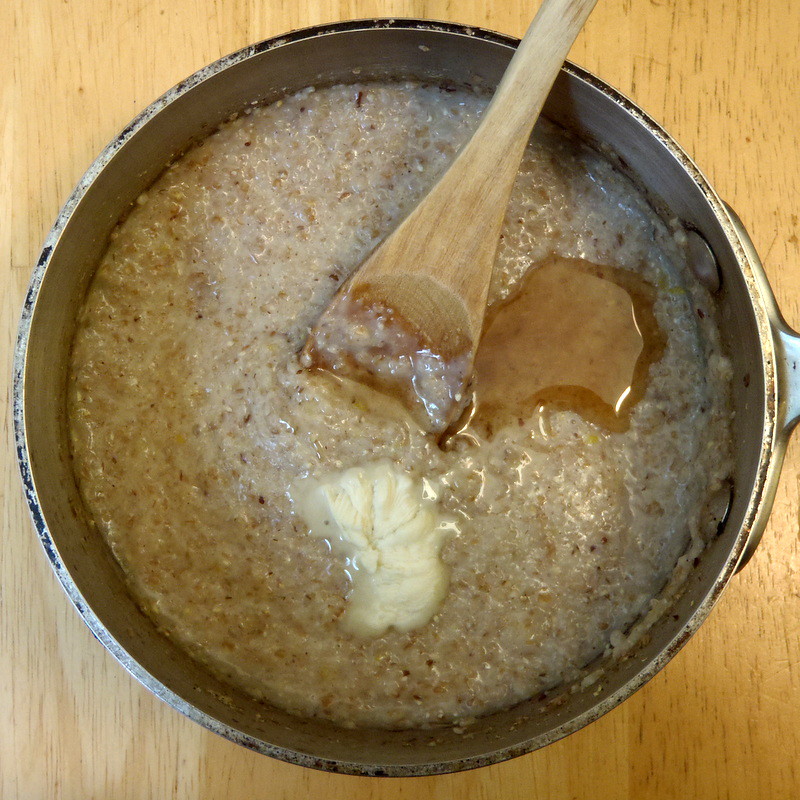
The next morning, brush the waffle iron lightly with oil and preheat. Separate the egg and stir the egg yolk into the batter. Beat the egg whites until they hold soft peaks. Fold them gently into the batter.
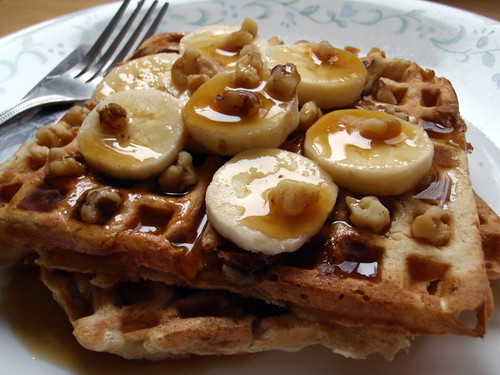
Pour the batter onto the waffle iron just until the barely covered. Bake 3 to 5 minutes, depending on your iron. Serve immediately with maple syrup and butter.
I thought it was interesting that in the book, Mark mentions that his favorite type of maple syrup is Grade B which is also the cheapest. Maple syrup is pretty darn expensive even up here in New England, but I found that Harvest sells Grade B maple syrup in bulk!
It looks like the "Waffle of Insane Greatness" recipe is from a restaurant called Aretha Frankenstein's in Tennessee. I have a feeling I will never get to go and try the originals, but having the recipe is good enough for me.
Waffle of Insane Greatness (courtesy of the Food Network and Aretha Frankenstein's)
makes 4 servings
3/4 cup all purpose flour
1/4 cup cornstarch
1/2 teaspoon baking powder
1/4 teaspoon baking soda
1/2 teaspoon salt
1 cup milk
1/3 cup vegetable oil
1 egg
1 1/2 teaspoons sugar
3/4 teaspoon vanilla
In a medium bowl, combine the flour, cornstarch, baking powder, baking soda, and salt; mix well. Add the milk, vegetable oil, egg, sugar, and vanilla and mix well. Let the batter sit for 30 minutes.
Preheat the waffle iron. Do not use non-stick spray on the waffle iron; the oil in the batter will allow the waffle to release easily. Follow the directions on your waffle iron to cook the waffles. Serve immediately with butter and syrup.
It's true about not needing to grease the waffle iron for these. If you let the batter sit long enough, the oil will even start to separate. If that happens, just stir the batter again and the oil will re-incorporate. I chose not to halve this recipe because it would've been a lot harder to do so and also because it seemed like the main ingredients (flour, milk, oil, and egg) were almost identical in quantity.
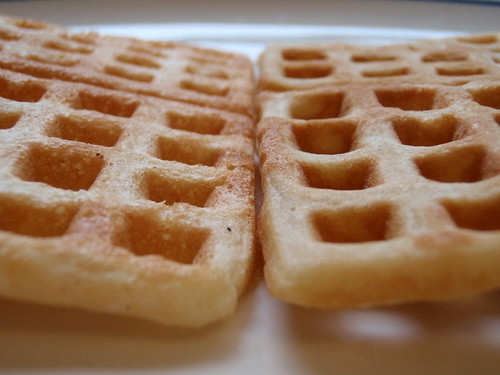
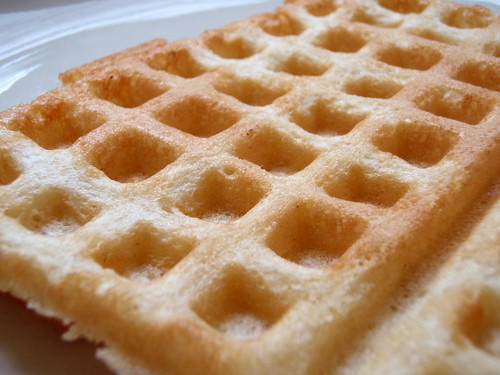
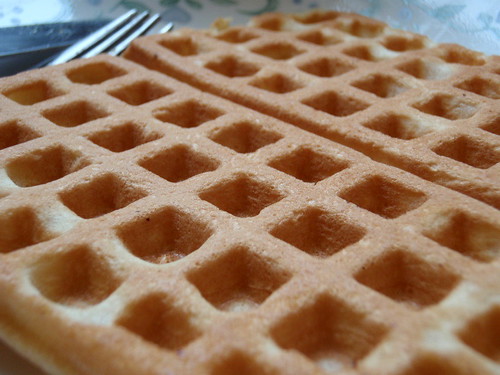
As you can see from the pictures above, the Waffle of Insane Greatness browned more uniformly and had a more defined shape. This translated into a crisper waffle. It also had an eggier taste than the Overnight Waffles which I thought had a pretty strong yeasty taste. The texture of the Overnight Waffles was definitely fluffier but I didn't really get the crispiness.
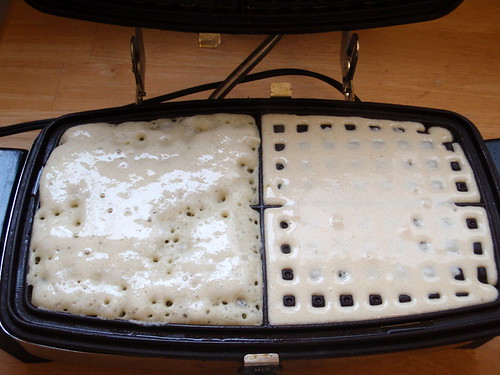
I decided to try to make them side by side so that they had the same amount of time on the iron. Again you can see (below) that the Waffle of Insane Greatness had a more defined shape and that the Overnight Waffles had more air bubbles, but now you can see that the Overnight Waffles actually brown quicker than the Waffle of Insane Greatness. (Please ignore the fact that there are holes in the Waffle of Insane Greatness; that's more due to user error as you can see in the picture with the waffle iron.)

Personally, I had a slight preference for the Waffle of Insane Greatness because it was able to get the crispy texture I wanted. Too many air bubbles in the Overnight Waffles meant it absorbed the maple syrup like a sponge and got way too soggy way too fast. Also, I thought the yeasty taste was a little too strong for me. One of my roommates preferred the Overnight Waffles, though, and my other roommate's sister preferred the Waffle of Insane Greatness.
As a final experiment, I mixed the last of both batters together and made an Overnight Waffle of Insane Greatness. This turned out to be the perfect waffle for me. The yeasty flavor was neutralized and turned into a more malted flavor. The waffle was crispier and had less air bubbles than the Overnight Waffles but was fluffier than the regular Waffle of Insane Greatness. If I ever really, really wanted to make the perfect waffle, I would make these two recipes and combine them again. But being the lazy person I am, I'll probably just make the Waffles of Insane Greatness again and maybe try separating the egg and whipping up the egg whites before folding them in.
One year ago: Hot Pot, Tang Yuan
Subscribe to:
Posts (Atom)