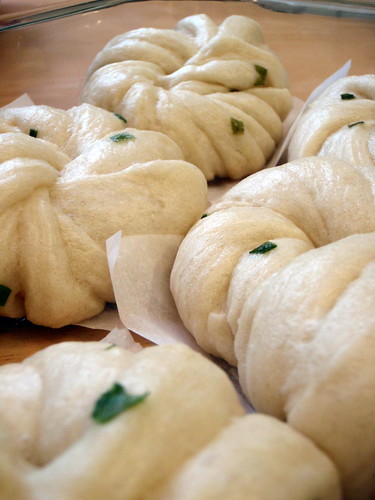
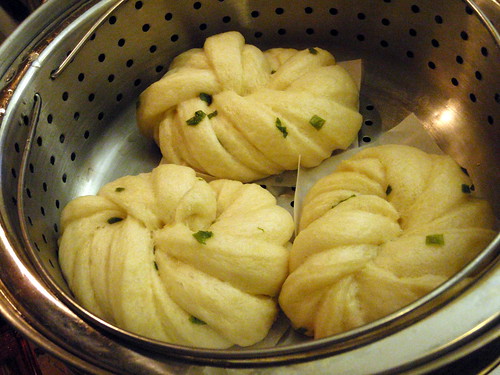
By popular request, here is my mom's hua juan recipe. Hua juan are steamed buns flavored with scallions and twisted to look kind of like a flower (hua juan means "flower twist" in Mandarin).
It is a yeast dough recipe, so you'll have to plan ahead to allow time for the dough to rise and then for the shaped buns to proof. Also, you'll need a way to steam the buns; I use my stock pot with the pasta insert and steamer insert for two layers of steamy goodness.
Hua Juan (Steamed Scallion Buns)
makes 12 buns
For the dough:
1/2 packet yeast (a little more than 1 teaspoon)
3 cups flour
1 cup milk, warmed to a little hotter than a fever (can you tell this recipe is from my mom?)
6 tablespoons sugar
1/4 cups vegetable oil
For the glaze:
3 tablespoons chopped scallions, green part only
1/2 teaspoon salt
1/4 teaspoon sugar
1 tablespoon sesame oil
Turn on oven to lowest setting. Dissolve the yeast in the warm milk. Mix in the rest of the ingredients for the dough and knead. Cover with a moist cloth or seal tightly and place in oven for 1 hour.
Mix together the ingredients for the glaze and allow to macerate.
Knead the dough again after it has doubled in size and then separate into 12 egg-sized pieces.
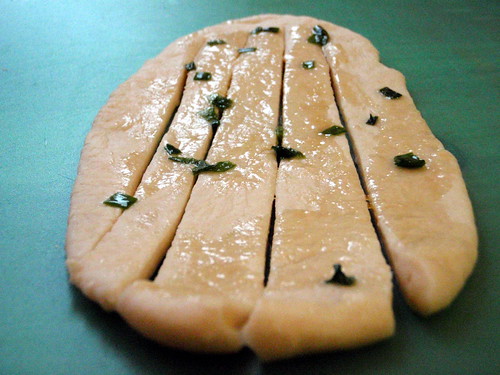
Roll each piece into a long oval and cut into long strips, leaving a 1/4" section attached at one end. Brush lightly with the glaze.
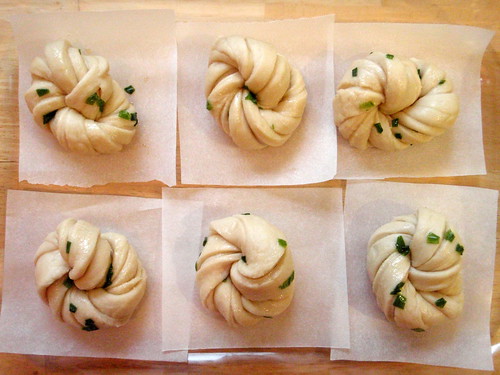
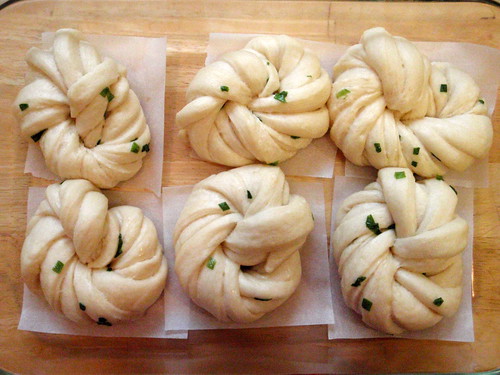
Twist and shape buns and place on square of parchment paper.
Cover the buns and let sit in oven again for another 40 - 60 minutes to proof.
Steam for 13 minutes.
If not not eating immediately, transfer to a freezer bag once it has cooled and freeze. To reheat, wrap with plastic wrap or put in a fold-and-close sandwich bag and microwave for 45 seconds.
The great thing about this recipe is that you can use the dough itself to make man tou (steamed bread buns) or stuff it with red bean paste to make dou sha bao. Once I even stuffed it with leftover dumpling filling and made rou bao zi.



cool joy, i like your blog and the pics look amazing! i added it to my list of blogs i'm following. so fun! :)
ReplyDeleteThose look delicious, I'm tempted to try making my own!
ReplyDeleteLooks delicious. I haven't had these before but I had something similar but pan fried.
ReplyDeleteI've had bad luck with making bread dough in the past but this looks too fun and pretty not to try!!
ReplyDeletethank you so much for the recipe! i tried to make them today,.. they are so good!! i baked some of them and they turned out very nice too.
ReplyDeleteThose steamed buns look good. I like the twisting folds.
ReplyDeleteThose look delicius and beautiful. Thanks for share your recipe!
ReplyDeleteI made these tonight for a dinner party -and they were a fabulous hit!!
ReplyDeleteEveryone loved them - will def. make again
Hi Joy,
ReplyDeleteI am Taiwanese but I have been living in Canada now for 20 years. The way you make your food reminds me so much of my home country. Sometimes when I miss the food so much, I make tomatoes with eggs on rice too. My husband is canadian and finds it a little strange to mix tomatoes with eggs but I don't care. Your Hua Juan buns look so good! I think I am going to try to find the time to make them but just looking at the picture makes my mouth water and then is good too.
Love your picture and your site so I passed it around to my friends. Good job.
These look fantastic and I will definitely give it a try.
ReplyDeleteQuestion - it is possible to bake these? If so, at what temperature and for how long?
Cynthia - I've never tried baking them myself, but Ah-Yi (in the comments above) tried it at 350 degrees for 10 minutes. They were a little more brown than she liked, so she said that next time she'd try 8 minutes?
ReplyDeleteHi Joy,
ReplyDeleteYou have a great blog. Will visit again to read all your posting . Great Pics and great recipes. Thanks for sharing your mom's bao recipe. :)
Elin
Never tried these before, but they look great!
ReplyDeletethese are SO pretty! thanks for the video, im going to try this recipe :)
ReplyDeleteThey remind me of the ones I use to eat, love the scallion taste.
ReplyDeleteI have made these several times now...in my attempts to recreate the wonderful buns I had whilst in Shanghai. I am not great at working with yeast, but after the first batch was done, I tasted one and started crying. You brought back all my fondest memories from China. You have the thanks of this humble Texas woman.
ReplyDeleteI'm a Taiwanese-American student in Berkeley and I made these today! They are so yummy... I really appreciate your (mom's) recipe. I feel like they are hard to come by. Thanks!
ReplyDeleteThese are fabulous & impressive. I love having another use for my 12qt steamer!
ReplyDeleteThanks for spreading the wealth! It's a great dim sum recipe which I'll enjoy making again... and sharing with others, too.
Thanks a lot for the great recipe. Just finished making these and they turned out really good. I have some left over dough that i'm going to make some man tao with.
ReplyDeleteI'm hoping that the sugar in the hua juan dough will maker a sweeter version of man tao. Hopefully that'll lead me towards perfecting my char siu bao buns.
My char siu bao buns have been good, but I find that the ones from the bakeries tend to have a sweeter bun
Oh my god. My grandpa use to make something like this every Sunday.. except he would roll it up instead of the flowery shape. I used to find them boring as a little kid, but as I grew, I appreciated the taste and how light yet delicious it was. I always wanted to learn how to make it.. but then he passed away before I could have him teach me.. I'm pretty sure it's done the same way.. and I want to thank you for giving me this opportunity to learn this.
ReplyDelete@Ady and @Dan - I never really thought that posting this recipe would get that kind of reaction, but I totally understand. Food can really have such strong memories associated with them, and I'm so glad my mom and I could help you two recapture those times for you!
ReplyDeleteWow, these look really good. I have a couple of questions though. English isn't my first language so I just want to clarify a few things. When you say 1/2 a packet of yeast do you mean dry yeast or compressed yeast and how much (in gram or teaspoons) is 1/2 a packet (sometimes it varies between countries so I want to be sure)?
ReplyDeleteFor my other question; you said "Let sit in oven again for another 40 - 60 minutes to proof." You just meant that the dough has to rise again, right? Is it really necessary to put it in the oven though? Can't I just cover the buns with a clean kitchen towel?
Anyway, thanks for sharing a lovely recipe!
@waruji - Great questions! I usually use Fleischmann's Active Dry yeast packets. Each contains 1/4 oz (7 g) so you can measure out 1/8 oz. or 3.5 grams. I actually just estimate it each time so you probably don't have to measure it out that exactly....
ReplyDeleteAs for your second question, you are right in your assumption. My mom always put them back in the oven, so that's what I do, but I suppose if your kitchen is warm and moist enough (the idea situation for proofing), you could just cover the buns with a clean, moistened kitchen towel.
I made your recipe. They are to die for! Totally brought back childhood memories. Thank you for sharing.
ReplyDeleteI just want to thank you so much for this recipe. I lived in Canada for 2 years, where I could easily buy these in China Town and steam them at home. I returned to the UK about 6 months ago and have since been unable to find them anywhere. I made these, but used an unsweetened non-dairy milk instead and they turned out amazingly. Absolutely delicious and JUST what I've been craving for months. Thanks so much again!
ReplyDeleteHas anyone tried making these with gluten-free flour? I'd like to do that soon...
ReplyDeletethank you Joy for the video!
ReplyDeleteMy children have been begging me to make these for them since we returned from Shanghai. Thank you so much for your video! I'm going to give it a try.
ReplyDelete@ Green Heart... that was my question too. My husband is gluten free and hasn't quite adjusted to not being able to have bread. I think these would satisfy him if they could be made with rice flour or some other gluten free flour or blend.
ReplyDeletehi joy.... i'm having some trouble with my buns..... the dough and buns are not proofing as fast or as much as in your recipe.... especially after they have been twisted into a bun.... i activated the dry yeast fine but is it because i used whole wheat flour???
ReplyDeleteSorry, I've never tried making these with whole wheat flour, but a quick google about baking with whole wheat flour shows that products made with whole wheat flour will be a lot heavier and denser than those made with all-purpose flour. Maybe try making them with a sponge? http://www.kingarthurflour.com/tips/whole-wheat-primer.html
DeleteI just made this with whole wheat flour using the exact recipe. I used Bob Mill stoneground wholewheat flour. It turned out fine - not hard or dense. I let it proof a bit longer - like 2 hours. I proof another 15 mins or so after I rolled them into shape. I made them into 12 pcs and steamed 13 mins like the recipe said. This is good. I am keeping this recipe.
ReplyDeleteAwesome; I'll have to try it with whole wheat flour next time. Thanks for the tip!
Deletedo I need to cover the buns with a damp clothe the second time I proof them?
ReplyDeleteYes! Sorry, I will add that into the recipe. Good catch!
DeleteI love making these :) Thank you so much for sharing!
ReplyDelete