Tuesday, March 31, 2009

The Amazing Bibimbap

Bibimbap

One day I was planning on making some fried rice with (even more) leftovers from hot pot when I remember this comic strip that I had see a couple of weeks ago. I had never made bibimbap before, but I ordered it almost every time I went to Super 88, so I figured it was time to try to make some for myself. I really took the words of the comic strip to heart: "...All it was, was nothing. Or rather, the idea of making something out of nothing. As long as it contained rice, that is...(and gochujang)...."

So I started off with some leftover brown rice.

Start with rice

Added some chopped napa cabbage.

Add napa cabbage

Swiss chard.

Swiss chard

Julienned carrots.

Carrots

Imitation crab meat.

Crab

Cubed tofu.

Tofu

Sliced cooked fish balls.

Sliced fish balls

Sliced fried fish cake.

Fried fish cake

And thinly sliced beef (marinated in soy sauce, sugar, and rice wine)

Beef

Topped it with a fried egg.

Fried egg

And some sesame seeds.

Sesame seeds

And finished it with the spicy bean sauce.

And spicy bean paste

The only thing is, I've always liked my bibimbap in the hot stone bowl, and since I didn't have one, I ended up stir-frying this all up to make fried rice in the end. =P

Monday, March 30, 2009

Hong Kong Style Pan-Fried Noodles

And now it's time to get back to some more Asian dishes. Pan-fried noodles are one of my favorite dishes at Cantonese restaurants, and I made this a couple of weeks ago when I needed to used up some (more) leftovers from hot pot as well as some broccoli from a Boston Organics delivery. I was really surprised at how easy it was; the hardest part was going to the Asian grocery store and finding the fresh Hong Kong style egg noodles. You could probably try making these with fresh or cooked semolina or non-Hong Kong style egg noodles, but the results won't be the same. The thin Hong Kong style egg noodles allow you pan-fry them while fresh so that they get crispy and cooked through without needing to boil them first, and they serve as the perfect medium for absorbing the gravy as well.

Other than the noodles, you can probably substitute any other meats and veggies you want: shrimp, beef, pork, chicken, squid, or baby corn, straw mushrooms, snow peas, baby bok choy, Chinese broccoli, etc.

Pan-fried Noodles with Chicken and Broccoli

Hong Kong Style Pan Fried Noodles (based on sugarlens' recipe)
serves 4

1 (16 oz.) package Hong Kong style noodles (I found these in the refrigerated aisle at the Asian grocery store)
2 small chicken breasts, sliced thinly
1 small onion, sliced thinly
2 cups broccoli, chopped
2/3 cup sliced mushrooms
3 cloves garlic, minced

Marinade:
2 teaspoons corn starch
2 teaspoons sesame oil
2 teaspoons soy sauce
2 teaspoons oyster sauce

Sauce:
2 tablespoons of oyster sauce
2 tablespoons of soy sauce
1 cup water
2 tablespoons of sugar
2 teaspoons of cooking wine

Thickening:
1 tablespoon of corn starch
1 tablespoon of water

Add oil to a heated pan. Add noodles. The noodles should brown very quickly. Use a pair of chopsticks or a spatula to make sure the noodles are getting browned evenly. If you need to, use the spatula to press the noodles against the pan or add some more cooking oil to make sure you brown most of the noodles. Plate the noodles and set aside.

Pan-fried Noodles

Mix together the ingredients for the marinade and add the sliced chicken. Set aside. In a separate bowl, combine the ingredients for the sauce. In a smaller bowl, combine corn starch and water. Set aside.

Add oil to a heated pan and saute garlic and broccoli for about 3 minutes or until garlic is starting to turn brown. Add a half cup of water and cover to let the broccoli finish cooking by steaming. After 5 minutes, remove cover and check to see if the broccoli is done. Salt to taste and dish out.

Add oil to a heated pan and cook onions, mushrooms, and chicken until done. Add broccoli back to the pan. Stir well. Add the sauce mixture. Bring it to a boil.

Add the corn starch mixture and give a quick stir. Bring it to a boil.

Pour gravy on top of the noodles. Serve immediately!

Yum

I'm definitely one of those "save the best for last" type eaters, so I almost always have a little bit of the crunchy noodles left at the end. Yum!

Friday, March 27, 2009

Whoopie Pies

Whoopie pies

I had some leftover orange cream cheese butter cream from when I made the carrot cake cupcakes so I decided to make whoopie pies to use it up. I had never heard of whoopie pies until one of my coworkers told me about them. Apparently they are very popular here in New England and consist a cake-like, usually chocolate flavored cookie sandwiching a white cream filling, kind of like a big Oreo, but much softer.

There was a recent article in the NYT asking if whoopie pies might be the new cupcakes, and I think it could totally be true. After all, if a French macaron and a cupcake had a baby, it would be the whoopie pie.

Whoopie Pie with Orange Cream Cheese Buttercream

Whoopie Pies (based on this recipe)
makes 12

2 cups all-purpose flour
1 teaspoon baking soda
1/4 teaspoon salt
1/3 cup unsweetened cocoa powder
1 cup white sugar
1 egg
1/2 cup vegetable oil
1 teaspoon vanilla extract
3/4 cup milk
Orange Cream Cheese Butter Cream (recipe here)

Preheat oven to 350 degrees F (175 degrees C). Grease cookie sheets. Sift together the 2 cups flour, baking soda,1/4 teaspoon salt, cocoa and 1 cup sugar. Set aside.

In a medium bowl stir together the egg, oil, 1 teaspoon vanilla and 3/4 cup of milk until well blended. Gradually stir in the sifted dry ingredients. Drop by tablespoonfuls onto the prepared cookie sheets.

Baking

Bake for 10 to 12 minutes in the preheated oven, until firm. Allow to cool on baking sheet for 5 minutes before removing to wire racks to cool completely.

Frosting the whoopie pie

Pair similar shaped and sized cookies together and sandwich butter cream generously in between.

Inside of a whoopie pie

I brought these on the road trip on to Montreal, and both Annie and Dan said that they were pretty good. The addition of the orange rind was a nice surprise and I think a lot more noticeable paired with the cocoa flavoring than with the carrot cake. If you need to store these, make sure you wrap them individually, as they will stick to one another.

Thursday, March 26, 2009

Cincinnati Chili

Cincinnati chili

I've been wanting to make Cincinnati chili for quite a while but never found the opportunity. It's definitely one of those dishes you want to make for a large group, and what's more perfect after a day of skiing than some chili?

Cincinnati chili differs from what most people would consider traditional chili in that it's a bit more mild and watery and served on a bed of spaghetti and topped with mounds and mounds of fluffy, shredded cheddar cheese. In fact, it's probably more akin to spaghetti sauce than chili. The beef is boiled instead of browned to achieve a fine texture, and the secret ingredient is a bit of chocolate. Yes, chocolate.

Toppings for Cincinnati chili

Cincinnati Chili
(based on this recipe)
Serves 14

4 lbs. 80% lean ground beef
4 cups water
4 (6 oz.) cans tomato paste
2 large onions, finely chopped
2 cloves garlic, minced
4 large bay leaves
4 tablespoons chili powder
2 tablespoons unsweetened ground chocolate
2 tablespoons ground cumin
4 teaspoons ground allspice
1 tablespoon cinnamon
2 teaspoons salt
2 teaspoons pepper
1/2 teaspoon red pepper
2 teaspoons white wine vinegar
2 teaspoons Worcestershire sauce
Hot cooked spaghetti (3 boxes worth)
Finely shredded cheddar cheese
Chopped onions
Small red beans

Combine ground beef and water in a large stew pot. Cook until beef is done, crumbling as it cooks. You want very fine particles of beef. Stir in everything but the last 4 ingredients.

Cover and cook, at a simmer for about one hour.

Remove cover and, if necessary, cook down to a good thick consistency. Remove and discard bay leaves.

To serve, mound a bed of spaghetti on your plate.

P3210413

Add the chili.

P3210415

To make 3-way Cincinnati chili, you'd add just the cheese at this point. For 4-way, you'd add either the onions or beans, and for 5-way, add both onions and beans.

P3210417

Top with a mound of freshly shredded cheddar cheese.

P3210419

The key to the dish is the shredded cheese. You want to grate it as fine as possible so that it will be incredibly fluffy and melt just from the residual heat from the spaghetti and chili, even though a layer of onions and beans. To do this, I used my new Microplane grater. Just look at that cheese; it's like sawdust! (But in a good, appetizing way).

Finely shredded cheddar cheese

Wednesday, March 25, 2009

Boston Organics, Week 6

I didn't do as well at using everything up these past two weeks, but my excuse is I was out of the country for 3.5 days! So here is how I used the produce from last time's Boston Organics delivery. I used the kale and Swiss chard in 2 separate hot pots, make carrot cake cupcakes with orange cream cheese frosting with the carrots and one of the oranges, St. Patrick's Day maki and corned beef hash pasties with the cabbage, duck fat potatoes with the potatoes, stuffed artichokes with the artichokes (recipe forthcoming), and fruit salad with the fruit that I didn't end up eating. Which leaves the broccoli. To add to the broccoli I got today. Hmmm, maybe it's time for Orangette's broccoli soup?

Boston Organics, Week 6

This week I got 2 Braeburn apples, 1 avocado, 4 bananas, 1 green bell pepper, 1 bunch broccoli, 1 bunch celery, 1 grapefruit, 2 Valencia oranges, 2 Bartlett pears, 1 red pear, 2 tangelos, 1 box cherry tomatoes, 1 lb. turnips, and 1 bunch collard greens. I've already made another fruit salad (with walnuts and honey yogurt dressing) with a bananas, pear, and orange. I think the big challenge this time will be what to do with the turnips. Any ideas?

Friday, March 20, 2009

Carrot Cake Cupcakes with Orange Cream Cheese Frosting

I don't like carrots but ended up with a whole pound of them from Boston Organics in my latest delivery. This wouldn't have been a problem back when I was a kid because my brother liked them, so anytime I had carrots I would just give them to him. But now that my brother lives on the opposite side of the country, I am forced to do things like make carrot cake cupcakes. Alas, the tragedy of it all. By the way, my brother's birthday is this Sunday so happy birthday, Timmy, and pretend I made and mailed these to you!

Carrot cupcakes with orange cream cheese frosting


Carrot Cake Cupcakes with Orange Cream Cheese Frosting (based on the recipe from Tartelette's site)
makes 30 cupcakes

For the cake:
2 cups all purpose flour
1 ½ tablespoons ground cinnamon
¼ teaspoon ground nutmeg
¾ teaspoons baking soda
¼ teaspoon baking powder
4 large eggs
¾ cup vegetable oil
1 teaspoon pure vanilla extract
2 cups granulated sugar
1 teaspoon kosher salt
1 pound carrots, grated medium fine

For the frosting:
12 oz. cream cheese softened
2 1/ 2 cups confectioners’ sugar
Zest of 1 orange
2 sticks butter, softened
1 teaspoon pure vanilla extract

Preheat oven to 350 °F. Line muffin tins with cupcake liners.

In a medium bowl, whisk together the flour, cinnamon, nutmeg, baking soda, and baking powder. Set aside.

In a large bowl, beat the eggs at high speed until light and frothy, about one minute. Decrease the speed to medium and add the oil, vanilla, sugar, and salt and mix just until combines. Decrease the speed to low and add the flour mixture until just combined. Using a spatula, fold in the carrots.

Fill each cupcake liner halfway with batter. Bake for 18 minutes. Cool completely before frosting.

Combine the cream cheese, sugar, and zest with an electric mixer. Start on low speed and then increase to medium high speed and beat until smooth. Add the butter and mix on medium speed until just fluffy and smotth, about 45 seconds. Add the vanilla and mix until just combined. Do not overbeat.

Carrot cupcakes

The original recipe was for a layer cake, but I thought it translated well to cupcake form. The only issue I had was for the first batch I filled the liners about 2/3 - 3/4 full and the batter ended up overflowing onto the tin when it baked. Adding orange rind to the cream cheese frosting is ingenious and adds a vibrant aromatic and a very subtle whiff of tartness to the otherwise very sweet topping. If I had wanted to go the extra mile, I would've added a sprinkle of additional orange zest on top or maybe finely chopped crystallized ginger. I thought about a carrot curl, but then I'd be defeating the purpose of making these cupcakes because I don't like the taste of carrots.

Off to Mount Tremblant and Montreal!

Wednesday, March 18, 2009

Corned Beef Hash and Pasties

I've never really been into corned beef hash, even though I love potatoes, probably because I've only ever had the canned kind. Which is gross.

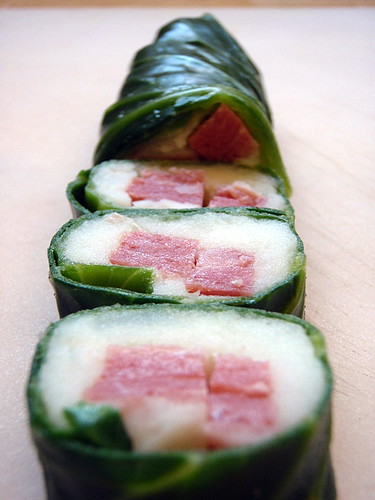
But I had all this leftover corned beef from making the St. Patrick's Day maki and saw 
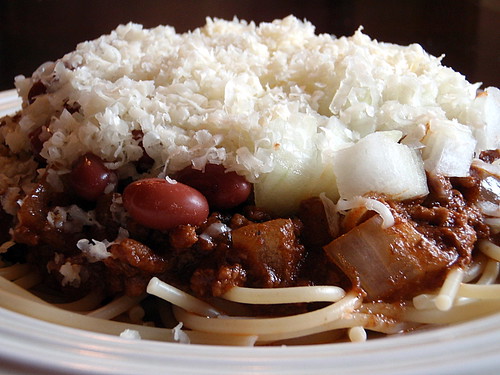
this recipe, so I figured I might as well try. Actually, I did more than try; I went to Whole Foods at 8 am in the morning to get some onions because we were out just so I could try this recipe. And boy am I glad I did. Homemade corned beef hash is so exponentially better than the canned stuff, and it's pretty easy to make too!

Corned beef hash

Corned Beef Hash
(based on this recipe from Simple Recipes)
serves 4-6

2-3 tablespoons unsalted butter or duck fat (guess which one I used)
1 medium onion, finely chopped (about 1 cup)
2-3 cups finely chopped, cooked corned beef
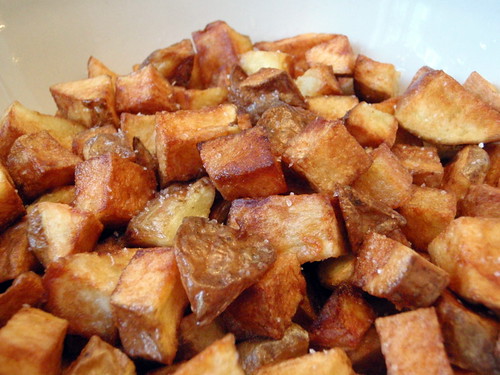
2-3 cups chopped cooked potatoes, preferably Yukon gold (I used Idaho potatoes, and it was fine)
Salt and pepper
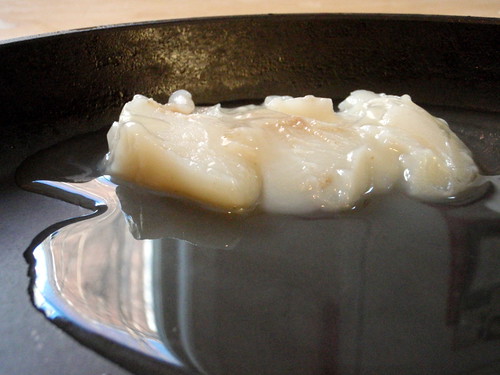
Heat butter or fat in a large skillet (preferably cast iron) on medium heat. Add the onion and cook a few minutes, until translucent.
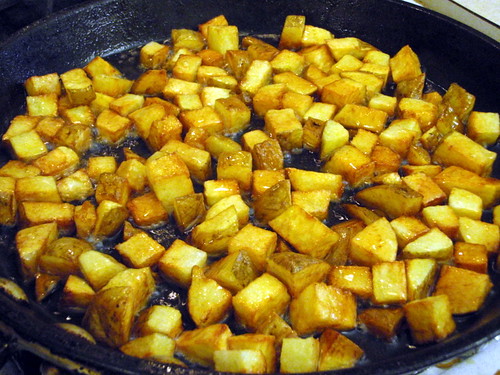
Mix in the chopped corned beef and potatoes. Spread out evenly over the pan. Increase the heat to high or medium high and press down on the mixture with a metal spatula.
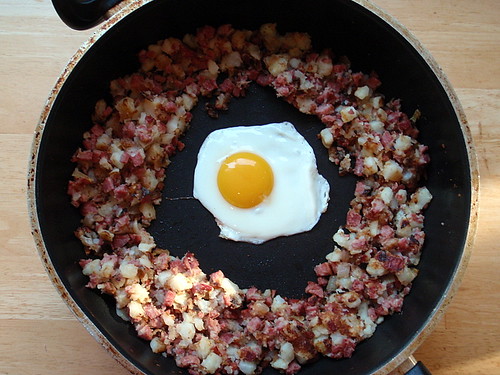
Do not stir the potatoes and corned beef, but let them brown. If you hear them sizzling, this is good. Use a metal spatula to peek underneath and see if they are browning. If nicely browned, use the spatula to flip sections over in the pan so that they brown on the other side. Press down again with the spatula. If there is too much sticking, you can add a little more butter to the pan. Continue to cook in this manner until the potatoes and the corned beef are nicely browned.
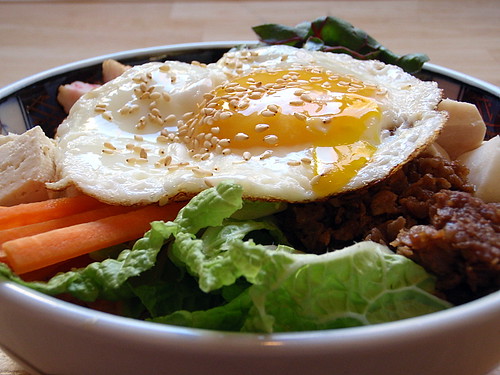
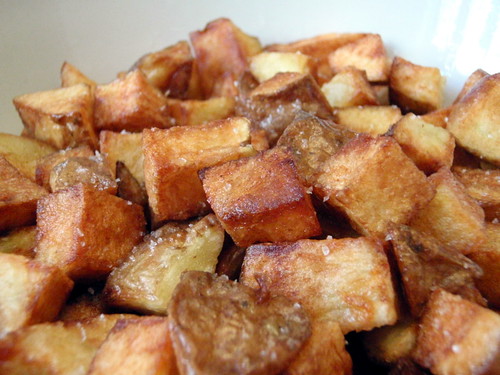
Remove from heat, and add salt to taste. Serve with fried or poached eggs for breakfast.
Fried egg
So now I had all this leftover corned beef hash and thought, "Why don't I try making pasties out of them?" No, not that kind of pasties, the Cornish kind. They're kind of like empanadas or those beef curry turnovers, but from England. When I visited a few years ago I tried them everywhere I could find them. Not only are they quite tasty, but they're perfect for tourists because you can eat them on the run. While doing some research about them, I found out that sometimes they had two internal pockets: one savory and one sweet so it was like a two course meal in one! I decided to just stick with the corned beef hash filling, though, and added some of the leftover cabbage as well.
Corned Beef Hash Pasties
makes 4
2 pie crusts
Leftover corned beef hash
Leftover boiled cabbage, diced
1 egg yolk
Preheat oven to 450°F.
Roll out the pie crusts and cut out one 8" circle in each, using a saucer or lid as a guide. Re-roll the remaining dough out and cut out 2 more circles.
Mix the corned beef hash and diced cabbage together.
Making the pasty
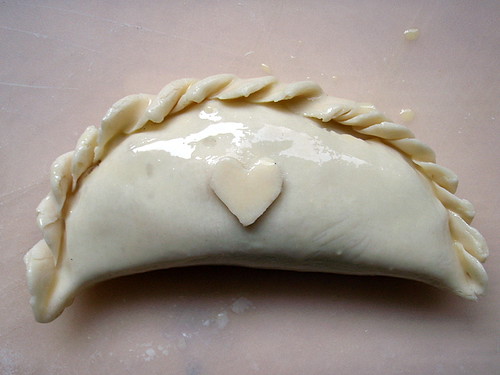
Fill each pie dough circle with about a 1/2 cup corned beef hash mixture. Fold and crimp the edges to seal. You can watch this video to see how I do it for the beef curry turnovers.
Sealed
In a small bowl, add a little water to the egg yolk and beat well. Brush on the top of the pasties. If you like, cut out a decoration with any leftover pie dough and adhere to the pasty using the egg wash. I started with the heart and decided to put a diamond, spade, and club on the other 3.
Glazed
Bake in the oven for 18 minutes or until golden brown.
Corned beef hash pasty

There's something so yummy and filling about meat pies. I think the pie crust really accentuates the savory fillings, kind of like how garlic bread really goes well with spaghetti. Ooh, now there's a thought: garlic butter brushed toaster pockets filled with spaghetti.... If only I still had my little toaster sandwich maker.....

By the way, I'm headed up to Tremblant and Montreal this weekend. Does anyone have any suggestions for what to do/where to eat? I'm thinking L'Express for dinner, Juliette et Chocolat for dessert, and Eggspectations for brunch. Sigh, unfortunately we'll only be spending 24 hours in Montreal....

Tuesday, March 17, 2009

St. Patrick's Day Maki

So after I blogged about receiving cabbage in my bi-weekly Boston Organics delivery and asked what to do with it, I had multiple people suggest making corned beef and cabbage since St. Patrick's Day was coming up. Well, I'm not really into boiled dinners (other than ramen, haha), but I did see this link on The Kitchn for corned beef and cabbage rolls and thought it was a cute idea. The dipping sauce seemed a little difficult to make, however, compared to the ease of making the rolls so skipped that part and decided to add mashed potatoes inside the rolls instead so it would look more like a normal maki roll.

St. Patrick's Day maki

St. Patrick's Day Maki (adapted from here)
makes 24 rolls

2 medium sized Idaho potatoes, peeled and cubed
1/4 cup butter, cut into 4 pieces
2 tablespoons milk
Salt to taste
1 medium size head of green cabbage
1 1/2 lbs. cold corned beef

Add the cubed potatoes to a large pot and add enough cold water to cover. Bring to a boil and cook for 15-20 minutes, until potatoes are soft when you insert a knife.

Drain and transfer to a medium bowl. Add butter and milk and mash until there are no lumps. Salt to taste and set aside to cool.

Start boiling a large pot of water.

Gently peel off the cabbage leaves, keeping them whole. In two batches, simmer the leaves for 8-10 minutes or until soft. Transfer from the pot to an ice-water bath. Pat the leaves dry and set aside.

Slice the corned beef into long strips.

Lay out a single cabbage leaf. Spread mashed potatoes over the bottom 2 inches, and place 2-3 strips of corned beef in the middle of the potatoes. Roll the cabbage leaf up tightly. After all the leaves are rolled, cut into bite-sized pieces and serve.

I found that the maki was flavorful enough not to need a dipping sauce, but I guess you can use a mustard or honey mustard if you really want. I brought these to a party on Saturday and didn't get to ask anyone what they thought of them, but when I went back at the end of the night, they were all gone except for two pieces, so I assume people liked them. =) Happy St. Patrick's Day everyone!

Next up: What to do with leftover corned beef and potatoes:  Corned Beef Hash (and Pasties)!

Monday, March 16, 2009

Duck Fat Potatoes

Duck fat potatoes

I had a wonderful weekend with a lot of cooking and baking but even more eating and drinking. =) Saturday morning, I went over to Jade's to have brunch with her and James. We had been planning this for about two weeks now, and as we were deciding what we would each make and bring, I couldn't believe I had to wait so long for all that deliciousness!

Jade made some crepes and had shaved dark chocolate, berries, sliced bananas, lemon juice, powdered sugar, and maple syrup as toppings. James brought homemade blueberry scones with a limoncello glaze and made brown sugar bacon.

I brought orange juice, eggs, the potatoes from Boston Organics, and my secret ingredient: duck fat.

Duck fat

I'd been reading for a while how good duck fat fries are, so the last couple of times I made duck, I'd been saving the drippings and harvesting the fat that solidifies on top. It's a beautiful thing--almost pure white and apparently, it's healthier than butter! You can store it in the freezer for months on end, and I only bring it out occasionally to make duck fat potatoes.

I love potatoes and have tried making home fries in the past but were never 100% pleased with the results. If you didn't add enough oil, they would invariably be almost burnt by the time they were cooked through, but if you add too much oil, it gets too greasy and neve really crispy. By cooking home fries in duck fat, though, there is some magic that happens where they never get too greasy, turn just the perfect golden brown, and are always crispy on the outside and dry and fluffy on the inside, like a baked potato. And the flavor! It's so indescribably good, I won't even try.

Duck Fat Potatoes
serves 3 epicureans

1.5 lbs. potatoes (red potatoes or Yukon golds work well)
2-3 tablespoons duck fat
Sea salt to taste

Wash and dice the potatoes. I don't usually peel them, but you can if you prefer. Place the diced potatoes in a bowl of cold, salted water. This is to prevent them from oxidizing (turning brown), to add a little flavor, and also to try to leech out some starch, which would make the potatoes gummy vs. crispy. Drain well after 5 minutes.

Frying the potatoes

Heat a large skillet on high and add the duck fat. Once the pan and fat are very hot, add the potatoes and form a single layer. Sprinkle some salt on top and stir every few minutes so that all sides of the potatoes are browned. You could also add a lot more fat so that the potatoes are immersed and essentially deep frying, but I like to hoard my duck fat.

They shrink!

Add more salt to taste if necessary and serve hot. If there is any leftover fat in the pan, you can use it to make scrambled eggs, which is what we did, and boy were those heavenly as well.

Friday, March 13, 2009

Panna Cotta, Take 3

Orange panna cotta

Okay, I think I have finally achieved the perfect consistency after two tries. I basically followed the same recipe as before, but this time I tried orange flavored panna cotta instead of almond, and I only had half-and-half and no cream so I adjusted the ratio a bit.

Orange Panna Cotta (based on this recipe)
makes 6 small servings

2 cups half-and-half
1 cup heavy cream
1 1/4 cups granulated sugar, divided
Zest from 1 medium orange
1 teaspoon orange extract
1 tablespoon powdered unflavored gelatin bloomed in 3 tablespoons water
1 red navel orange (or any other kind of orange that doesn't segment well; I would not recommend mandarins for example)
1 cup freshly squeezed orange juice

In a small saucepan over medium-high, combine half-and-half, milk, zest, and 3/4 cups sugar; bring to a boil. Stir in the orange extract. Remove from heat, and let stand for 20 minutes.

Cut the orange horizontally (along the latitudinal planes) so that you have 6 circular slices that will fit into the ramekins you are using.

Microwave the gelatin and water for 8 seconds. Add a ladleful or two of the warm half-and-half mixture to the gelatin and gently stir until all lumps are gone. Add to the rest of the half-and-half mixture. Pass the mixture through a sieve and divide evenly among 6 small ramekins or other servings dishes. Carefully add the orange slices so that they are floating on top. Cover with plastic wrap and place in the refrigerator for at least 3 hours.

In a small saucepan, boil the orange juice and remaining 1/2 cup sugar until the sugar is dissolved. Let cool.

Once the panna cotta has set, pour the orange syrup on top and serve.

Orange panna cotta

I think because I added the warm mixture to the gelatin to dissove it before adding it to the rest of the mixture, it really helped to distribute the gelatin. I definitely noticed a lot less gelatinous lumps in the sieve this time, and as a result, the texture of the panna cotta was perfect--neither too soft or too firm. On the other hand, I realize I like the almond flavored ones better, so if I ever make this again, I know what I'll stick with.

I had originally wanted the orange slices to sit on the bottom of the ramekin so that after the panna cotta had set, I could flip it upside-down and serve it with the orange slice on top. But the slices ended up floating when I added the panna cotta mixture so I had to scrap that idea. That's also the reason why you can see some milkiness on top of the orange slice and why the circumference of the slice I chose was a lot smaller than the mouth of the ramekin. And by the way, how are people able to unmold the panna cotta anyways? I tried running a knife along the edge, but it didn't work very well; you could see the knife marks along the edge and the top (or bottom, depending on how you look at it) was all sunk in afterwards. Maybe I need to run some hot water on the outside first to "melt" the edges a bit....

I didn't take any pictures of how it looked with the orange syrup because by the time it had cooled the light sucked, and anyways, I like the look without the syrup because you can clearly see the pure white of the panna cotta and the little orange slice floating on top like a lily pad. Too bad you can't really eat the orange slice as is because of the rind. I suppose if I had had the time, I could have candied the slices so that they could be eaten as is. Perhaps next time....

Thursday, March 12, 2009

Boston Organics, Week 4

So with the last delivery, I made kale chips with the kale, used the mushrooms in hot pot, ate the grapefruit, apples, and bananas, used the pears and oranges for panna cotta, used the tomato to make tomato and eggs over rice, used the broccoli for pan-fried noodles (post coming soon), used the potatoes for potato leek soup with bacon, used the scallions for Peking duck and warm tofu with spicy garlic sauce, and gave the sprouts to Connie since I tasted a few and didn't like them.

Boston Organics, Week 4

This week I got 2 Anjou Pears, 1 Cameo Apple, 4 Fair-Trade Bananas, 2 Fuji Apples, 2 Minneola Tangelos, 1 Rio Star Grapefruit, 3 Valencia Oranges, 2 Artichokes, 1 bunch Broccoli, 1 lbs Carrots, 1 Green Cabbage, 1 bunch Swiss Chard, 1 bunch Kale, and 1.5 lbs Red Potatoes.

I don't really like carrots, so I will probably try making a carrot cake or cupcakes with those. The red potatoes will definitely be used to duck fat potatoes. I will probably make more kale chips with the kale. The chard already went into last night's hot pot. Never worked with artichokes before, but I'm thinking stuffed artichokes. The broccoli will probably go into a stir fry or maybe broccoli soup, and I'm still trying to figure out what to do with the cabbage. Any ideas?

Tuesday, March 10, 2009

Warm Tofu with Spicy Garlic Sauce

So the answer to the previous post is that the mix won. Surprised? I kind of wasn't. There's a reason Korean moms use the mix, and I'm not one to argue with them....

Warm Tofu with Spicy Garlic Sauce

Another Korean dish I made recently (although it's from the March 2009 issue of Gourmet, so I don't know how authentic it is) was warm tofu with spicy garlic sauce. It's one of those incredibly easy (so easy I barely consider it cooking) but so good recipes. My mom makes something similar except it's cold silken tofu with soy sauce, sugar, scallions, and bonito flakes on top. Sometimes she adds thousand year eggs, too, but I don't really care for them. Anyways, this warm version should tide me through the rest of the Boston winter. Only 28 more days until Opening Day!

Spicy Garlic Sauce

Warm Tofu with Spicy Garlic Sauce
(based on this recipe)
makes an appetizer for 2-3 people or a light meal for 1

1 (12 oz.) package firm silken tofu
1 teaspoon chopped garlic
1/4 cup chopped scallion
2 teaspoons toasted sesame seeds
3 tablespoons soy sauce
1 tablespoon sesame oil
1 teaspoon coarse hot red-pepper flakes
1/2 teaspoon sugar

Carefully rinse tofu, then cover with cold water in a small saucepan. Bring to a simmer over medium-high heat, then keep warm, covered, over very low heat.

Meanwhile, mince and mash garlic to a paste with a pinch of salt. Stir together with remaining ingredients (except tofu).

Just before serving, carefully lift tofu from saucepan with a large spatula, drain, and transfer to a small plate. Spoon some sauce over tofu and serve warm.

Warm Tofu with Spicy Garlic Sauce

The original recipe called for soft, not silken tofu, but all I had was firm silken tofu, and it worked just fine, although you have to be extra careful when transferring it. I prefer the texture of silken tofu for this dish anyways, probably because it reminds me of my mom's dish. I also ended up estimating the measurements for all the ingredients for the sauce. I definitely didn't have a quarter cup of chopped scallions as I recently harvested almost all my scallions for the Peking duck. And I just realized that I forgot to crush the sesame seeds with the side of a heavy knife. Oh well, it was still delicious anyways. ^_^

My scallions Harvested scallions
Before and after