Monday, March 29, 2010

Apple Tarte Tatin

Apple Tarte Tatin

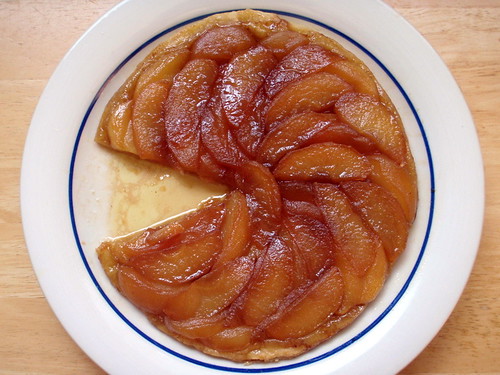
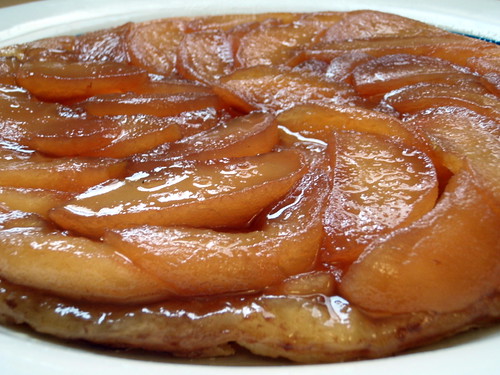
I had a couple of apples plus a lemon from the last Boston Organics delivery, so when I found a box of puff pastry in my freezer that I had forgotten about, I immediately thought of trying to make a tarte tatin. I never took French, so I have no idea how to pronounce that, but it sure sounded good: apples caramelized in butter and sugar, then topped with puff pastry and finished in the oven.

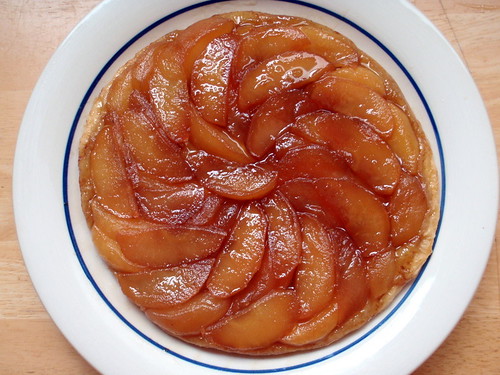
I remembered Molly (of Orangette fame) had included a recipe for tarte tatin in her book, A Homemade Life, so I pretty much followed that version. It wasn't until I went to copy and paste her version on-line that I realized the book version of the recipe didn't exactly mention that the puff pastry was supposed to be "1/2 inch wider all around than the skillet". And you can see why below; the pastry shrinks as it bakes. But I don't think it really matters all that much once you flip it over. I also changed it up a bit by cutting the apples into sixteenths instead of quarters since I only had 4 apples. And instead of placing them rounded side down, I made a spiral patter with the slices on their sides.

Apple Tarte Tatin

Apple Tarte Tatin (based on Orangette's version here)
makes 8 servings

4 large apples, (I used Fuji)
Juice of 1 lemon
1 ½ cups granulated sugar
6 tablespoons unsalted butter, divided
About 14 ounces puff pastry

Peel and core the apples and cut each into 16 slices. Toss the apple slices in a large bowl with the lemon juice and ½ cup of the sugar. Set aside for 30 minutes.

Golden caramel

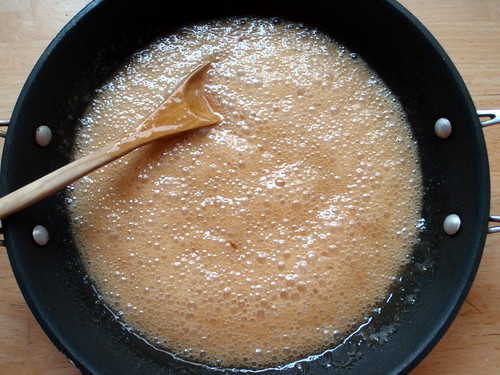
Melt 4 tablespoons of butter in a 9-inch oven-safe skillet over medium heat. Add the remaining 1 cup sugar, along with a few tablespoons of the apple-lemon juices. Stir to mix. Cook the mixture over medium-low heat, stirring regularly with a wooden spoon, for about 15 minutes, or until the mixture is a smooth, bubbly, pale caramel color.

Starting the first layer

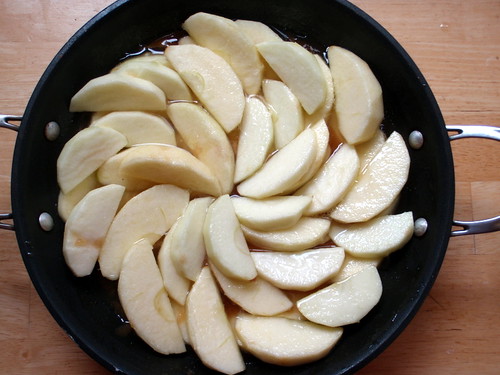
Remove the pan from the heat and carefully add apple slices, arranging them neatly in a decorative pattern. Arrange a second layer of apples on top wherever they fit, closely packed. This second layer need not be terribly neat. Top the apples with the remaining 2 tablespoons of butter, cut into dice.

Second and third layers

Preheat the oven to 375°F.

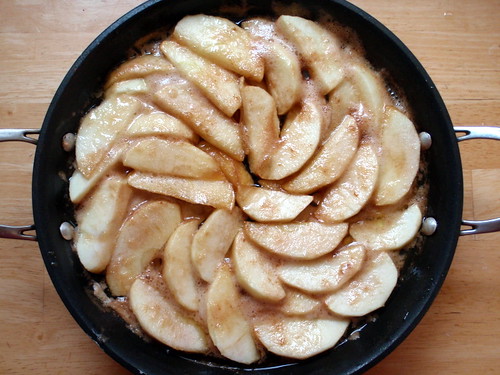
Cook the apples over medium-low heat for about 20 minutes, occasionally spooning the bubbling caramel liquid over them. Press them down gently with the back of a spoon — don’t worry if they shift a bit in the liquid; just move them back to where they were — and watch to make sure that no one area of the pan is bubbling more than another. Shift the pan as necessary so that the apples cook evenly. They are ready when the liquid in the pan has turned to a thick, amber ooze. The apples should still be slightly firm. Do not allow them to get entirely soft or the liquid to turn dark brown. Remove the pan from the heat.

Cooked apples

On a floured surface, roll the puff pastry out to a thickness of about 3/16 inch. Using a sharp, thin knife, trace a circle in the pastry about 10 inches in diameter (1/2 inch wider all around than the skillet), and trim away any excess. Carefully lay the pastry circle over the apples in the skillet, tucking the overlap down between the apples and the inside of the pan.

Baked Puff Pastry

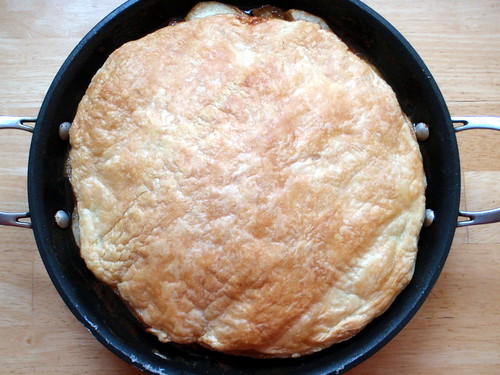
Place the skillet on a rimmed baking sheet, and bake for about 30-35 minutes, until the pastry has risen, and is dry and golden brown. Remove the skillet from the oven, and let it to rest for a minute or two. Tilt the pan and look down inside the edge: if there is a lot of juice, pour most of it off into the sink. [Do not pour it all off, or the apples may stick to the pan.] Place a serving platter upside-down over the skillet and, working quickly and carefully (it’s hot!), invert the tart onto the platter. Rearrange any apple slices that may have slipped or stuck to the skillet. Serve warm or at room temperature.

Apple Tarte Tatin

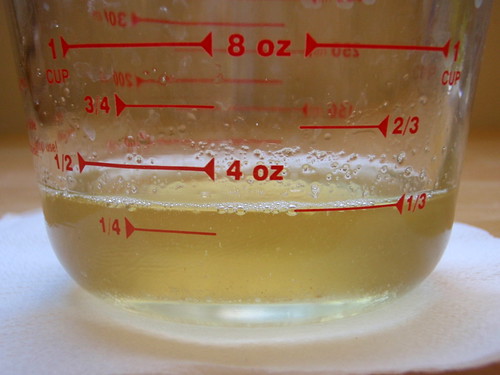
Now if only I could figure out what to do with all the buttered apple juices I drained off....

Next:  The Best Scones in the World
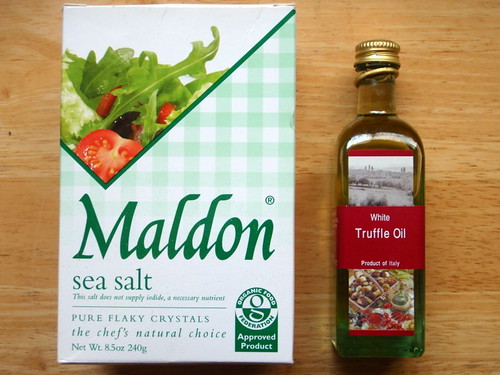
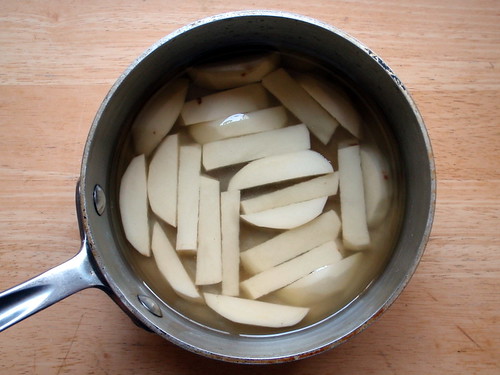
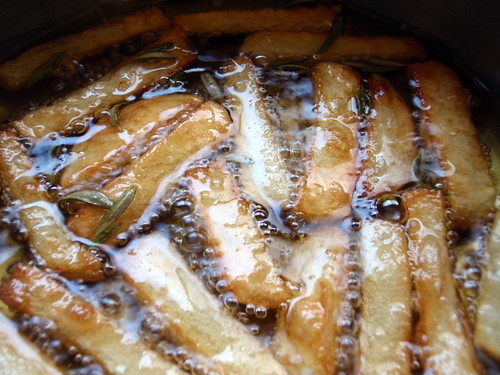
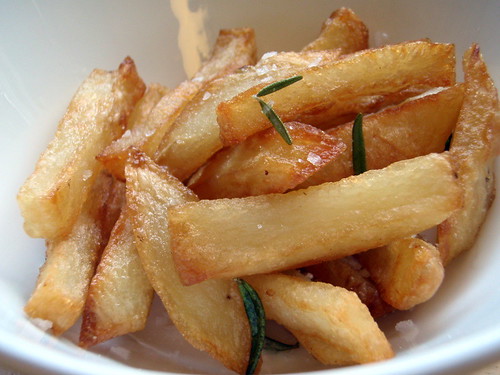
Previously:  Duck Fat French Fries with Rosemary, Maldon Salt, and Truffle Oil

Thursday, March 25, 2010

Duck Fat French Fries with Rosemary, Maldon Salt, and Truffle Oil

...And back to the unhealthy. (Although in my defense, I did try to make baked sweet potato fries the same day I made these, but they were just such a fail in comparison to these that I am ashamed to post about them.)

When I first read about the cold fat method of making French fries on Bitten, I was ecstatic. A way to make crispy fries without the splatter and smell of oil all over your kitchen? Genius! And then I thought, why not go all the way and really dress these fries up? I had had the rosemary truffle fries at Garden at the Cellar recently, and really, really loved them, so I picked up some fresh rosemary and white truffle oil from Whole Foods. (As another aside, did you know that most "truffle oils" on the market don't even contain real truffles? If you look at the list of ingredients, it just says "truffle flavoring" or something like that, which is code for chemicals which have never seen a truffle before. Unfortunately, I think there is only one brand of truffle oils in the U.S. that contain real truffles, and it wasn't available at Whole Foods.)

P3212588

I also had a box of Maldon salt I had picked up from Christina's Spices in Inman Square. I'd rave about this salt myself, except it's already been done by so many people with so much more cooking cred than me. Needless to say, this is pretty much one of the best finishing salts you can buy. What I really love about this salt, other than the taste, is what a tactile experience it is to crush the flakes between your fingertips.

And of course, I had duck fat. Oh, how I love thee, duck fat. Especially with potatoes. (And don't forget, duck fat is better for you than butter!)

I used the potatoes I had received in my Boston Organics delivery. I'm not sure what exact kind they were, but they were relatively small and, I believe, from Prince Edward Island.

Duck Fat French Fries with Rosemary, Maldon Salt, and Truffle Oil (method pretty much taken word for word from Bitten)

Potatoes, peeled
Enough fat to cover the cut potatoes (duck fat, peanut oil, etc., or any combination thereof)
Fresh rosemary
Maldon salt
Truffle oil

Cut your peeled potatoes into whatever shape you like, but probably no skinnier than three-eighths of an inch. Rinse them and shake off the water (part of the genius of this technique is that a little residual water won’t cause splattering, so you don’t need to towel-dry the potatoes). Put them in a heavy pan — a straight-sided sauté pan is ideal, but anything not too shallow will do. They should ideally be in a single layer, but this is not always practical: aim for it, though. Add room-temperature fat just to thoroughly cover and put the pan over low heat, without a lid.

P3212565

As the oil temperature slowly rises, the potatoes will, in effect, poach in fat and their excess water will gently evaporate (hence the lack of splattering). Yes, the oil will bubble, but reassuringly, not alarmingly. Every now and again, use a thin-bladed spatula or a long-handled spoon to make sure they are not sticking (their starch has a tendency to cause this) and give the pan a shake. Be very careful: at a certain point they will be very, very fragile — cooked but not yet crisp.

P3212577

When the potatoes are very tender, you can raise the heat, but only a little. Say, from low to medium-low. They will finally start to crisp and turn golden, and will ultimately become french fries. Excellent ones. The one down side (apart from the limit on quantity) is that this can take as long as an hour.

P3212578

When your fries are starting to brown, throw in some of the fresh rosemary. When your fries are sufficiently crisp and browned, remove fries and rosemary with a slotted spoon and drain. Drizzle a little truffle oil on top. Grab a pinch of Maldon salt and crush between your fingers to sprinkle on top. Repeat to taste.

P3212580

I'm pretty sure you could make these French fries with regular oil instead of duck fat, with regular sea salt instead of Maldon salt, and without the rosemary and truffle oil, and they would still taste great. I was kind of surprised by how non-greasy these were on the inside. I figured that having the potatoes sit in fat for so long would've meant they would've been soaked in grease, but in actuality, they tasted more like a light and fluffy baked potato on the inside while staying nice and crispy on the outside. In other words, perfection.
Another thing I really like about this method of making French fries is that because the oil was kept at relatively low temperatures, the fats were not too damaged and you can save and reuse the fat for another French fry making session. Which I'll probably be doing real soon....

Next:  Apple Tarte Tatin
Previously:  Lemon Angel Food Cake
One year ago:  Cincinnati Chili

Monday, March 22, 2010

Lemon Angel Food Cupcakes

P3202557

And now for something a little healthier. After making two Crack Pies and the Guinness Milk Chocolate Ice Cream, I had a lot of egg whites sitting in my fridge. I toyed briefly with the idea of making macarons, but then I remembered that no matter how cute and pretty they look, they are still ridiculously time-consuming to make, and I don't even really like how they taste all that much. So instead, I decided to make angel food cake. And since I had a lemon to use up from my Boston Organics delivery, I decided to make lemon angel food cupcakes.

Just about every recipe for angel food cake lists cake flour as an ingredient. I already have unbleached all-purpose flour and white whole wheat flour in my pantry and really didn't feel like buying yet another type of flour. But luckily, a quick google for "cake flour substitute" brought me to this page, where I learned that I could add a tablespoon of cornstarch to a 1/2 cup measuring cup and then level off with all-purpose flour to make the equivalent of a 1/2 cup of cake flour.

I also don't have a sifter, either, but I just ended up using a fine-mesh metal sieve and two bowls to sift the flour and sugar together. At first I thought I could get away with just whisking the two together, which is what I usually do when I need to sift flour, but I realized pretty quickly that the powdered sugar was not going to unclump from mere whisking.

P3202549

Oh, and I got to use my new lemon juicer for the first time! It's so much faster and cleaner than the reamer I've been using, and it was on sale too! Don't forget to roll the lemon around on a hard surface before cutting so that you can get more juice out of it.

P3202548

Lemon Angel Food Cupcakes (based on this recipe from Cooking Light)
makes 16 cupcakes

1/2 cup cake flour (or 1 tablespoon corn starch plus 7 tablespoons all-purpose flour)
3/4 cup powdered sugar
3/4 cup egg whites (about 5 large eggs)
1/8 teaspoon salt
3/4 teaspoon cream of tartar
1/2 cup granulated sugar
1/2 teaspoon vanilla extract
Grated rind from 1 medium lemon

1/4 cup butter, softened
2 cups powdered sugar
Freshly squeezed lemon juice from 1 medium lemon

Preheat oven to 350°F. Place 16 paper muffin cup liners in muffin cups. Set aside.
Lightly spoon cake flour into dry measuring cups; level with a knife. Sift together flour and 3/4 cup powdered sugar into a medium bowl; repeat the procedure 2 times.

P3202552

Beat egg whites and salt with a mixer at high speed until frothy (about 1 minute). Add cream of tartar, and beat until soft peaks form. Add 1/2 cup granulated sugar, 1 tablespoon at a time, beating until stiff peaks form. Sprinkle flour mixture over egg white mixture, 1/4 cup at a time; fold in after each addition. Stir in vanilla and rind.

P3202553

Divide batter evenly among prepared muffin cups. Bake at 350° for 18 minutes or until lightly browned. Remove from pan; let cool completely on a wire rack.

P3202554

To prepare frosting, beat butter with a mixer at high speed until fluffy. Gradually add 2 cups powdered sugar; beat at low speed just until blended. Add lemon juice; beat until fluffy. Spread lemon frosting over each cupcake.

P3202558

Since I only have one muffin tin, I had to bake these in two batches, which meant I wasn't entirely sure how far to fill the muffin cups. I erred on the side of caution for the first batch and only filled them 3/4 of the way. They do rise in the oven, but then they shrink quite a bit once they cool, both in height and circumference. Don't be surprised if the cupcakes don't stay entirely round after they've cooled. So for the second batch I filled the cups with batter basically all the way to the top and was much more pleased with how those turned out after they had cooled.

I found that I could eat one of these cupcakes in about two bites; they were so soft and delicious! Actually, the texture really reminds me of the cake layer of lemon pudding cakes. And the frosting--when I first tasted it straight from the bowl, I wasn't that impressed with the taste or texture, but once it's on the cupcakes--is so mouth-watering good! It really reminded me of those lemon Girl Scout cookies or lemon coolers.

Next:  Duck Fat French Fries with Rosemary, Maldon Salt, and Truffle Oil
Previously:  Mama Huang's Secret Beer Duck Recipe

Friday, March 19, 2010

Mama Huang's Secret Beer Duck Recipe

My mom made me promise not to post her recipe for her beer duck, but I figure it won't hurt to show you some pictures, in the tradition of the Feng Family Secret Peking Duck Recipe. It's a really easy recipe that only uses 5 ingredients (6, if you count water) and produces a really tender, super-flavorful duck. Best of all, you can harvest the duck fat at the end and the resulting drippings can totally be re-used for other recipes like xiao long bao. I'm thinking of trying to make Taiwanese meat stew from the drippings I have sitting in my fridge right now....

Beer duck mis en place
Mis en place (can you figure out the 5 ingredients?)

Beer duck
15 minutes in

Beer duck
30 minutes in

Beer duck
1 hour in

Beer duck
1 hour 30 minutes in (heehee, I think it's funny how the duck looks like it's embarrassed and trying to cover its private parts here)

Beer duck
2 hours in

Not the prettiest thing in the world at the end because the meat is literally falling off the bones, but so, so yummy. And look at all that delicious duck fat floating on top! I can't wait to try this cold fat method of making French fries with it!

P.S. I have been known to share secret duck recipes with people who have gotten me really, really good Red Sox tickets. I'm talking about Opening-Day-against-the-Yankees good. Just so you know. ;)

ETA:  No more teasing; here's the full recipe!

Next:  Lemon Angel Food Cupcakes
Previously:  Guinness Milk Chocolate Ice Cream

Wednesday, March 17, 2010

Guinness Milk Chocolate Ice Cream

Guinness Milk Chocolate Ice Cream

I wanted to make a special ice cream for St. Patrick's Day, but couldn't decide between Guinness Milk Chocolate ice cream or Baileys Irish Cream ice cream, so I took a poll on Facebook. I got 4 votes for Guinness, 8 votes for Baileys, 3 votes for both, and 1 vote for corned beef and cabbage ice cream. Thanks, Ed. =P It was pretty interesting that all the guys (except for Ed) voted for the Guinness, and all the women, except for one, voted for the Baileys.

I ended up making the Guinness Milk Chocolate ice cream because it only needed 4 egg yolks, vs. the 6 needed for the Baileys, and also because I needed to buy some beer to make my mom's beer duck. And also because I was just curious about what Guinness Milk Chocolate ice cream would taste like (I'd already had the Häagen-Dazs version of Baileys).

P3162511

Guinness Milk Chocolate Ice Cream (from David Lebovitz's The Perfect Scoop, via flamingobear)
makes about one quart

7 ounces milk chocolate, finely chopped
1 cup whole milk
½ cup sugar
Pinch of coarse salt
4 large egg yolks
1 cup heavy cream
¾ cup Guinness (I used Guinness Draught)
1 teaspoon vanilla extract

Put the chocolate pieces in a large bowl and set a mesh strainer over the top.

Heat the milk, sugar, and salt in a medium saucepan until hot and steamy. In a separate medium bowl, whisk together the egg yolks. Temper the yolks by slowly and gradually pouring in the warm milk mixture. Whisk constantly so that you don’t scramble the eggs. Then scrape the warmed egg yolk mixture back into the saucepan.

Stir the mixture constantly over medium heat with a heatproof spatula, scraping the bottom as you stir, until the mixture thickens and coats the spatula (which will be at about 170-175°F on an instant-read thermometer). Pour the custard through the strainer over the milk chocolate, then stir until the chocolate is melted. Once the mixture is smooth, whisk in the cream, then the Guinness and vanilla. Stir until cool over an ice bath.

Guinness Milk Chocolate Ice Cream

Chill the mixture in the refrigerator for several hours or overnight – until the mixture is 40°F. Then freeze it in your ice cream maker. This ice cream is very soft coming out of the ice cream maker. It hardens somewhat in the freezer but maintains an almost soft-serve consistency due to the alcohol content. It melts quickly, so eat fast!

Guinness Milk Chocolate Ice Cream

So let me first say that I'm not really a big fan of the taste of beer or milk chocolate. I was hoping that the two flavors together would meld into something that's greater than the sum of its parts, but in the end, what I taste is beer and milk chocolate. I think I was trying to taste the beer, though, so its sharpness was very apparent to me. I bet if you like the taste of beer and milk chocolate, you'd love this ice cream.

Irish Car Bomb Sundae

Then I had the brilliant idea of adding some Baileys on top, just to see how that would taste. And let me tell you, that totally transported me away to this little green island to the west of England where leprechauns roam and rainbows end with pots of gold. This, my friends, was pure awesomeness. I think next year, I might try to make both the Guinness Milk Chocolate ice cream and the Baileys Irish Cream ice cream and swirl them together to make an Irish Car Bomb ice cream. But for this year, I'll just keep enjoying my Irish Car Bomb Sundae. ;)

Sunday, March 14, 2010

Momofuku's Crack Pie

Crack pie

I told myself I wouldn't make this. Even though it was one of the most delicious things I had ever tasted, and I pretty much had all the ingredients for it already, I still told myself, "Self, you can not make this pie." Because you see, I'm trying to eat healthier. After the last two posts, I figured it was time to start posting something healthier. But then, I realized, Pi Day is coming up. And I have a birthday party and a potluck dinner to go to. And this recipe is for two pies. And well, when the stars align....

This is not an quick and easy recipe to make. Before you even get to making the filling or even the crust, first you have to make the cookies that go into the crust. But it's so worth it. This pie? Costs $44 at Momofuku Milk Bar. Forty-four bucks! And that's not including the shipping and handling if you don't happen to live in NYC. So do yourself a favor and just make it yourself.

Momofuku's Crack Pie (from the LA Times)
Makes 2 pies (6 to 8 servings each)

Cookie for crust
2/3 cup plus 1 tablespoon (3 ounces) flour
Scant 1/8 teaspoon baking powder
Scant 1/8 teaspoon baking soda
1/4 teaspoon salt
1/2 cup (1 stick) softened butter
1/3 cup (2 1/2 ounces) light brown sugar
3 tablespoons (1 1/4 ounces) sugar
1 egg
Scant 1 cup (3 1/2 ounces) rolled oats

Heat the oven to 375° F.

In a medium bowl, sift together the flour, baking powder, baking soda and salt.

In a large bowl using an electric mixer, beat the butter, brown sugar and sugar until light and fluffy.

Whisk the egg into the butter mixture until fully incorporated.

With the mixer running, beat in the flour mixture, a little at a time, until fully combined. Stir in the oats until incorporated.

Spread the mixture onto a 9-inch-by-13-inch baking sheet and bake until golden brown and set, about 20 minutes. Remove from heat and cool to the touch on a rack. Crumble the cooled cookie to use in the crust.

Oatmeal cookie for crust

Crust
Crumbled cookie for crust
1/4 cup (1/2 stick) butter
1 1/2 tablespoons (3/4 ounce) brown sugar
1/8 teaspoon salt

Combine the crumbled cookie, butter, brown sugar and salt in a food processor and pulse until evenly combined and blended (a little of the mixture clumped between your fingers should hold together). Divide the crust between 2 (10-inch) pie tins. Press the crust into each shell to form a thin, even layer along the bottom and sides of the tins. Set the prepared crusts aside while you prepare the filling.

Pressed cookie crust

Filling
1 1/2 cups (10 1/2 ounces) sugar
3/4 cup plus a scant 3 tablespoons (7 ounces) light brown sugar
1/4 teaspoon salt
1/3 cup plus 1 teaspoon (3/4 ounce) milk powder
1 cup (2 sticks) butter, melted
3/4 cup plus a scant 2 tablespoons heavy cream
1 teaspoon vanilla extract
8 egg yolks
2 prepared crusts
Powdered sugar, garnish

Heat the oven to 350° F.

In a large bowl, whisk together the sugar, brown sugar, salt and milk powder. Whisk in the melted butter, then whisk in the heavy cream and vanilla.

Filling

Gently whisk in the egg yolks, being careful not to add too much air.

Divide the filling evenly between the 2 prepared pie shells.

Filled pie

Bake the pies, one at a time, for 15 minutes, then reduce the heat to 325° F and bake until the filling is slightly jiggly and golden brown (similar to a pecan pie), about 10 minutes. Remove the pies and cool on a rack.

Baked pie

Refrigerate the cooled pies until well chilled. The pies are meant to be served cold, and the filling will be gooey. Dust with powdered sugar before serving.

Crack pie

I actually made all the cookies (enough for two pies) but made each pie separately on separate days since I only have one pie pan. Because the volumetric measurements are kind of hard to divide in half, I ended up weighing the ingredients that had weights listed for them. From what I read on the interwebs, it seems like the toughest part about making this pie is figuring out how much time to bake it for and at what temperatures. I pretty much just followed the LA Times guidelines and baked it for 15 minutes at 350° F, reduced the heat to 325° F, and continued baking for another 20 minutes. At this point it was still "slightly jiggly and golden brown".

Crack pie

It really is important to chill this pie. I ended up cutting out a slice because I wanted to try to take a picture of it while I still had daylight. The pie was still just a little above room temperature, and not completely solid yet. I did take a bite at that point and thought it just tasted okay. When I tried it later after it had been thoroughly chilled in the fridge, it was much, much better. The texture had condensed, and the flavors just gelled better as well.

I had toyed with the idea of substituting store-bought oatmeal cookies for the crust to save some time, but ultimately, I'm glad I didn't. The filling itself is so sweet that you need the crust to be more of a blank canvas rather than try to compete. A lot of people at the party described this as tasting like "pecan pie without the pecans". I bet this would be even better if there was a sprinkle of sea salt on top, and I'd be really curious if this could be lemon-ized so it was kind of like a lemon bar. On crack.

Monday, March 1, 2010

Bacon Fat Caramels

When I first read about Humphry Slocombe's lard caramels, my first thought was, why didn't they just use bacon fat instead of lard? After all, candied bacon was all the rage already, and wouldn't bacon fat caramels sound so much more appetizing than lard caramels? And for those of you who think bacon fat caramel sounds disgusting, well, we don't have to be friends anymore. ;)

Bacon Fat

So I made sure to save as much bacon fat as I could from the bacon I used for the bacon caramel corn. I ended up with a little over 7 tablespoons of fat from about 10 oz. of uncooked bacon. I searched on-line to see if anyone else had posted a recipe for bacon fat caramels, but the only one I found used sweetened condensed milk instead of cream. I usually like sweetened condensed milk in my desserts, but it is a pretty strong flavor, and I really wanted the bacon flavor to shine through, so I ended up using a recipe for fleur de sel caramels and just replaced the butter with bacon fat.

Bacon Fat Caramels

Bacon Fat Caramels (adapted from a recipe on Epicurious)
makes about 40 candies

1 cup heavy cream
5 tablespoons bacon fat
1 teaspoon kosher salt
1 1/2 cups sugar
1/4 cup light corn syrup
1/4 cup water

Line bottom and sides of an 8-inch square baking pan with parchment paper, then lightly oil parchment.

Bring cream, bacon fat, and salt to a boil in a small saucepan, then remove from heat and set aside.

Boil sugar, corn syrup, and water in a 3- to 4-quart heavy saucepan, stirring until sugar is dissolved. Boil, without stirring but gently swirling pan, until mixture is a light golden caramel.

Bacon Fat Caramel

Carefully stir in cream mixture (mixture will bubble up) and simmer, stirring frequently, until caramel registers 248°F on thermometer, 10 to 15 minutes. Pour into baking pan and cool 3 hours. Cut into 1-inch pieces, then wrap each piece in a 4-inch square of wax paper, twisting 2 ends to close. Store in an airtight container in the refrigerator.

Optional: Sprinkle diced, cooked bacon and/or sea salt on top of the caramel when it is still slightly soft.

Bacon Fat Caramels

I actually didn't have any wax paper but found that wrapping the caramels in parchment paper worked fine. The caramels were pretty greasy, but I think that was more because of the oil I used to grease the parchment rather than from the bacon fat itself. I did notice that at room temperature, the caramels are really quite soft, so I would definitely keep these chilled until you serve them.

As for the taste, some people have said it tastes like bacon drenched in maple syrup. Others have said that they didn't even taste the bacon until they bit into the part that had a bit of diced bacon in it. I did prefer the pieces that I sprinkled sea salt (I used Maldon sea salt) on more than the pieces that just had diced bacon because I think the texture worked better with the sea salt. Although, I did press all the fat out of the diced bacon, so maybe if they weren't so dry, it would have worked better.

Oh, and since I had two leftover butter wrappers after making the bacon caramel corn, I cut them up to wrap some of the caramels. I kind of like how they look, even though it's false advertising.


Recyling butter wrappers 

Previously:  Caramel Bacon Corn