Friday, January 24, 2014

Grilled Cheese Egg in a Hole


You'd think grilled cheese would be an incredibly easy thing to make, but I still remember the first time I ever tried to make one (I think I was 12 or 13) I thought I could just put a piece of American cheese between two slices of bread and toast that in the toaster oven (at least it wasn't a toaster!).  Imagine my surprise when I bit into that combination and tasted dry, flavorless disappointment instead of crispy, cheesy glory.

Since then, I've learned to butter the outside of the bread before grilling it on a skillet.  It makes a vast improvement, but trying to spread cold butter on a soft slice of bread can often be another source of frustration. Then I learned a pro-tip from Five Guys:  use mayonnaise instead of butter on the outside of a grilled cheese.  It's way more spreadable and adds just a little oomph of flavor to the sandwich.

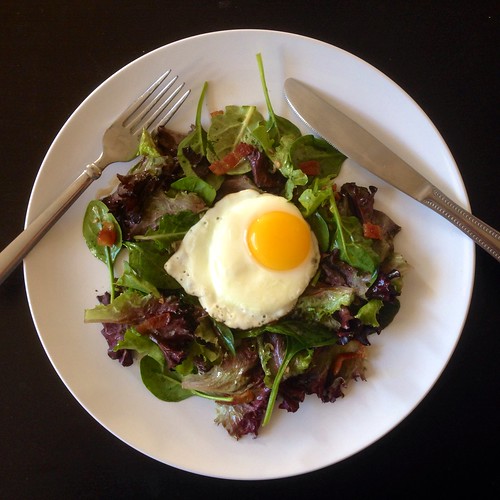
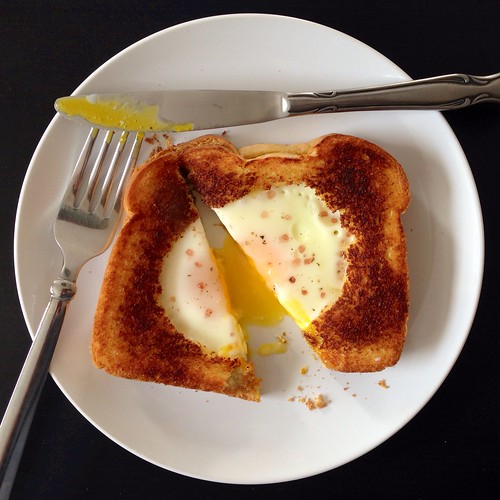
I decided to take it up another notch by making an egg in a hole with the grilled cheese.  The hardest part of the whole endeavor was finding the right sized instrument to make the hole.  I didn't want the diameter of the hole to be too small or else it would take too long for the egg whites to cook through, but I didn't want it too wide either or else the height of the egg in the grilled cheese would be too low and the egg to grilled cheese surface area ratio would be too high.  I settled on using my rice maker's measuring cup, which had a diameter of 2 ¾".  I think a tiny bit smaller would've been perfect, but as you can see, it turned out okay.  =)


Grilled Cheese Egg in a Hole
makes 1 sandwich

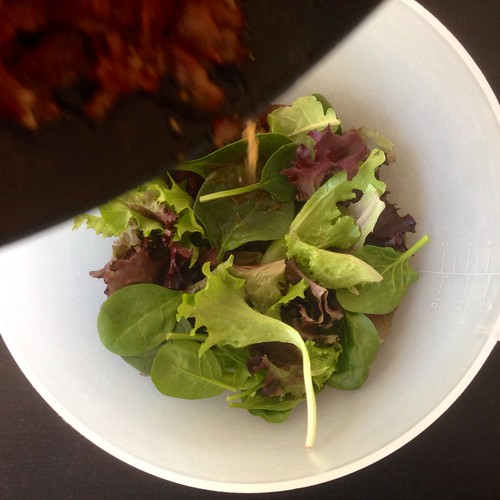
2 slices soft bread, like white or potato
1-2 teaspoons mayonnaise
1-2 slices of sharp white cheddar or your favorite melty cheese
1 large egg
Fresh ground pepper and sea salt

Start heating a non-stick pan on medium-low.


Spread a thin layer of mayonnaise on one slice of bread and place mayonnaise-side down in the pan.

Cut the cheese into thirds.  Place one-third on each side of the bread in the pan.  Cut the remaining third in half and fill in the top and bottom of the gap between the other slices of cheese, leaving a cheese-less square in the middle.


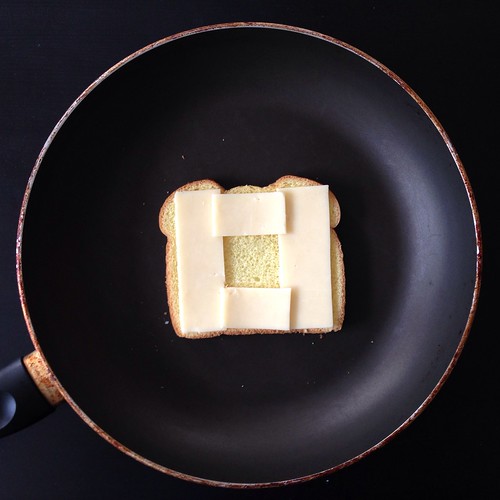
Spread a thin layer of mayonnaise on the other slice of bread and place on top of the cheese, mayonnaise-side up.  Cook for a few minutes until the bottom is golden brown.


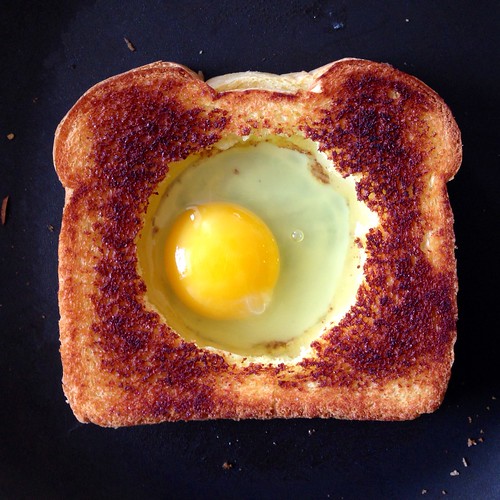
Flip the sandwich over.  Using a cookie cutter or drinking glass, cut out a hole in the middle of the sandwich about 2 ½" to 2 ¾" wide.  Remove the circle of bread (you can continue grilling this on the side of the pan) and crack the egg into the hole.  Cover and cook until the egg is set to your liking.


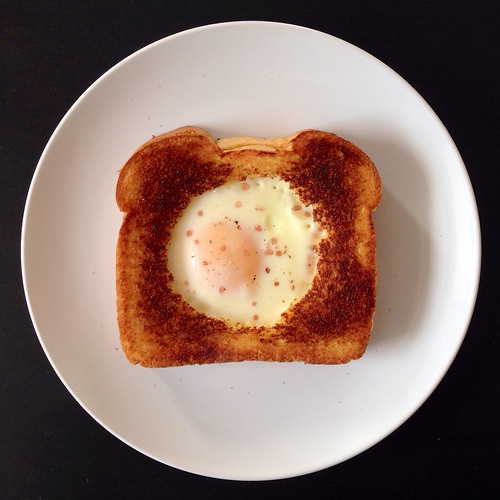
Slide the sandwich onto a plate.  Season the egg with fresh ground pepper and sea salt (I used a red Alaea salt, which is why the egg looks like it has measles).  Serve with tomato soup if you like.


Next:  Homemade Tagliatelle with Shaved Truffles
Previously:  Sarah Ruth's Saucepan Brownies
Last Year:  Rainbow Cookie Sandwiches
Four Years Ago:  Pear Bread
Five Years Ago:  Luo Buo Gao (Chinese Turnip Cake)

Wednesday, January 22, 2014

Sarah Ruth's Saucepan Brownies

http://www.flickr.com/photos/joyosity/11998994916/

I've been looking a while for a good homemade brownie recipe.  I've tried making Smitten Kitchen's favorite brownies, The Kitchn's extra-dark brownies with sea salt and lime, Coconut & Lime's bittersweet cranberry brownies, and even Alice Medrich's Best Cocoa Brownies.  But the thing is, I grew up making brownies from a box, and I haven't been able to find anything that comes close to the chewy, fudgy goodness of my childhood.  Until now.

I first met Sarah Ruth because she was looking for a roommate, and I just happened to have a spare bedroom in my new home.  Little did I know she was exactly what I needed in my life (and my home) these last 5 months.  To date she's killed at least 3 bugs for me, listened to me whine about work, laughed at me when I was being silly, accepted my introverted need for alone time, and last but not least, shared with me this recipe.  Sadly, she moved out yesterday, but I'm going to always be super grateful for the time we were able to live together.

These brownies are moist, dense, and super easy to whip up.  They're called saucepan brownies because you don't even need to use a separate mixing bowl; you just melt the butter in a saucepan and then mix everything in there before pouring it into a greased baking pan.  I highly recommend using a coarse sea salt because it doesn't fully melt in the batter, so when you take a bite you'll get these little nuggets of saltiness that just elevates the rest of the brownie.  If you don't have any coarse sea salt, you can sprinkle some flaky salt on top of the brownies after it's done baking for a similar effect.

http://www.flickr.com/photos/joyosity/11998478903/

Sarah Ruth's Saucepan Brownies
makes 24 brownies

1 cup salted butter*
3/4 cup packed cocoa powder
2 1/2 cup sugar
1 teaspoon vanilla extract
1/2 teaspoon coarse sea salt
3 large eggs
1 1/4 cup flour
1/2 teaspoon baking powder

Preheat oven to 350°F.

Melt the butter in a saucepan over low heat.  Stir in the cocoa and mix until smooth.  Remove from heat and cool slightly.  

Add sugar, vanilla, salt, and eggs.  Stir until combined.  Sift in the flour and baking powder and stir until just combined.  

Spread into greased 9" x 13" pan.  Bake for 30 minutes.  Cool completely before slicing and serving.

*If you only have unsalted butter, add another 1/2 teaspoon of salt to the batter.

Next:  Grilled Cheese Egg in a Hole
Previously:  Banoffee Pie
Five Years Ago:  Scallion Pancakes

Friday, January 17, 2014

Banoffee Pie


Sherlock is back!*  I discovered BBC's Sherlock last winter and have been impatiently waiting for series 3 for what feels like forever!  What's so great about the show?  The acting, the writing, the mysteries, the chemistry, and of course, Mr. Benedict Cumberbatch himself.  ^_^

I read in an interview that his favorite dessert is banoffee pie, so I decided to try to make one to celebrate the return of Sherlock.  I've been intrigued with this dessert ever since I first saw Juliet offer it to Mark as a sort of peace offering in Love Actually.  With a crust made from crushed digestive biscuits, the pie is filled with layers of creamy toffee, sliced bananas, and lots of whipped cream.  The dessert is British in origin, like the sticky toffee pudding I made previously, and the name comes from an amalgam of "banana" and "toffee".

I couldn't find any digestive biscuits in my local grocery store, so I used good ol' American Nilla wafers.  In a pinch, you could probably use a prepared graham cracker crust.  Some of the recipes I looked up used sweetened condensed milk boiled for hours in the can (essentially homemade dulche de leche) for the toffee layer, but if you don't have hours, you can just make a quick filling using butter, brown sugar, and sweetened condensed milk.

This dessert kind of reminds me of Benny in that it's certainly not the prettiest dessert to look at, but once you've had some, it's irresistible.  ;)


Banoffee Pie (adapted from Saveur)
makes 1 pie

2 sticks unsalted butter
11 oz. box of Nilla wafers
½ cup packed brown sugar
14 oz. can sweetened condensed milk
3 or 4 bananas
1 pint heavy cream
Powdered sugar, to taste
A pinch or two of espresso powder (optional)
Grated chocolate

Melt one of the sticks of butter in a small saucepan.

Crush the wafers in a food processor until you get a fine crumb texture. Transfer to a bowl and stir in the melted butter. Press into a pie pan. Chill the crust in refrigerator for at least one hour.

Melt the other stick of butter in a small saucepan. Stir in the brown sugar and melt over low heat. Add the condensed milk and bring the mixture to a boil for a few minutes, stirring continuously.

Pour the filling into the crust. Cool and chill again for at least one hour until the caramel is firm.

Slice the bananas and place them in a single layer on top of the caramel.

Start whipping the cream.  Sprinkle in some powdered sugar until the whipped cream is barely sweet (the rest of the pie is already insanely sweet).  Whip in the espresso powder if using.


Top the bananas with the whipped cream, sealing the filling in. Sprinkle the top of the pie with grated chocolate.


*Okay, I may or may not have already watched series 3 at the same time it aired in the UK since I just couldn't wait any longer, but for the majority of Americans, it'll be starting this Sunday on PBS after Downton Abbey!

Next:  Sarah Ruth's Saucepan Brownies
Previously:  Flower Pavlovas
Last Year:  Traditional Croissants
Four Years Ago:  Kalua Pork
Five Years Ago:  Mayonnaise Shrimp with Candied Walnuts

Tuesday, January 14, 2014

Flower Pavlovas


I've been holding off on posting about these fruit pavlovas since this summer because I honestly didn't know what to write about them.  They're too pretty not to share though, so I think I'll make this a picture tutorial instead of my normal recipe plus pictures post.

Start off by making the pavlova base, which is basically a meringue with cornstarch added.  You can find a full recipe at The Kitchn.

Beat egg whites until soft peaks form

Gradually add the rest of the ingredients and beat until stiff peaks form

Shape and bake

Using a paring knife, cut out a thin slice

Remove the first slice and continue cutting out thin slices...

...until all you have left is the pit

Start layering the slices in a small dish...

...forming smaller, overlapping rings...

...using smaller and smaller slices...

...until you fill it all in

Grab a pavlova base...

...and carefully slide the fruit slices onto it

Tada!

The pavlovas above were made with nectarines, if I recall correctly.  You'll want to use fruits that will be soft enough to shape into the flower pattern.  I think they're prettiest when there's a contrast between the peel and flesh, but here's one I made with kiwi slices that's quite pretty in its own right.

Reminds me of a succulent plant


Next:  Banoffee Pie
Previously:  Salade Indochinoise
Last Year:  Spicy Tuna with Crispy Sushi Rice
Four Years Ago:  Banana Bread Yeasted Waffles
Five Years Ago:  Nian Gao (Mochi Cake)

Friday, January 10, 2014

Salade Indochinoise

What do you get when you take a perfectly innocent salade Lyonnaise and Thai it up with a fried egg?  A sinfully good salade Indochinoise*!  Okay, I'm done with the puns.  =P

A couple of days ago I saw this Thai fried egg salad on Food 52 and was really intrigued.  I prefer a runny yolk and no raw onions, though, so I looked to the French for inspiration.  A classic salade Lyonnaise consists of a poached egg with crisp bacon over frisée tossed with a warm vinaigrette.  To combine the two, I decided to make the eggs sunny-side up and add fish sauce, lime juice, and garlic to the hot bacon fat to make the dressing.  So yeah, this is a pretty intense salad.  You have been warned.


Salade Indochinoise
serves 2

2 slices thick cut bacon, cut into lardons
1 1/2 teaspoon Thai fish sauce
1 tablespoon fresh lime juice
1/2 teaspoon cane sugar
1 garlic clove, minced
A small squirt of sriracha
2 large eggs
2 large handfuls salad greens

Add the lardons to a pan and place on medium-low heat.

While the bacon is cooking, combine the fish sauce, lime juice, sugar, minced garlic, and sriracha in a small bowl.

Once the bacon is crisp, remove from the pan and add to the fish sauce mixture.

Crack the two eggs onto the hot pan.  Cook until the egg white are just set.  Carefully remove the sunny-side up eggs onto a plate, keeping as much bacon fat as you can in the pan.

Add the fish sauce mixture back to the hot pan.  Lower the heat and swirl the pan to warm up the dressing.


Toss the dressing and salad greens together and plate.  Slide the eggs on top and serve.

The best part is breaking into the yolk and letting that glorious molten gold spill onto the plate.  Divine!


I used a spring mix that I got in my Boston Organics delivery, but next time I'd probably use a sturdier green like escarole or romaine to hold up against the heat and pungency of the dressing.  And if you like cilantro, tossing a handful in would probably be awesome.

*I guess it would be helpful to know that Indochine is the French word for the peninsula on which Thailand sits.

Next:  Flower Pavlovas
Previously:  Sticky Toffee Pudding Ice Cream
Last Year:  Tartine's Lemon Cream Tart
Four Years Ago:  Gaufres de Leige (Belgian Waffles)
Five Years Ago:  Hua Juan (Steamed Scallion Buns)