Sunday, June 14, 2009

Daring Cooks Challenge #2: Homemade Bulgogi Dumplings

Bulgogi dumplings

My first thought after seeing the second Daring Cook's challenge was, "Why mess with perfection?" Jen from Use Real Butter had chosen Chinese dumplings as the challenge, which coincidentally, was one of my first posts on The Cooking of Joy. I've been making my mom's recipe for dumplings for as long as I can remember not only because it's my mom's but quite simple because it is the best-tasting dumpling I've ever had. In my opinion, it has the perfect ratio (1:1) of meat to vegetable and is just seasoned enough that you can serve it boiled with only some sriracha sauce for heat, if you want. So seriously, why mess with perfection?

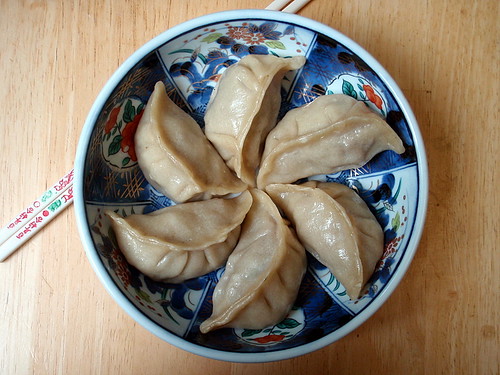
But Jen's request to "try something different" if we'd made Chinese dumplings before echoed in my head as a challenge. Then when I came up with the idea to make kalbi using the kiwi, pear, and apple I had gotten in my Boston Organics delivery, I started thinking about making a beef dumpling filling with the same marinade. And using Romaine lettuce instead of napa cabbage as the vegetable since Romaine is traditionally eaten with kalbi and bulgogi (Korean marinated barbecued sirloin beef). And ssamjang (seasoned soybean paste) as the condiment. And thus, the bulgogi dumpling was born.

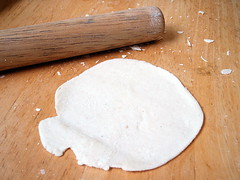
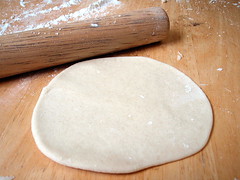
One of the other requirements for the Daring Cook's challenge was to make your own wrappers. Jen had posted a recipe that used warmed water instead of the boiling water recipe I was used to. Since I was doing something different anyways, I figured I'd try her recipe (using her mom's version to mix the dough) but I soon realized that I much preferred the boiling water version. The warm water version gave a really stiff dough that was much harder to work with. At first I thought that maybe I hadn't added enough water, but the recipe only called for 1/2 cup water for 2 cups of flour, and I had already added about 2/3 cup of water. So I ended up scrapping half of the warm water dough and making a half batch of the boiling water dough, which I've reprinted here. Using the boiling water and kneading the dough for a good five minutes allows the dough to develop a lot of gluten. Resting it for 20 minutes makes it even more pliable so that you should have no problems rolling out your wrappers and stretching them while wrapping.

Warm water wrapper Boiling water wrapper
Wrapped dumplings Wrapped dumplings
Wrapped dumplings P5231205-1

Above is a side by side visual comparison of the two wrappers with the boiling water ones on the right. The reason for the color discrepancy is simply because I ran out of bleached all-purpose flour after making the warm water wrappers and used unbleached all-purpose flour for the boiling water ones.


Bulgogi Dumplings

makes about 56 dumplings

1 bundle bean thread vermicelli
1 lb. ground beef (I used 80% lean meat)
1/2 head romaine lettuce, washed and roughly chopped
3 scallions, roughly chopped
1/2 cup kalbi marinade
1/2 tablespoon sesame oil
56 homemade dumpling wrappers (recipe below)

Soak the bean thread vermicelli in a bowl filled with hot water for 15 minutes.

While the vermicelli is soaking, use a food processor to mince the lettuce and scallions. Transfer to a large mixing bowl.

Squeeze out the excess water in the vermicelli and use the food processor to chop into about 1/2" pieces. Add to the mixing bowl.

Add the ground beef, marinade, and sesame oil and mix well. Cover and refrigerate until ready to use.

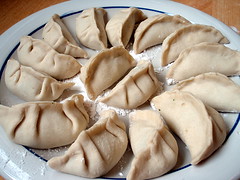
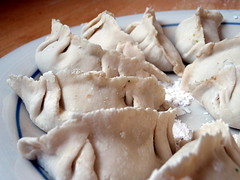
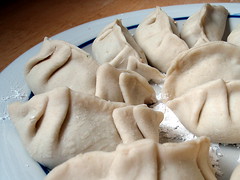
Once you have your dumpling wrappers ready, prepare plates or trays with flour for dipping. Put a spoonful of the filling in the middle of a wrapper and fold in half. Seal center portion of the joined edges. Make two pleats on both the left and right side of the dumpling. Make sure that the whole thing is totally sealed and then dip the bottom in the flour and place on the tray. Here are step-by-step photos to show you how it's done, or you can check out this video, but ignore the part about wetting the edges. Since we are using fresh dumpling wrappers here, you can skip that step.

To pan-fry the dumplings, heat a frying pan on high and add oil once it is hot. Once the oil is hot, add the dumplings one at a time so that they are sitting upright. Once the bottoms are browned, add about a 1/2 cup of water (for 8 dumplings, my usual serving size). If you like your dumplings extra crispy, add 1 tablespoon of flour or cornstarch to the water and mix to get rid of the lumps before you add it to the pan. Be very careful as the steam coming off the pan may burn you. Cover and let cook for a few minutes until the water is almost all gone. Remove the lid and let the rest of the water cook off.

Homemade Dumpling Wrappers (adapted from here)
makes about 56 wrappers

3 cups all-purpose flour
1 cup boiling water
4 tablespoons cold water
Flour for dusting

Pour boiling water into the flour, quickly stir with a fork or chopstick, mix well, then add the cold water. Mix and knead into a soft dough about 5 minutes.

Cover with damp cloth or paper towel. Set aside and rest for 20 minutes.

Knead the dough for 1 minute and divide into 4 quarters. Roll one quarter into a long snake and pinch into about 1 inch lengths.

Dust flour on work surface. Roll each piece into a circle of about a 3 inch diameter. Try to make the edges thinner than the middle.

Bulgogi dumplings with gochujang

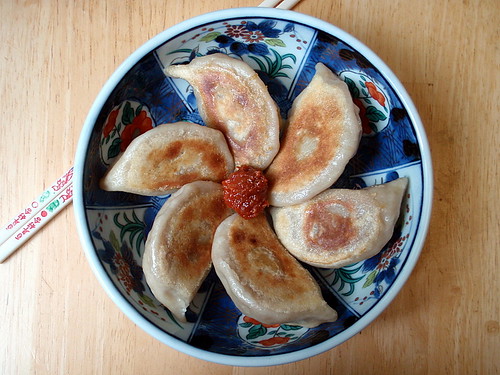
Instead of the usual soy sauce, vinegar, sesame oil, and sugar dipping sauce I like to have with my dumplings, I just served it with ssamjang. The intense saltiness of the season soybean sauce complemented the sweetness of the marinade, but I have to admit both flavors were a little too strong, so I tried wrapping some Romaine lettuce around a dumpling, similar to how I like to eat my kalbi.

Bulgogi dumpling wrap

This combination ended up being perfect as now there was a balance of all the oral senses: taste (sweet and salty), temperature (hot and cold), and texture (crunchy and soft).

Bulgogi dumpling wrap

So once again, the Daring Cooks Challenge forced me to try something I normally wouldn't have made, which is the point of a challenge, I suppose. To be honest, I'll probably continue to stick with my mom's dumpling recipe and store bought wrappers, but it was pretty fun to make these, and I'm looking forward to next month's challenge!

Wednesday, June 10, 2009

Kale Chips

Organic Kale from Boston Organics

I was lucky enough to score tickets to all three Red Sox Yankees games this week, which also meant I'd have three days of Fenway food temptation to deal with. I mean, I love those Fenway franks as much as the next girl, but three days in a row of hot dogs for dinner is a little overboard, even for me. So I decided to use up the kale I'd gotten in my last Boston Organics delivery and make a little snack for myself (and the 2 vegetarians I was going with).

This recipe is super duper simple, and I've even pared it down from the first time I made them. The first time I'd read somewhere that you could toss the kale in a vinaigrette before baking them, but I found that it was too much liquid and ended up having to bake the chips a lot longer just to get them crispy. Yesterday I tried making them with only oil and salt, and they came out perfect. They kind of remind me of Korean roasted seasoned seaweed, only not as pretty.

Making kale chips

Kale Chips
makes a sandwich bagful

1 bunch kale
Cooking spray
Sea salt

Preheat the oven to 350 °F.

Wash the kale and tear into bite-sized pieces. Dry well in a salad spinner.

Line a baking sheet with aluminum foil and spray liberally with cooking spray. Add the kale pieces in an even layer and spray with more cooking spray. Sprinkle sea salt on top to taste (I used about a teaspoon) and toss.

Bake kale for 10-15 minutes, tossing at least once, until crispy. Do not let them get too brown or else they will be bitter.

Kale chips

The only sad thing about making kale chips is that they shrink so much so you only end up with a baggie-ful when you started off with a whole bunch. And they're pretty addictive, so they only last a half inning or so. Unless it's the inning where Papi hits his third homerun of the year and the Red Sox went on to score two more runs. Because that was a pretty long inning. Just sayin'.

I think I'll make some wok-fried edamame with garlic to bring to tonight and tomorrow's game. They'll be like the healthier, Asian version of peanuts at a ballgame since I can just toss the shells onto the ground! =)

Friday, June 5, 2009

Black Sesame Ice Cream

Black Sesame Ice Cream

And here is the promised recipe for black sesame ice cream. I basically used the same recipe I created for the red bean black and sesame ice cream but left out the sweetened red beans. At Annie's party I started talking to jglee about making ice creams, and she mentioned that she also makes this, but from real black sesame seeds and with a frozen custard base. I realized I have found myself moving away from the frozen custard recipes, maybe in part because it requires a lot more effort and also because it means a lot of left over egg whites. But I did just bookmark this recipe for "self-frosting angel cake" that uses egg whites (and as a bonus it bakes in a pan instead of a bundt pan, which I don't own) so maybe I'll try another frozen custard recipe in the near future.

Churning Black Sesame Ice Cream


Black Sesame Ice Cream
makes about 1 quart

1 can (14 oz.) sweetened condensed milk
3 1/2 cups half and half
2 pouches (about 1/2 cup) black sesame instant powder mix

Whisk all the ingredients together and let chill completely in the refrigerator.

Freeze in ice cream maker according to manufacturer's instructions. Transfer to an airtight container and let harden in freezer overnight.

Black Sesame Ice Cream

Wasn't that easy? Three ingredients and three sentences! =) Which reminds me, I should get around to making my coconut lime sorbet soon. That recipe only has two ingredients, and I bet I can get the directions down to two sentences.....

This is my entry to the Homemade #5 Challenge - Ice Cream.

Thursday, June 4, 2009

Boston Organics, Week 14

With the last delivery I made kalbi with the pear, apple, and kiwi; granola with the banana; fresh orange sorbet with the oranges and lemon; sliced up the tomato for hamburgers; and threw the rest of the vegetables into fried rice.

Boston Organics, Week 14

This week I received 2 Anjou Pears, 2 Braeburn Apples, 2 Fair Trade Bananas, 2 Kiwis, 2 Valencia Oranges, 1 lb. Asparagus, 1 lb. Baby Carrots, 3 Tomatoes on the Vine, 1 Zucchini, and 1 bunch Kale. I think I'll make David Lebovitz's pear-caramel ice cream, curried carrot soup, browned butter and basalmic vinegar roasted asparagus, and kale chips.

The rest of the fruit will probably be consumed this weekend between heats at the Boston Dragon Boat Festival. Please come and cheer for The Boat for Kids Who Don't Paddle Good! We'll be the really, really, ridiculously good-looking team. ;)

Wednesday, June 3, 2009

Butter Mochi Cupcakes

Mochi Cupcake

For Annie's birthday party this past Sunday, I wanted to make ice cream and cupcakes and decided on black sesame ice cream and butter mochi cupcakes after she said she liked the Asian flavor ice creams and requested a non-citrusy cupcake. I've made mochi cake before, but when I looked up recipes for the cupcakes on-line, I noticed that there was a lot less milk used in the recipe I found than in the recipe I usually used. I also came across recipes for butter mochi, which used coconut milk in addition to or instead of milk. So I decided to combine the two to make butter mochi cupcakes!

Butter Mochi Cupcakes with Sweetened Red Beans
makes about 26 cupcakes

1 stick unsalted butter, melted (and cooled to room temperature)
1 cup white sugar
3 eggs
1 teaspoon vanilla extract
1 can coconut milk
1 pound (16 ounces) glutinous rice flour (the green bag with the 3 elephants on it)
1 teaspoon baking powder
1 (18.75 oz.) can sweetened red beans (or red bean paste)

Preheat oven to 350°F. Line muffin tin with cupcake liners and spray the inside of the liners with cooking spray.

In a large bowl, mix together the butter, sugar, eggs, vanilla and coconut milk. Stir in the rice flour and baking powder and mix well.

Mochi Cupcake

Fill the cupcake liners about halfway with the batter. Place about a teaspoon of the sweetened red beans on top of the batter. Divide the remaining batter evenly among the liners. The liners should be 80-90% full.

Bake for 30 minutes in the preheated oven or until golden brown.

Mochi Cupcake

Since I wasn't going to frost these, I experimented with a couple of ways to decorate them. For the cupcake in the very first picture picture, I just left it as is with the red bean sandwiched between two layers of batter. I also tried using a toothpick to swirl the red bean layer around with the batter and putting some whole red beans on top in a flower pattern. I ended up liking the first kind the most because they were the only ones that got nice and golden brown on top. The swirls that I tried were really too thin and faint, and the whole red beans ended up migrating during the baking process so you couldn't even tell it used to be a flower.

In the end, I thought the cupcakes were just okay. They tasted fine, but they didn't develop the nice crust that I get when I make my normal recipe for mochi cake. Whether that's because of the tweaked recipe with less liquid or because there was no contact with a metal surface or a combination of the two, I'm not sure. I also didn't think the texture of the cupcake was conducive to cupcake form. It was soft and sticky (as it should be) which meant that it stuck to the cupcake liner (even though I sprayed it with cooking spray) and lost its shape as it was eaten. In my opinion, you should be able to easily peel the liner away from a cupcake, and it shouldn't turn into a blob when you try to eat it. So I think I will stick to making mochi cake in sheet cake form with my original recipe, although I may try it with coconut milk instead of regular milk next time.

Stay tuned for the black sesame ice cream recipe which turned out much better. =)

Tuesday, June 2, 2009

Homemade Banana-Sweetened Granola

Homemade granola

I'm lucky enough to work at a place that supplies free milk (skim, 2%, and whole!) so my breakfast each weekday morning is usually some type of cereal and milk. I never considered making my own granola before, though, because I remember all the hype when I was younger about how much sugar and fat is in granola. Then I came across this recipe for banana-sweetened granola that seemed too good to be true. Not only did the recipe not contain any sugar (using a banana and some maple syrup-or in my case, honey, because I didn't have any maple syrup-as sweeteners) but it also didn't list oil as an ingredient (although the almonds, flax seeds, and shredded coconut that I added contain natural fats). I don't know how this compares to homemade granola that uses sugar and oil, but I do know that this was good enough to eat as breakfast for a whole week!

Homemade Banana-Sweetened Granola (based on this recipe at Delicious By Nature)
makes about 6 servings

1 ripe or frozen banana
3/4 cup water

1 tablespoon honey

1 teaspoon cinnamon

1 teaspoon vanilla

1/4 teaspoon sea salt

2 cups rolled oats
1/4 cup almonds, chopped

1 cup shredded coconut

2 tablespoons flax seeds
1/2 cup raisins

Preheat oven to 375° F.


Using a blender, blend together banana, water, honey, cinnamon, vanilla, and sea salt until very smooth.

Toss banana puree together with rolled oats and nuts. Lay everything out in a single layer on a tinfoil lined baking pan (it may stick a little). Bake for 40 minutes until oats are starting to brown. Stir 4 times throughout, breaking up any clumps that are forming.

Add shredded coconut when there are 12 minutes left of baking time to lightly toast.

Remove from oven and add the flax seeds and raisins. Serve with milk or yogurt or as a snack on its own.

Granola with milk

Feel free to substitute different nuts, seeds, and dried fruits if you like. I just added the shredded coconut because I still had some leftover from making the Samoa cupcakes and the raisins from making the carrot cake ice cream.